
In this tutorial, we will teach you how to install OPNsense on VirtualBox in a simple and efficient way.
OPNsense is an incredible tool for those looking for a secure operating system with various tools to provide security.
Downloading OPNsense
Now, let’s download OPNsense using the link below.
https://opnsense.org/download/
Next, we will select the architecture type as “amd64” and the type as “dvd” to allow the installer using “ISO”. After that, we can choose the mirror to download from.

Unzipping the OPNsense image
After the download is complete, we need to unzip the OPNsense image to access the file with the “.ISO” extension.

Optionally, if you wish to unzip via the terminal, you can use the command below.

After unzipping, we will see a file similar to the one in the figure below.

Configuring VirtualBox to install OPNsense
Now, let’s open VirtualBox and select the “Machine” tab at the top, and then click on “New“.

Next, let’s use the configuration below.
- 1 = Name of the virtual machine.
- 2 = Location where the virtual machine will be created.
- 3 = Location where you unzipped the OPNsense file.
- 4 = Operating system type will be BSD
- 5 = Architecture will be 64-bit.
After that, click on “Hardware”.

In “Hardware”, we will choose 1024MB of RAM and 1 processor core. Remember that you can increase these resources according to your needs.

Then, we will click “Finish” to complete this initial step.
Creating a host-only interface in VirtualBox
We are going to create a “host-only” network in VirtualBox. The reason for creating this network is to allow your real machine to access the OPNsense LAN interface.
Note: Creating a "host-only" network is optional, as the user could use the VirtualBox bridge mode network and access the OPNsense LAN on their internal network.
However, we believe that using a "host-only" network is the most suitable for this learning scenario.
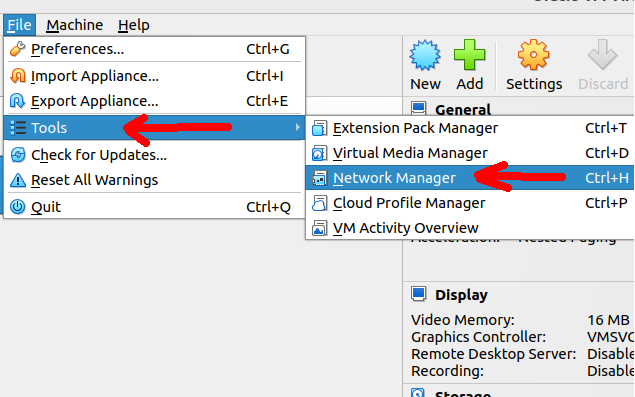
Next, we will click on “Create” to create a “Host-only” network.
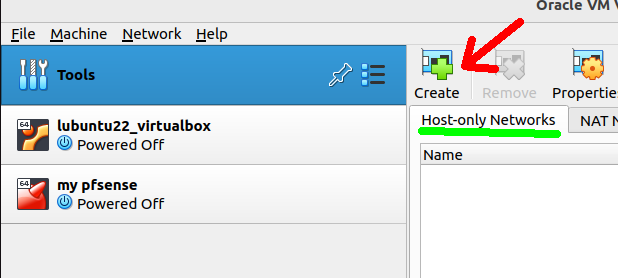
By default, VirtualBox will create a network called “vboxnet0” and this network will be in the “192.168.56.0/24” range.

Adding OPNsense networks in VirtualBox
Now, we will begin the step of adding the networks we will use in OPNsense to VirtualBox. To do this, right-click on our OPNsense virtual machine and select “Settings”.

Next, we will select Network from the left side menu to see the network adapters.
For the first adapter, “Adapter 1,” we will choose the network type as “Host-only Adapter” (this will be the adapter we use to access the OPNsense configuration).

For the second adapter, “Adapter 2,” we will choose “NAT” mode. NAT mode will allow the OPNsense WAN interface to access the Internet by performing NAT with the host computer (your real computer).

After configuring, we will click OK.
Starting the OPNsense installation in VirtualBox
Now that we have done the initial setup, we can start the OPNsense installation in VirtualBox. To do this, let’s double-click on our virtual machine.

We will see a screen appear with the virtual machine boot.

At the bottom, we will enter the installation login and password as described below.
- login: installer
- Password: opnsense

Next, we will enter the keyboard configuration screen. You can choose the keyboard that best suits you.

Right after, we will select the “Install (ZFS)” mode and click OK. We will use this ZFS mode for its simplicity of operation with VirtualBox.

Next, we will click “Proceed anyway” for the low RAM warning.

Now, let’s select the “stripe” mode without disk redundancy.

Let’s select the virtual disk and click OK.

VirtualBox will ask if you are sure you want to continue and erase the selected virtual disk. Click “Yes” if you are sure.

Now, let’s select “Complete Install” and click OK.

IMPORTANT: When the figure below appears, we will disconnect the virtual “ISO” disk of OPNsense. Otherwise, the boot will be from the ISO again.

To disconnect the “ISO” image from VirtualBox, let’s click on the CD symbol in the lower right part of VirtualBox and uncheck the “ISO” image.

A message like the one below may appear asking if you want to force it, and we will click “Force Unmount”.

Next, let’s shut down the virtual machine by clicking the icon below.

Then we will click on “Power off the Machine“.

Starting the virtual machine with OPNsense installed
Now, let’s start our OPNsense virtual machine.

After booting, we will see a login and password screen. In this case, we will use another login as described below.
- Login: root
- Password: opnsense

Configuring the OPNsense LAN interface
Now let’s start configuring the LAN interface. This interface is very important as it will allow us to access the OPNsense graphical configuration interface.
Follow the steps in the figure below to configure the LAN interface to receive an IP from the VirtualBox Host-Only network’s DHCP.

After the configuration, we will see that the LAN interface has received an IP that is within the range of the Host-Only network we created in VirtualBox.

Accessing the OPNsense GUI interface
Now, let’s open a browser and enter the IP of our LAN interface. In our case, it is “https://192.168.56.108”. Check what the IP of your LAN interface is.
In some browsers, we will have to click on “advanced” and accept and continue. This is because the HTTPS certificate is self-signed.

On the login screen, we will use the credentials below.
- Login: root
- Password: opnsense

And we will see the initial OPNsense configuration screen.
If you want, you can start the configuration wizard by clicking “Next”.

And you can enter information such as hostname and “Enable Resolver” for DNS.

Next, you can enter timezone information for your OPNsense.

If you wish to finish the configuration Wizard, just click on the OPNsense symbol as in the figure below.

And that’s it, your OPNsense is now installed on VirtualBox. Now a new configuration stage begins based on the objectives you want to use OPNsense for, and that will be for another post. If you are interested, comment on the channel.

Juliana Mascarenhas
Data Scientist and Master in Computer Modeling by LNCC.
Computer Engineer
See More:
Configure Load Balance with PfSense
How to install pfBlocker on pfSense: step by step guide


