
In this tutorial we will teach you how to install and configure an OpenVPN server on PfSense.
After showing the installation and configuration of OpenVPN in PfSense, we’ll show you how to install the client and how to create a virtualized test case.
Setting up the OpenVPN server
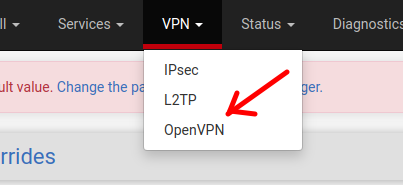
First, we will select the VPN tab and then click on OpenVPN.
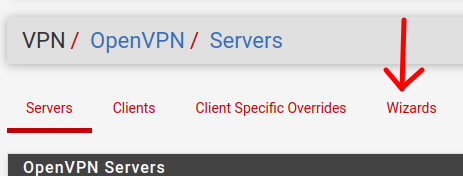
For this tutorial, we will use the “Wizards” to create OpenVPN. Therefore, we will click on “Wizards“.
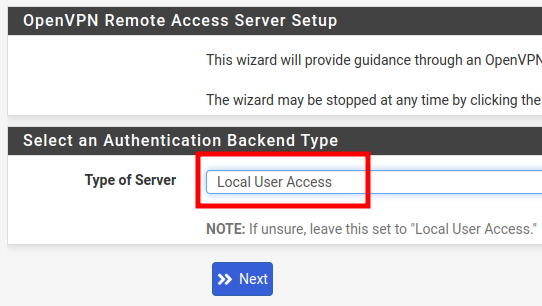
Now we will select the authentication server type. In this case, we will select “Local User Access”. This way, the OpenVPN server within pfSense will be used for user authentication in the VPN.
Creating the OpenVPN Server Certificate Authority
Now we will create our Certificate Authority (CA).
To do this, we will fill in some fields as shown in the figure below. We will describe what to enter in the fields right after.

- Descriptive name: Here we will name the Certificate Authority. In our case, we are using the name “CA_myVPN”.
- Key length: The key length, for this tutorial we will use the default size of 2048 bits. However, we could increase the key length to up to 16386 bits.
- Lifetime: We are using the default which is nearly 10 years. We can change this value to a date that suits our needs.
- Common Name: The internal name for the certificate. In this case, we will leave it blank and inherit the same name used in “Descriptive name“.
- Country Code, State or Province, City, and Organization: This is where we enter information about the country code, state, city, and organization name. In this case, we are using fictitious information for an organization located in São Paulo.
Next, we will click on “Add new CA” to create the new Certificate Authority.
Creating the OpenVPN Server Certificate
First, we will indicate that we want to add a new Certificate by clicking the “Add new Certificate” button. The following figure shows where we should click.

Now, we will create the VPN server certificate. To do this, we will start by giving it a name, such as “Server_Cert_VPN”.
We can see that many fields were automatically filled in with the information we entered when creating the Certificate Authority.
However, the Lifetime field was automatically filled with the value 398.
Note: To avoid issues with some platforms, the Lifetime of a certificate should not exceed 398 days.

Once completed, we will click on “Create new Certificate”.
OpenVPN Server Information
We will enter the OpenVPN server information to allow client access.
Below, we will describe the fields:

- Description: Here, I like to provide a name that will help the client identify which VPN they are connecting to. Therefore, it is worth putting a name that describes your VPN. Here, we will use the description “my_OpenVPN”.
- Protocol: We can choose between TCP and UDP at the transport layer. Additionally, we can choose between IPv6 and IPv4 or use both simultaneously. For this tutorial, we will use only UDP and IPv4.
- Interface: Here, we will indicate which interface the OpenVPN server will operate on. In this case, we are using a VPN server to allow external client access. Therefore, we will use the WAN interface.
- Local Port: Specifies the port that the OpenVPN server will use to await communication with clients. We will choose the default port 1194. However, if you are already using this port with another service, you can change the port to avoid conflict.
Configuring Encryption
We will explain the main fields related to OpenVPN server encryption after the figure below.

- TLS Authentication: In this field, we will check the option to enable TLS authentication.
- Automatically generate a TLS Key: We will check this option to generate the TLS key automatically.
- TLS Shared Key: Here, we could enter a TLS key that was generated in the past. However, for this tutorial, we will leave this field blank.
- DH Parameters Length: The length of the Diffie-Hellman (DH) key for security in the VPN parameter exchange, in this case, we will use 2048 bits.
- Data Encryption Algorithms: Here, we have the algorithms that can be negotiated between the client and the server. It is important to use algorithms compatible with OpenVPN clients.
- Fallback Data Encryption Algorithm: Here, we can indicate the algorithm that will be used when the negotiation of the above-listed algorithms fails.
- Auth Digest Algorithm: Here, we will indicate the authentication method between the VPN client and server.
- Hardware Crypto: As the name suggests, this field allows the use of hardware acceleration. However, we will not use it in this tutorial.
OpenVPN Tunnel Settings
Now we will create the settings that will be used in the VPN tunnel between the client and the OpenVPN server.
We present the figure below with the settings used, and then we will describe each field.

- Tunnel Network: Here, we will indicate the network that will be used in the VPN tunnel between the client and the VPN server. It is worth noting that we must use a network that is not used by another internal network. In our case, we will use the network “10.0.8.0/24“.
- Redirect Gateway: If we select this field, we will make the clients use the OpenVPN server gateway as the default gateway. Thus, all traffic to the Internet will pass through the OpenVPN server.
- Local Network: Here, we can define the local network that will be accessed by OpenVPN clients. In this case, we will choose the network “192.168.56.0/24“.
- Concurrent Connections: Number of clients that can access the OpenVPN server simultaneously. If we are running the OpenVPN server on more limited hardware, we can reduce the number of concurrent clients.
- Allow Compression & Compression: Allows compression within the VPN. However, we will not enable it to ensure greater security.
- Type-of-Service: This field can be checked when we want to apply some type of quality of service to VPN traffic.
- Inter-Client Communication: If we check this option, OpenVPN clients will be able to communicate with each other. This communication between clients will depend on the VPN project needs.
- Duplicate Connections: By checking this option, the same VPN user can maintain more than one connection to the VPN. This can be useful in the case of multiple user devices.
- Duplicate Connection Limit: Here, we can limit the number of simultaneous connections that the same user can make to the OpenVPN Server.
OpenVPN Client Parameters
Now we will discuss the main parameters that can be passed to the OpenVPN client.

- Dynamic IP: Allows maintaining the client’s connection even if the IP changes.
- Topology: We have the option to use “Subnet” to allow an IP for each client on the VPN network or isolate clients using the “net30” option. In this tutorial, we will use the “Subnet” option.
- DNS Default Domain & DNS Server 1-4: Here, we can specify the DNS servers that will be used by our VPN clients. In this case, we are using the “DNS Default Domain” pointing to Google’s DNS “8.8.8.8” and “DNS Server 1” pointing to a second Google DNS “8.8.4.4”.

- NTP Servers: Specify a Network Time Protocol server for VPN clients.
- NetBIOS & WINS: By checking the options related to NetBIOS and WINS, we will allow these protocols to function for clients accessing our VPN.
Applying Firewall Rules for OpenVPN
Now we will use the Firewall Rule and OpenVPN rule options to apply VPN rules to our firewall. This procedure could be done manually if the administrator prefers.

Finishing the OpenVPN Server Installation
We have now completed the installation of the OpenVPN server. The next step will be to create a user for testing.

Next, we will see our OpenVPN server created.

Package for Exporting OpenVPN Clients
Now, let’s install a package that will allow us to export the configuration of our VPN clients.
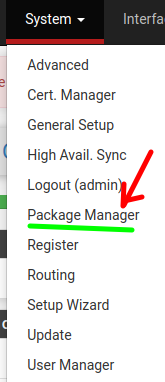
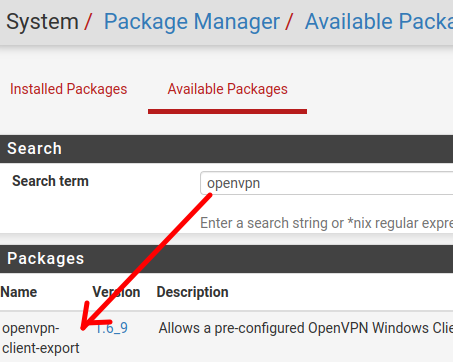
For that, let’s click on System-> Package Manager.
Then let’s click on Available packages and search for openvpn. After that we will click on Install for the package openvpn-client-export.
Creating a user for the VPN
Now we need to create a user so that we can export the configuration to a machine that will be used as a client for our OpenVPN server.
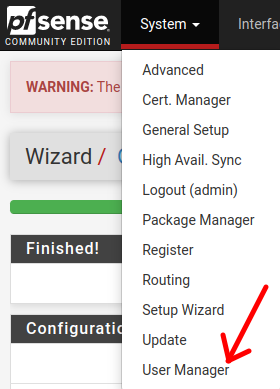
To create a user for our VPN, let’s click on System->User Manager
Next, let’s click on “User” and then on “Add”.

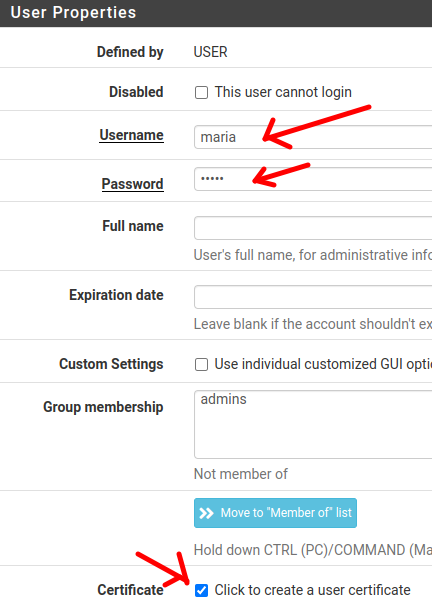
Now we are going to create our user, in this case we are going to create a user called “maria” and we are going to use a password for the user maria.
Then let’s check the option “Click to create a user certificate”.
Now let’s give Mary’s certificate a descriptive name. In this case we named it “maria cert”.
Note that the Certificate authority is pointing to the certificate we created there when we configured the OpenVPN server.
Then we can click on Save.

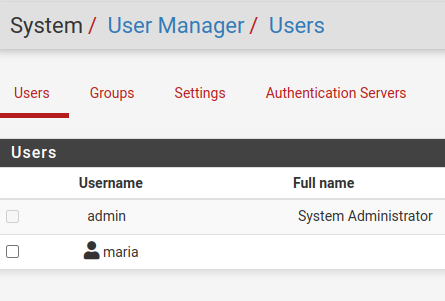
We will see a screen like the figure below demonstrating that the user maria was created successfully.
Exporting OpenVPN User
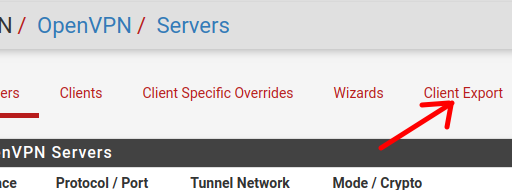
Now we will click on VPN and we will choose OpenVPN.

Next, let’s click on Client Export, as in the figure below.
Now we will see some parameters that can be defined for the client. Let’s comment on each parameter below the figure.
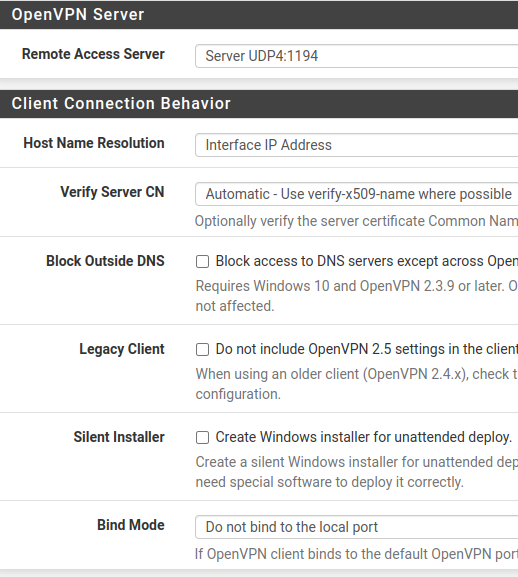
Remote Access Server: Here we will choose the UDP protocol and the port that will be used for the server 1194.
Host Name Resolution: Here we can leave the “Interface IP Address” which will use the WAN IP of our pfsense. In addition we have other options like using Multi WAN with portforwarding and DDNS. However, for this tutorial we will only use the “Interface IP Address”.
Verify Server CN: Here we have the option to automatically verify the server certificate.
Block Outside DNS: Here we can force our VPN clients to use the DNS of the OpenVPN server.
Legacy Client: If you check this option we will not have OpenVPN 2.5 settings and this will allow compatibility with older versions.
Silent Installer: A silent installation option for Windows.
Bind Mode: By default we choose the “Do not bind the local port” and this allows multiple clients to connect to the same port of our OpenVPN server. If you choose the option “bind to default OpenVPn port” you will only be able to serve one client at a time.
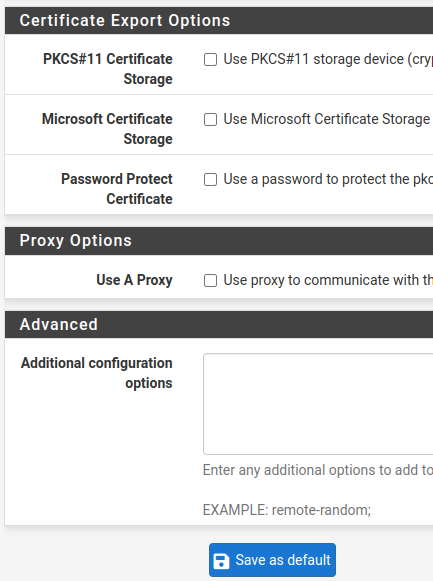
PKCS#11 Certificate Storage and Microsoft Certificate Storage: we have certificate storage options.
Also, we can use password option for Viscosity bundle with Password Protect Certificate.
Use A Proxy: indicates whether we will use a proxy to access the OpenVPN server.
Additional configuration options: Here we can enter additional settings for the OpenVPN client.
If you have changed any parameter, then you must click on “Save as default”. This way the configuration that was created will be standardized.
Selecting user certificate
Now let’s select our user’s certificate.
In this case we are going to export to a Linux machine so we are going to choose the indicated option “Most Clients”
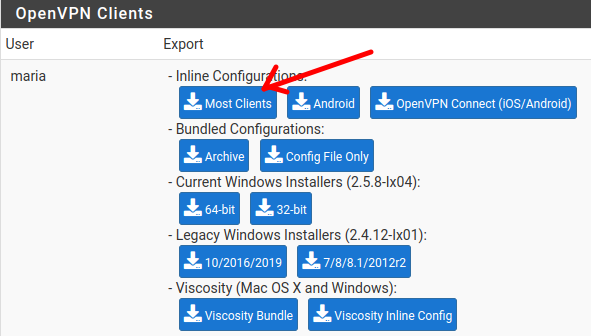
After that, we can send the certificate to the client.
Sending the file to the client
Here is an optional way to send the ovpn file to the client in the test scenario we create in the next session.
One way to send the configuration file to the client that is on an external network is using the netcat command as shown below.
On the external PC (which will be the VPN client) open the terminal and that has the IP 172.16.10.4.
Type:
nc -nlv -w 2 8080 > maria.ovpn On the internal PC that is on the 192.168.24.0/24 network open the terminal
Go to the downloaded file directory and type
nc -nv 172.16.10.4 8080 < pfSense-UDP4-1194-maria-config.ovpn After a few seconds the file will be transferred.
Configuring the OpenVPN Client
We have a tutorial teaching how to configure the OpenVPN client on Linux: Click Here.
We have a tutorial teaching how to configure the OpenVPN client on Linux: Click Here.
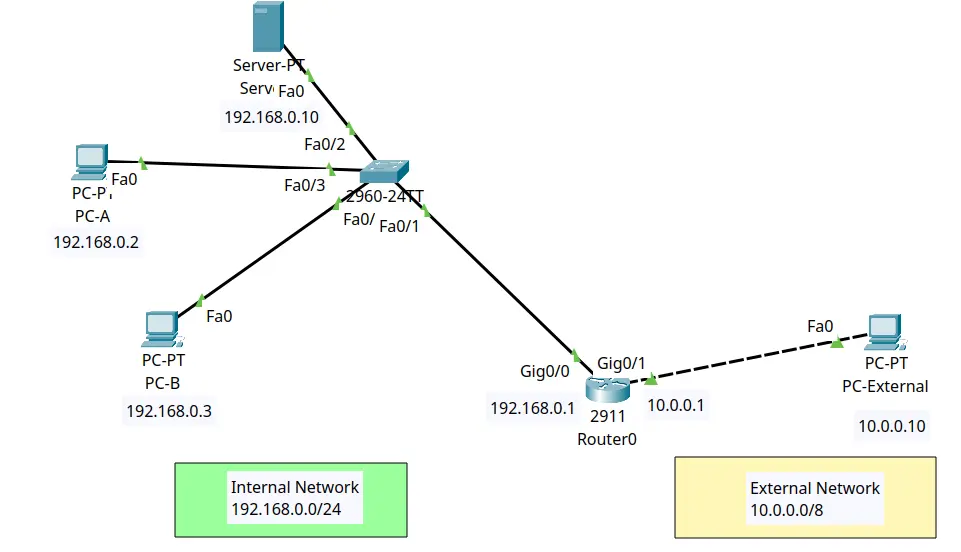
Creating the test scenario
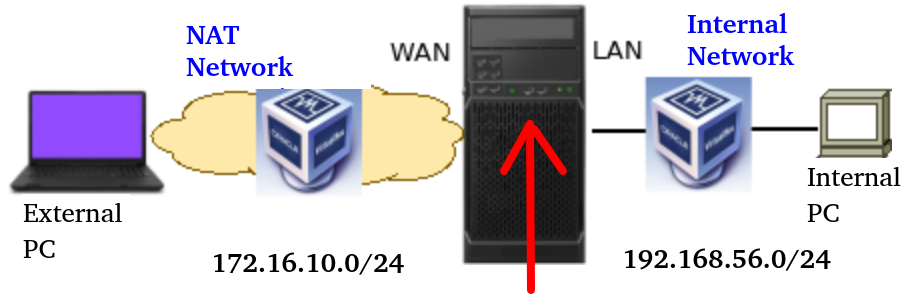
We will present a test scenario that can be used to practice creating an OpenVPN Server and OpenVPN Client.
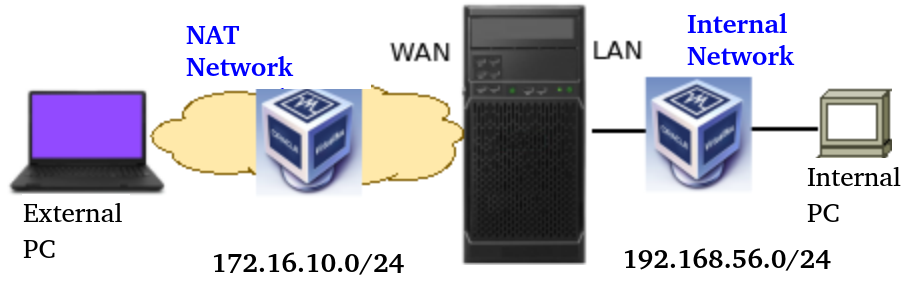
Creating the NAT network
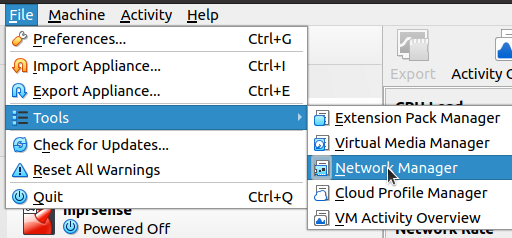
If you are on a newer version of Virtualbox, as in the picture below, the NAT Network will be in File -> Tools -> Network Manager.
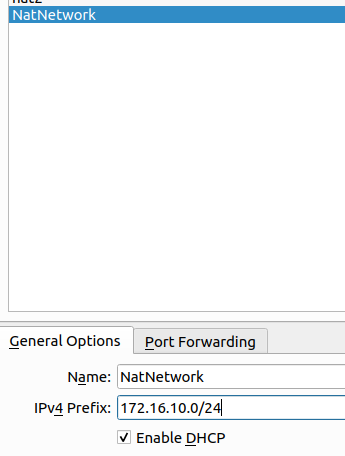
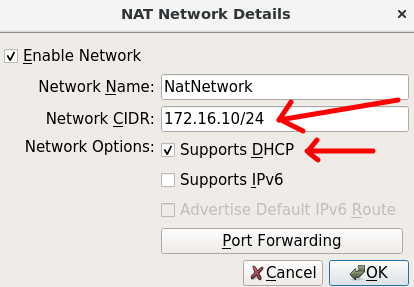
Then let’s select NAT Network and right-click and create a NAT network. As in the figure below. Let’s enter the network 172.16.10.0/24 and check the option “Enable DHCP”.
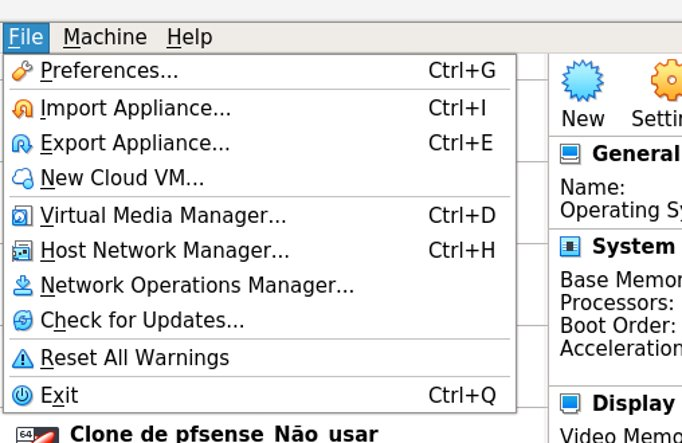
If you are using an older version of VirtualBox, you can follow the steps below.
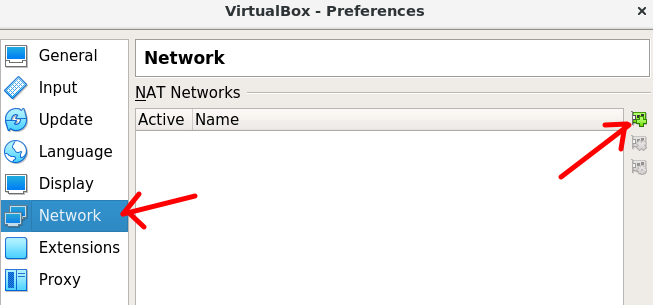
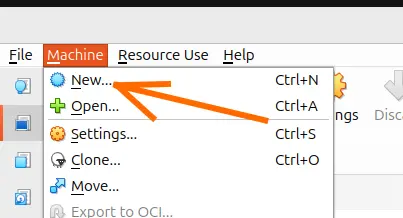
Now let’s open VirtualBox and click on File and then on Preferences.
Next, let’s click on Network and click on the symbol next to it to create a new network.
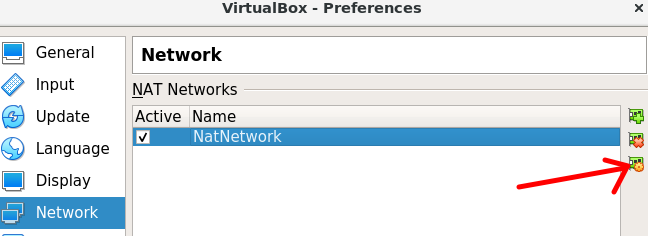
Once the NatNetwork network has been created, click on the configuration icon as shown in the figure below.
Next, let’s enter a network range that will be used to represent our external network in the VPN. In this case, we are using the 172.16.10.0/24 network.
Configuring pfSense
Now let’s configure the pfsense interfaces.
If you want to learn how to install pfsense in a VirtualBox virtual machine, click HERE.
To configure the pfSense WAN interface, we need to locate this interface in pfsense.
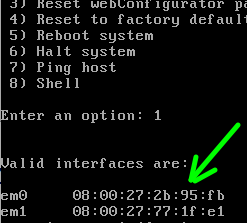
To do this, we will open the virtual machine that has pfsnse and type 1. By typing 1, we will access the “Assign Interfaces” option, in this case we are only accessing it to see the MAC addresses of the interfaces.
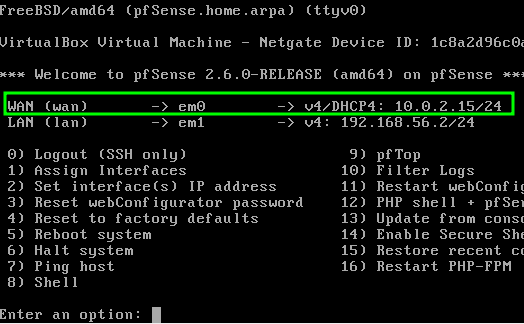
After typing 1 we will see the names of the interfaces and their MAC addresses. The em0 interface is WAN so we can check its MAC address.
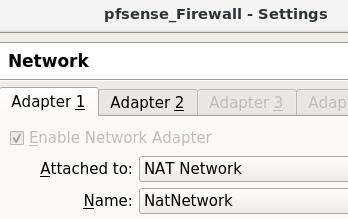
Now let’s access the virtualBox configuration of the machine where pfsense is running. Next, let’s select Network and then select Adapter1.
This interface will be as NAT Network.
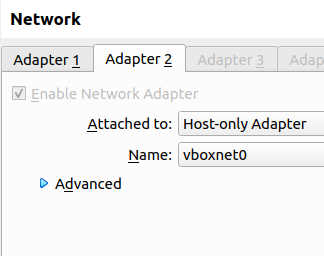
On the second tab we will select Adapter2 and click on “Enable Network Adapter” and then choose Host-only Adapter and vboxnet0.
Now let’s go to the pfSense virtual machine to give an IP for the LAN interface. To do this, go to the pfsense terminal screen and type 2.
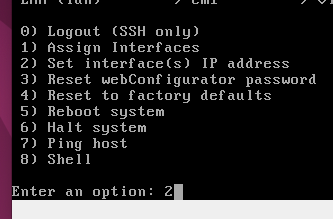
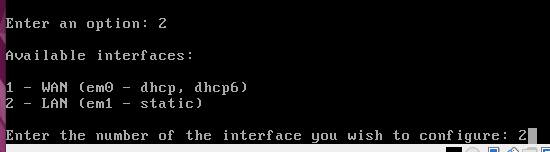
Now, let’s select the LAN interface to enter the new IP. For this we will type 2 again.
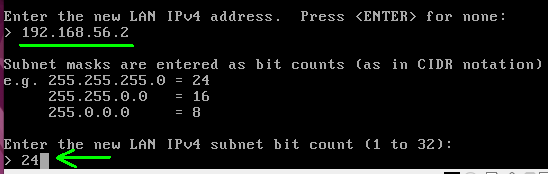
Next, let’s enter the IP of the LAN interface. For this tutorial, we are going to use the IP “192.168.56.2” for the pfsense LAN interface. Also, let’s use the “/24” mask. To enter the IP just type the IP and for the mask just type the corresponding number for example 24.
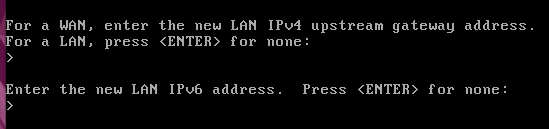
After that comes the question if we want to configure a gateway for the WAN. In this case, in this case we are configuring the LAN and so we’re just going to hit ENTER.
Then the question will come if we want to enter IPv6 for the LAN. In this tutoriall we are not going to enter IPv6 and so we are going to press ENTER.
Now, let’s enable the DHCP service on the LAN interface. In this way, computers that are attached to the LAN interface will automatically receive IPs.
To enable DHCP on the LAN interface, type y and press ENTER.
After that we will insert the range of IPs that will be assigned to the hosts. In this case we use 192.168.56.100 as the beginning of the IP range and 192.168.56.200 as the end of the IP range for hosts.

Next comes the question if we want to revert the webconfigurator to HTTP. In this case we will type n because we don’t want to use HTTP but HTTPS.

After that, we can press ENTER until the initial screen reappears and we will see a screen similar to the screen below.
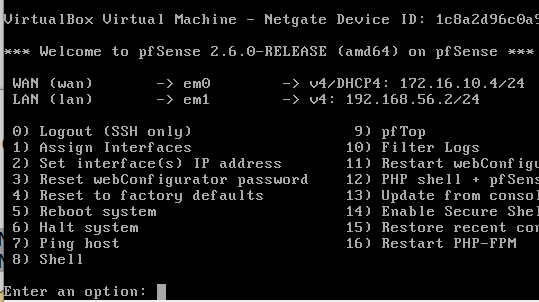
We can see in the figure above that the LAN interface already has the IP 192.168.56.2.
Accessing the pfSense web interface
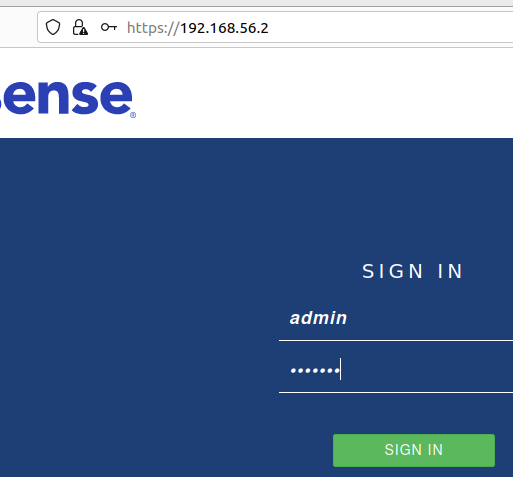
Now we are going to use our LAN IP to access the pfsense web interface. To do this, let’s open a browser and type 192.168.56.2
After that we will type the user = admin and the password = pfsense.
And finally we enter the pfSense configuration page. Now we can follow the Configuration Wizard or select the option we want from the top menu.
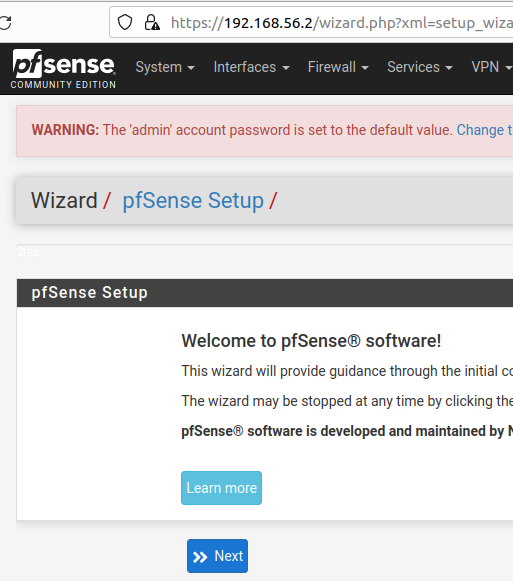
After accessing pfSense we can start the VPN configuration described in the sections above.
Configuring pfsense WAN
Now, let’s configure the pfsense WAN interface to allow traffic from private IPs. We are doing this configuration because we are using a private IP for the external PC in our scenario.
Let’s click on Interfaces and then WAN.
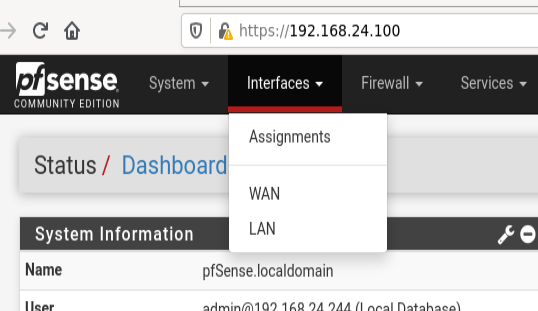
Let’s scroll down and uncheck “Block private networks and loopback addresses”. After that, let’s click on “Save”.
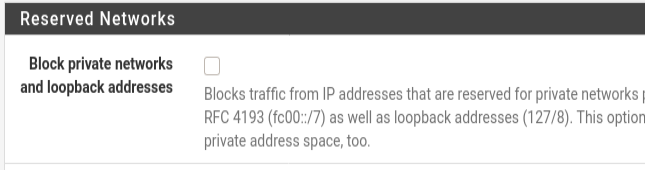
Then let’s apply the changes by clicking on “Apply Changes”.

Configuring the External PC
Let’s start configuring the external PC. In this case, our external PC uses Ubuntu 22.
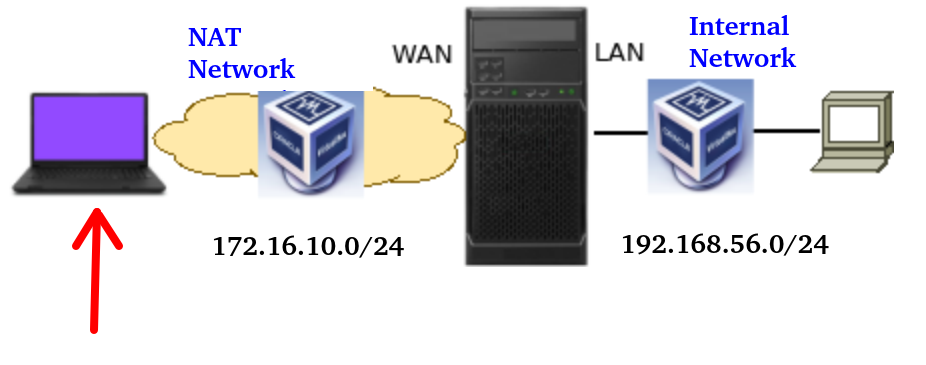
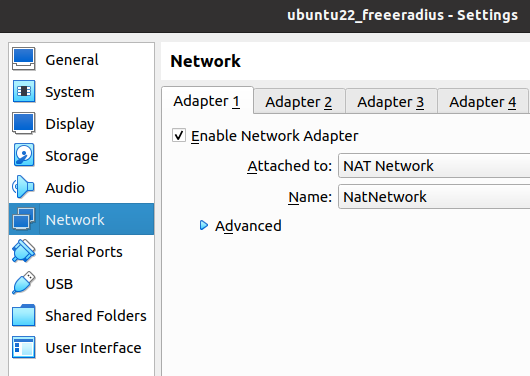
First, let’s add the network interface of the external PC as NAT Network and in the same network as the WAN interface of our pfSense.
For this we will open the VirtualBox configuration of the External PC virtual machine and select “Adapter1” and select “NAT Network”.
Next, let’s select the network name as “NatNetwork” this name should be the same name you used in the PfSense WAN Nat Network.
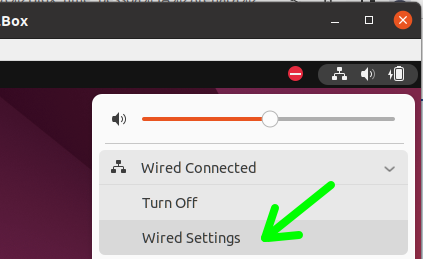
Now, let’s turn on the virtual machine with Ubuntu 22 and access the network icon at the top left of the screen.
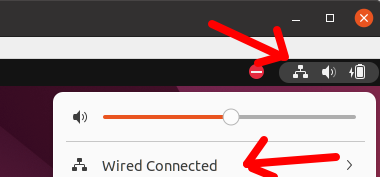
Next, let’s click on “Wired Settings”.
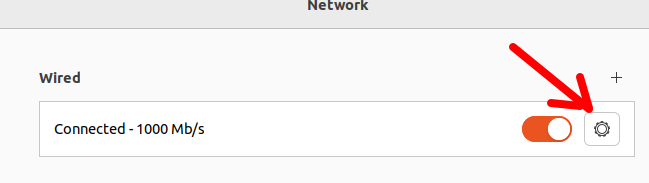
Soon after, we will click on the configuration icon of the Wired interface, as in the figure below.
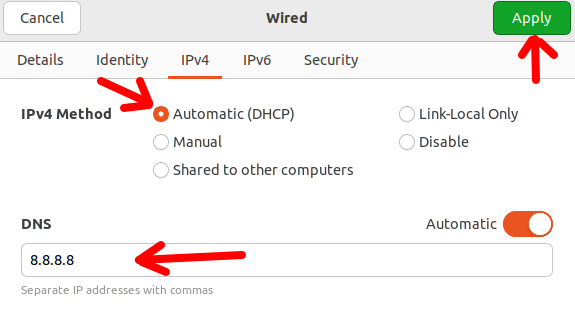
Inside the configuration menu, we will access the IPv4 tab and we will click on “Automatic (DHCP)”. This configuration will allow the virtual machine’s network interface to receive an IP from the VirtualBox “NatNetwork” network.
Also, let’s enter a DNS IP. In this case, we will choose to use the google DNS “8.8.8.8”.
After performing the above procedures, let’s restart the network interface. To do this, we can double-click on the button to enable the Wired interface. The figure below shows where we should double-click.

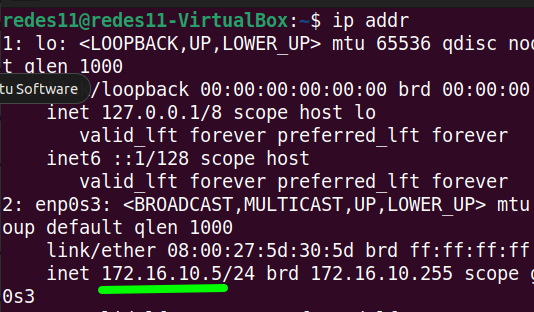
Now we can open the terminal to check if the external machine got an IP in the “NatNetwork” network range of VirtualBox. For that, let’s type the command below.
ip addrWe can see in the figure below, that the virtual machine got the IP “172.16.10.5”. This IP belongs to VirtualBox’s “NatNetwork” network range, so the configuration is correct.
Once you have the scenario set up, you can start running the tests.

Juliana Mascarenhas
Data Scientist and Master in Computer Modeling by LNCC.
Computer Engineer
Reference
https://docs.netgate.com/pfsense/en/latest/vpn/openvpn/index.html
https://serverfault.com/questions/1114167/pfsense-nat-a-port-to-a-site-to-site-openvpn-host
Tutorial: Using Port Forwarding in Packet Tracer
Tutorial: Web Server in Packet Tracer (Client-Server)

Email Server & Webmail Setup: Postfix, Dovecot, SnappyMail
Install Ubuntu Server 26 on VirtualBox (Step-by-Step)

How to Configure NAT in Packet Tracer (Step-by-Step)


