Let’s install the Openvpn server on a Linux machine with Ubuntu. In addition, we will use TLS Crypt v2 to provide a specific tls-crypt key for each client.
At the end of the article, we will also present the installation of Open VPN on the client and the configuration of the VPN client.
Installing Openvpn
First, let’s install openvpn. Depending on the installation date, the repository may already contain the openvpn version or higher. In our case, it is not yet in the repository as we can verify.
sudo apt-get update && sudo apt-get install openvpn sudo apt install easy-rsa Checking the Open VPN Version
We can see that so far the version that is in the ubuntu repository is 2.4.7. However, we need version 2.5 or higher.
To check the version you can use the command:
openvpn --version 
If your Open version is lower than 2.5, then click here to install the new version.

Creating a directory for easy-rsa
Now let’s create a directory for easy-rsa and create symbolic links. We will use symbolic links so that future updates can be replicated to our configurations.
Initially, let’s exit the terminal’s root mode. For this, we can issue the command exit.
exitNow, let’s create the easy-rsa directory
mkdir ~/easy-rsaCreating the symbolic link to “/usr/share/easy-rsa/*” .
ln -s /usr/share/easy-rsa/* ~/easy-rsa/Now, let’s access the directory we created and let’s check if the symbolic links are already there.
cd ~/easy-rsa/lsInitializing the OpenVPN PKI
Now let’s initialize the PKI inside the directory we just created.
cd ~/easy-rsa/./easyrsa init-pkiWe will see a message like the one shown below. This message shows that we are ready to create the CA Certificate Authority.
The CA will be the Certification Authority responsible for validating the certificates.

Note: In this tutorial, we are creating the CA inside the VPN server for the sake of simplicity and practicality. However, the CA may be on a separate server. In addition, there are security-related arguments that can motivate you to separate a CA server just to have the function of validating certificates.
Creating the CA Certificate Authority
When creating the CA we will have the option to fill in some fields. The main field is the common name .
This way, this common name field will be the only one that we will fill in this configuration.
Our common name field will have the value “VPN_CA”. However, you can use another name.
In addition, we will use the “nopass” option to avoid having to use a password when signing a certificate.
If you wish, you can choose to request a password each time you sign, just remove the “nopass” option.
To create the CA, we will use the command below:
./easyrsa build-ca nopassAfter the command, we will have a message similar to the one below:
“...

CA creation complete and you may now import and sign cert requests.

Your new CA certificate file for publishing is at:

/home/redes/easy-rsa/pki/ca.crt

...“
We can enter our directory to check the new files:
cd ~/easy-rsa/pki ls We can verify that there is now a file called ca.crt . In the future, we will use this file.
We can also verify our CA’s private key. Using the command below:
ls ~/easy-rsa/pki/private 
Creating the OpenVPN Server Key
To create the OpenVPN server key, let’s enter the ~/easy-rsa/ directory and use the command to create the key:
cd ~/easy-rsa/./easyrsa build-server-full vpn_server nopassAfter typing this command, you will see a result similar to the one shown in the figure below:
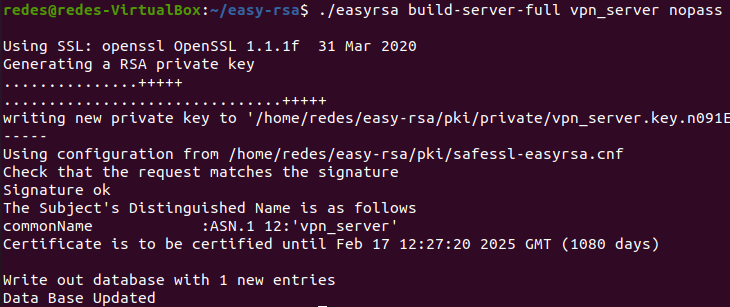
Now by listing the contents of the ~/easy-rsa/pki/private/ directory we can see that we have a new key = “vpn_server.key”.

We can also verify the certificate created for the VPN server. For that, we can use the command below:
ls ~/easy-rsa/pki/issued
Signing the OpenVPN Server Certificate
Now we need to sign the Openvpn server certificate. So, to sign the Open VPN server certificate, let’s enter the ~/easy-rsa directory and then type the command below:
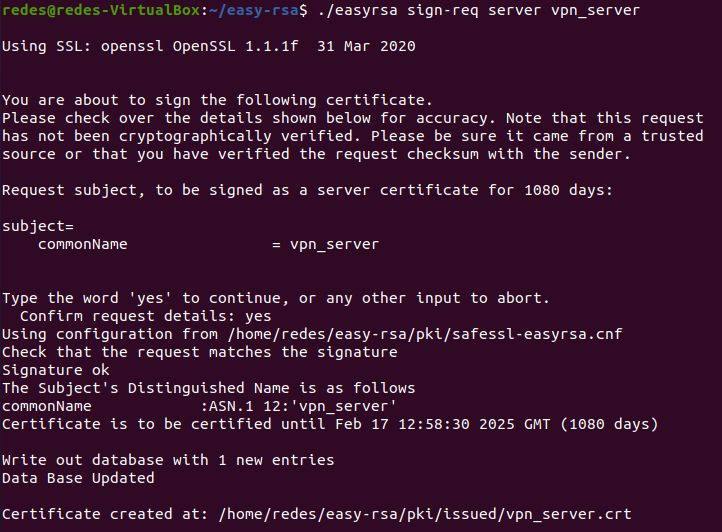
cd ~/easy-rsa/./easyrsa sign-req server vpn_serverAfter the command we will see a result similar to the figure below:
You have to type yes and then press ENTER.
Generating the Diffie hellman parameter
To generate the Diffie hellman parameters we go to the ~/easy-rsa/ directory and then we run the command to generate the DH.
cd ~/easy-rsa/./easyrsa gen-dhThe figure below shows the result after executing the command to generate Diffie hellman.

Creating a TLS Crypt v2 for OpenVPN
We will use TLS Crypt v2 which makes it possible to provide a specific tls-crypt key for each client.
That way, we can reduce the damage if a client’s tls-crypt key is compromised.
This is because if a client had their tls-crypt exposed, only that client’s tls-crypt would pose a security risk.
It’s worth remembering that –tls-auth and tls-crypt use a pre-shared group key, which is shared among all clients and servers in an OpenVPN deployment.
That way, if any client is compromised, the attacker will have access to this shared key and consequently compromise security.
Creating TLS Crypt v2 Key for Open VPN Server
Now let’s create the TLS Crypt v2 key that will be used by the Open VPN server. So, initially let’s enter the directory “~/easy-rsa/pki/”.
cd ~/easy-rsa/pki/After that, let’s type the command below:
openvpn --genkey tls-crypt-v2-server private/vpn_server.pemIf you want, you can verify that a vpn_server.pem key has been created in the “~/easy-rsa/pki/private/” directory.
You can check using the command:
ls ~/easy-rsa/pki/private/Configuring the Open VPN Server
Initially we go to the /etc/openvpn/server directory, we will use the command:
cd /etc/openvpn/serverNext, let’s create a file named server.conf.
sudo nano server.confIn this file, we will add the configuration lines below:
#--------------------
#VPN port
port 1194

#VPN over UDP
proto udp

# "dev tun" will create a routed IP tunnel
dev tun

ca ca.crt
cert vpn_server.crt

key vpn_server.key

tls-crypt-v2 vpn_server.pem

dh dh.pem

#network for the VPN
server 10.8.0.0 255.255.255.0

push "redirect-gateway autolocal"

# Maintain a record of client <-> virtual IP address

# associations in this file.
ifconfig-pool-persist /var/log/openvpn/ipp.txt

# Ping every 10 seconds and assume client is down if
# it receives no response in 120 seconds.
keepalive 10 120

#cryptographic cipher
cipher AES-256-GCM

#avoid accessing certain resources on restart
persist-key
persist-tun

#log of current connections
status /var/log/openvpn/openvpn-status.log

#log verbose level (0-9)
verb 4

# Notify the client when the server restarts
explicit-exit-notify 1
#-----------------------------------------
Explaining server.conf configuration lines
Now, let’s describe the configuration lines used. Initially we have the line “port 1194” which indicates the port that the server will use for OpenVPN.
After that, we have the line “proto udp” which indicates that our VPN will use the UDP transport layer protocol.
Then we have the line “dev tun” which indicates that we will use a tunnel of IP routes for the VPN.
After that, let’s start indicating the certificate of the certificate authority using the line “ca ca.crt“, in this case the file is “ca.crt”. In this example the certificate authority is also on the same machine as the VPN server.
Now let’s tell which is our file that has the VPN server certificate = “cert vpn_server.crt”. Remember that we created our certificate with the name vpn_server.crt. If you used another name, remember to change it to the name you used.
The next line “key vpn_server.key” indicates the key that will be used by the VPN server. Also, it is worth remembering that this key is secret and must be kept secret. In our example, we created the key with the name “vpn_server.key”.
Now let’s use the “tls-crypt-v2 server vpn_server.pem” line to point to the OpenVPN server’s TLS Crypt V2 key. In our case the key file name was “vpn_server.pem”.
Now let’s enter the name of the Diffie hellman = “dh dh.pem” file. In our case this file is named dh.pem.
The next line, “server 10.8.0.0 255.255.255.0”, informs the range of IPs that will be used in the VPN. This IP range can be changed to prevent it from coinciding with any of your company’s internal networks.
The line “push “redirect-gateway autolocal” forces the use of the VPN as a gateway.
Then we have the line “ifconfig-pool-persist /var/log/openvpn/ipp.txt” which stores the virtual addresses of VPN clients.
Then we have the line “keepalive 10 120” which indicates that we are going to send a ping every 10 seconds to the clients and that if the client does not respond for 120 seconds it will be considered disconnected.
The next line “AES-256-GCM cipher” indicates which cryptographic cipher will be used.
The lines “persist-key” and “persist-tun” are used to prevent access to resources in case of restart in case of reduced privileges.
The line “status /var/log/openvpn/openvpn-status.log” informs where the logs of the connections in progress will be stored.
Next, we have the line “verb 4” that indicates the level of detail of the logs. The detail level can range from 0 to 9.
The last line, “explicit-exit-notify 1”, indicates that the VPN server will notify clients if it needs to be restarted.
Copying files to /etc/openvpn/server folder
Now that we’ve created the configuration file, we need to copy the VPN server’s certificate and key files into the “/etc/openvpn/server/” directory.
Copying ca.crt and dh.pem
Initially we go to the directory “~/easy-rsa/pki/”.
cd ~/easy-rsa/pki/Then we will copy the certificate from the certificate authority. In our case it is “ca.crt”.
sudo cp ca.crt /etc/openvpn/server/Next we will copy the file from Diffie hellman. For that, we are going to copy the dh.pem file to the “/etc/openvpn/server/” directory.
sudo cp dh.pem /etc/openvpn/server/Copying vpn_server.key and vpn_server.pem
Then we go to the directory “~/easy-rsa/pki/private/”.
cd ~/easy-rsa/pki/private/Inside this directory, we will copy the files that are needed for the VPN server, “vpn_server.key” and “vpn_server.pem”. For the copy, we will use the cp command.
sudo cp vpn_server.key /etc/openvpn/server/sudo cp vpn_server.pem /etc/openvpn/server/Copying vpn_server.crt
Now let’s go to the directory where we have the open vpn server certificate. In this case it is the “~/easy-rsa/pki/issued/” directory.
cd ~/easy-rsa/pki/issued/Now let’s copy the vpn_server.crt file to the “/etc/openvpn/server/” directory.
sudo cp vpn_server.crt /etc/openvpn/server/Enabling forwarding on the Open VPN server
So far, we’ve done pretty well with configuring the Open VPN server. Therefore, we need to enable forwarding on the machine that will be serving the Open VPN.
For this, we will insert a line in the /etc/sysctl.conf file. So, let’s use the command below to insert the line by the command:
sudo nano /etc/sysctl.confThen we’ll add the line at the end of the file:
net.ipv4.ip_forward = 1You can tell me: Juliana, this line is already in the file. The answer is yes. However, this line will be commented on most systems, especially if we have never configured the server to forward packets.
If we wish, we can uncomment the line instead of inserting the line “net.ipv4.ip_forward = 1” .
Now let’s reload the file using the command:
sudo sysctl -pAfter typing the above command, we can see a result similar to the figure below:

Configuring the VPN server to do NAT
After all the initial setup, we need to ensure that our VPN server is NATed correctly.
That happens because the client connections will be routed through it and will use an IP different from the IP of the VPN server’s network.
So we need to create some NAT rules in the firewall.
Initially we need to check which VPN server interface forwards data to the default gateway. For this, we will use the command below:
ip route list default
The figure above shows that the interface of our VPN server doing the default routing is enp0s3.
So let’s use the “enp0s3” interface. In your case, use the name of the interface that appears in the command “ip route list default”.
Entering NAT and Redirect Rules for Open VPN
Now let’s edit the file that does the preliminary reading of the firewall rules. For this, we will edit the file “/etc/ufw/before.rules”.
So, let’s use the command below:
sudo nano /etc/ufw/before.rulesInside this “before.rules” file, we will add the lines below:
*nat
:POSTROUTING ACCEPT [0:0]
-A POSTROUTING -s 10.8.0.0/16 -o enp0s3 -j MASQUERADE
COMMIT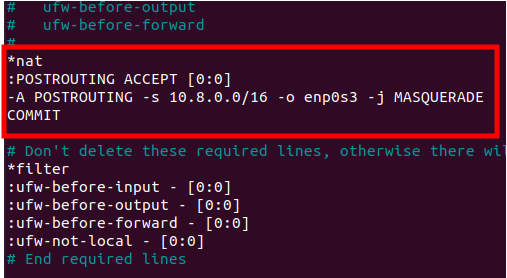
The figure above demonstrates that we must insert these configuration lines at the beginning of the “before.rules” file.
This way, these lines we have entered will allow NAT on our VPN server.
Here we must put the network we are using for the VPN. Therefore, we use the “10.8.0.0/16” network in our settings.
Also, let us specify the interface that connects the VPN server to the default gateway, “enp0s3”.
Editing “/etc/default/ufw”
Now let’s edit the “/etc/default/ufw” file and change a line to allow redirection.
For this, we will find the line “DEFAULT_FORWARD_POLICY=”DROP” “ and we will change it to DEFAULT_FORWARD_POLICY=”ACCEPT”. Below we have the changed configuration:
sudo nano /etc/default/ufwDEFAULT_FORWARD_POLICY=”ACCEPT”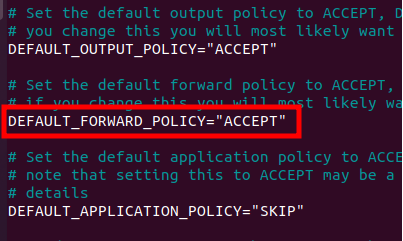
Allowing Open VPN Server Access
Now, let us create a rule allowing access to the Open VPN server port. In our case, our server is operating on port 1194.
So let us use the rule below to allow UDP access on port 1194:
sudo ufw allow 1194/udp
Restarting the Firewall
After changing the lines let’s restart the Firewall. For this we will use the commands below:
sudo ufw disablesudo ufw enable
Starting the Open VPN Server
Let’s initialize the Open VPN server. To do this, let’s run the command below:
sudo systemctl start [email protected]Next, let’s verify that the server has started correctly with the following command:
sudo systemctl status [email protected]The figure below shows the result of the OpenVPN server status.

To ensure that the OpenVPN server starts every time the machine boots, use the command below.
sudo systemctl enable [email protected]
Configuring the Open VPN Client
After configuring the Open VPN server, let us start configuring the Open VPN client. For this, we will configure a hypothetical client called Alice.
Furthermore, we will configure another machine where the Alice client will be used.
Note: It is worth remembering that we are using virtual machines and virtualized network to demonstrate the OpenVPN configuration. However, the same procedure applies to machines that are using public IPs. Additionally, we chose to use a virtualized scenario so that our readers can replicate the scenario as a proof of concept.
Creating and signing the OpenVPN client certificate
To create the Open VPN client certificate, let’s enter the “~/easy-rsa” directory inside the Open VPN server. Next, let’s type the command below:
cd ~/easy-rsa/./easyrsa gen-req Alice nopassRemember to press ENTER when asked if you want to use the Common Name.
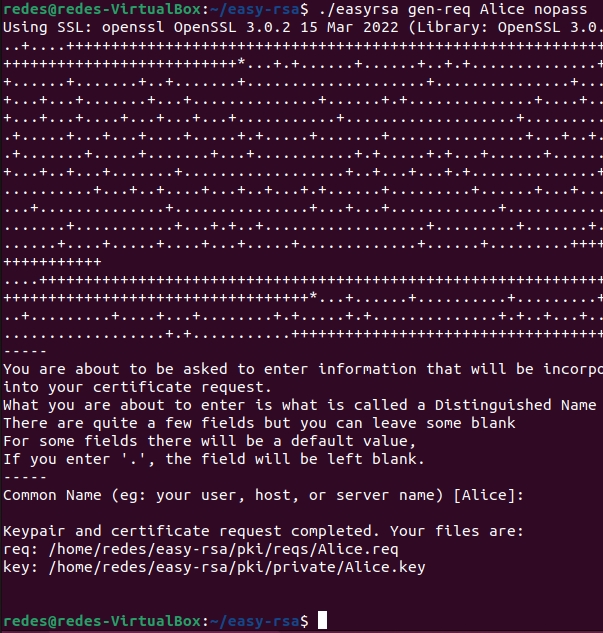
It is worth remembering that we are using a client named Alice as an example. Of course, you will make changes to your clients’ names.
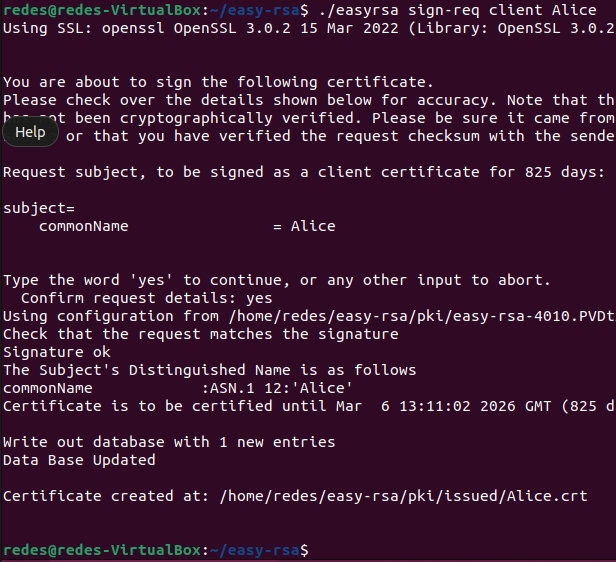
Then we will sign the Openvpn client certificate, using the command below:
./easyrsa sign-req client AliceConfirm the operation with “yes”.
Creating TLS Crypt v2 Key for Client
Now let us create the TLS Crypt v2 that the client will use. Therefore, this tutorial will create a key that the Alice client will use.
For this, inside the Open VPN server, let’s enter the ~/easy-rsa/pki/ directory.
cd ~/easy-rsa/pki/Next, let’s type the command below:
openvpn --tls-crypt-v2 private/vpn_server.pem --genkey tls-crypt-v2-client private/Alice.pemWe can verify that the key for Alice was created inside the ~/easy-rsa/pki/private/ directory.
ls ~/easy-rsa/pki/private/
Preparing Open VPN Client Files
To configure the openvpn client, we will need to create a directory where we will store the files of the VPN clients. For this we will use the command below:
mkdir ~/vpn_clientsInside this directory we will create subdirectories for each client. In our case, we have the client Alice. So let’s create a subdirectory alice.
cd ~/vpn_clientsmkdir aliceNow let’s copy the ca.crt files and the other Alice files to the “~/vpn_clients/alice” directory.
The first file is ca.crt which is in “~/easy-rsa/pki/” . So let’s use the command below.
cd ~/easy-rsa/pki/cp ca.crt ~/vpn_clients/aliceNow let’s copy the “.crt” and “.key” files from the client. For this, we go to the “~/easy-rsa/pki/issued/” directory.
cd ~/easy-rsa/pki/issued/Next we are going to copy Alice’s certificate file “.crt” to the directory we created for the Alice client.
cp Alice.crt ~/vpn_clients/aliceNow let’s copy Alice’s key “.key” and “.pem”. For that, we go to the directory “~/easy-rsa/pki/private/”.
cd ~/easy-rsa/pki/private/Then we will copy Alice’s key “Alice.key” and “Alice.pem” to Alice’s directory.
cp Alice.key ~/vpn_clients/alicecp Alice.pem ~/vpn_clients/aliceNow let’s go to Alice’s directory:
cd ~/vpn_clients/aliceNext let’s give an ls command to check if the files are there.
ls
Creating the Open VPN OVPN file
Now let’s create the file “make_client_ovpn.sh” inside Alice’s directory. This file is a script that will make our life easier when configuring clients.
Of course, you could manually type the settings into the clients’ “.ovpn” file. However, here we suggest the script to automate the task.
cd ~/vpn_clients/alicenano make_client_ovpn.shNext, let’s copy and paste the lines below:
#!/bin/bash

# 1 argument = Client_identifier
cat <(echo -e 'client') \
<(echo -e 'proto udp') \
<(echo -e 'dev tun') \
<(echo -e 'remote 127.0.0.1 1194') \
<(echo -e 'resolv-retry infinite') \
<(echo -e 'nobind') \
<(echo -e 'persist-key') \
<(echo -e 'persist-tun') \
<(echo -e 'remote-cert-tls server') \
<(echo -e 'cipher AES-256-GCM') \
<(echo -e '#user nobody') \
<(echo -e '#group nobody') \
<(echo -e 'verb 3') \
    <(echo -e '<ca>') \
    ca.crt \
    <(echo -e '</ca>\n<cert>') \
    ${1}.crt \
    <(echo -e '</cert>\n<key>') \
    ${1}.key \
    <(echo -e '</key>\n<tls-crypt-v2>') \
    ${1}.pem \
    <(echo -e '</tls-crypt-v2>') \
    > ${1}.ovpn
Explaining the configuration lines
Now, let’s explain the meaning of these Open VPN client configuration lines:
“client” indicates that it is an Open VPN client.
“proto udp” indicates that it will use the UDP protocol
“dev tun” indicates that it will use IP tunnel
“remote” 127.0.0.1 1194″ indicates the IP of the Openvpn server and the port that will be used. In your case, assuming you are going to use the VPN on the Internet, you should check the public IP of your VPN server.
“resolv-retry infinite” Indicates that it will keep trying to resolve the VPN server name.
“nobind” indicates that it will not use a specific port.
“persist-key” and “persist-tun” allows you to preserve connection state in case of restart.
“remote-cert-tls server” indicates the server’s tls
“cipher AES-256-GCM” indicates the encryption cipher used
“#user nobody” and “#group nobody” indicates reduced privileges on non-Linux clients. Remove the “#” if using a client on a machine that does not use the Linux operating system.
“verb 3” indicates the verbosity of the logs.
The rest of the script indicates that we are going to read the files “${1}.crt” + “${1}.key” + “${1}.pem” , where “${1}” is the identification name you assigned to the client. This client identifier is the first argument that we will pass to our script.
Running the script
After creating the make_client_ovpn.sh file, let’s make it executable. For this we will use the command below:
chmod +x make_client_ovpn.shAfter that, we will run the file using the “./” and followed by the client identification name. In our case, the client is Alice.
./make_client_ovpn.sh AliceYou will notice that a “.ovpn” file has been created inside Alice’s folder. You can check using the “ls” command.
ls
Sending the OVPN file to the client
Now let’s copy the Alice.ovpn file to the client’s computer. For this, we can use different ways to copy such as SFTP, email, pendrive.
(Optional) Let’s use netcat to transfer the Alice.ovpn file.
For this we will start a netcat server on the machine that will receive the Alice.ovpn file (Alice machine). For this we will use the command below:
nc -vnl -w 2 8888 > Alice.ovpnThis command informs that the computer will listen on port 8888 and will insert the received content inside the Alice.ovpn file.
Now let’s go to the VPN server machine and go to Alice’s folder. Then we will type the following command:
nc -vn 10.0.2.15 8888 < Alice.ovpnIn this case we are sending the contents of the Alice.ovpn file to the machine 10.0.2.15 using TCP port 8888.
If you have questions about netcat and want to go deeper, we have a video lesson (It’s in portuguese but you can use subtitles):
Editing the client ovpn file
Okay, once the file is copied. Let’s edit it and change the IP of the line “remote 10.0.2.7 1194”.
In our case, the VPN server IP is 10.0.2.7. Check the IP that will be used in your environment.
If we are using a Linux machine, we can comment out the user nobody and group nobody lines. To comment out the line, use the “#”.

Installing openvpn on the client
Connecting the Client to the VPN
Now let’s connect the client to the VPN. In our case, the client is Alice. So let’s use the command below:
sudo openvpn --config Alice.ovpnTesting the VPN on the Client
There are several ways to test if the client is forwarding its traffic to the VPN. However, let’s use the traceroute command to test.
Thus, using the traceroute command for an internet site, we must have a routing of the traffic from the client to the Open VPN server.
Consequently, traffic from the client will be routed through the Open VPN server to the website.
Let’s use the command below:
traceroute www.google.com
We can see in the figure above that the first hop is going to the VPN IP “10.8.0.1”. After that, the next hop is the default gateway of the Open VPN server.
In this way, we can demonstrate that the traffic is already being routed from the client to the Open VPN server.
Installing the newest version of OpenVPN
If your OpenVPN version is lower than 2.5. Then you can update using the commands below:
sudo -sNext, let’s type the command below to create the keyrings directory.
mkdir -p /etc/apt/keyrings
Now, let’s install curl. For this, we will use the command below.
apt install curl
Now let’s add the new OpenVPN repository.
curl -fsSL https://swupdate.openvpn.net/repos/repo-public.gpg | gpg --dearmor > /etc/apt/keyrings/openvpn-repo-public.gpg
Now we can install the OpenVPN version for your operating system version with the command below making the appropriate substitutions in *** and &&& .
echo "deb [arch=amd64 signed-by=/etc/apt/keyrings/openvpn-repo-public.gpg] http://build.openvpn.net/debian/openvpn/*** &&& main" > /etc/apt/sources.list.d/openvpn-aptrepo.listIn this case, let’s replace *** with the version of OpenVPN you want to install.
Below are several OpenVPN version options.
stable: uses the stable version and excludes the possibility of using alphas, betas and RCs
testing: latest version including alphas, betas and RCs types
release/2.3: Uses OpenVPN version 2.3
release/2.4 : Uses OpenVPN 2.4 version including alphas, betas and RCs
release/2.5: Uses OpenVPN 2.5 including alphas, betas and RCs
release/2.6: Uses OpenVPN version 2.6 including alphas, betas and RCs
And let’s replace &&& with the Linux version you have.
Below are several Linux version options.
stretch = Debian 9.x
buster = Debian 10.x
bullseye = Debian 11.x
bookworm = Debian 12.x
bionic = Ubuntu 18.04 LTS
focal = Ubuntu 20.04 LTS
jammy = Ubuntu 22.04 LTS
kinetic = Ubuntu 22.10
lunar = Ubuntu 23.04
As an example we can choose the command below to install the repository for the OpenVPN 2.6 version on a machine with ubuntu 22.04 jammy.
echo "deb [arch=amd64 signed-by=/etc/apt/keyrings/openvpn-repo-public.gpg] http://build.openvpn.net/debian/openvpn/release/2.6 jammy main" > /etc/apt/sources.list.d/openvpn-aptrepo.list
For more information about other versions, we can access the openvn repository site: https://community.openvpn.net/openvpn/wiki/OpenvpnSoftwareRepos
Now let’s install the new version of OpenVPN
apt-get update && apt-get install openvpnNow, let’s use the command to see the version of openvpn.
openvpn --versionWe can see in the figure below that we already have a new version of openvpn.


Juliana Mascarenhas
Data Scientist and Master in Computer Modeling by LNCC.
Computer Engineer
Have a comment or question about this tutorial? Comment on the Simplificandoredes channel.
References
https://community.openvpn.net/openvpn/wiki/OpenvpnSoftwareRepos
https://community.openvpn.net/openvpn/wiki/HOWTO
https://github.com/OpenVPN/easy-rsa/blob/master/README.quickstart.md
https://openwrt.org/docs/guide-user/services/vpn/openvpn/server
https://github.com/OpenVPN/openvpn/blob/master/doc/tls-crypt-v2.txt

