This tutorial teaches you how to create and configure a site-to-site VPN using pfSense and OpenVPN.
Also, there is another tutorial in our series of VPN tutorials. If interested, search here on the VPN site.
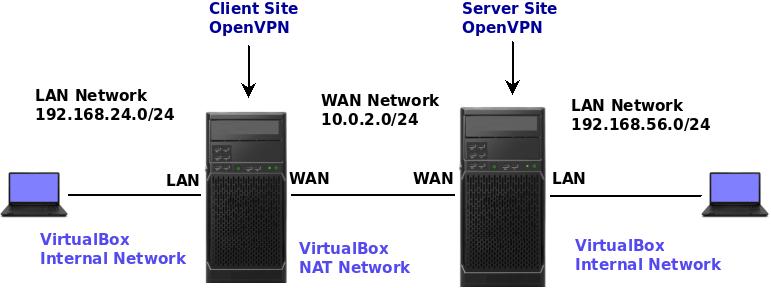
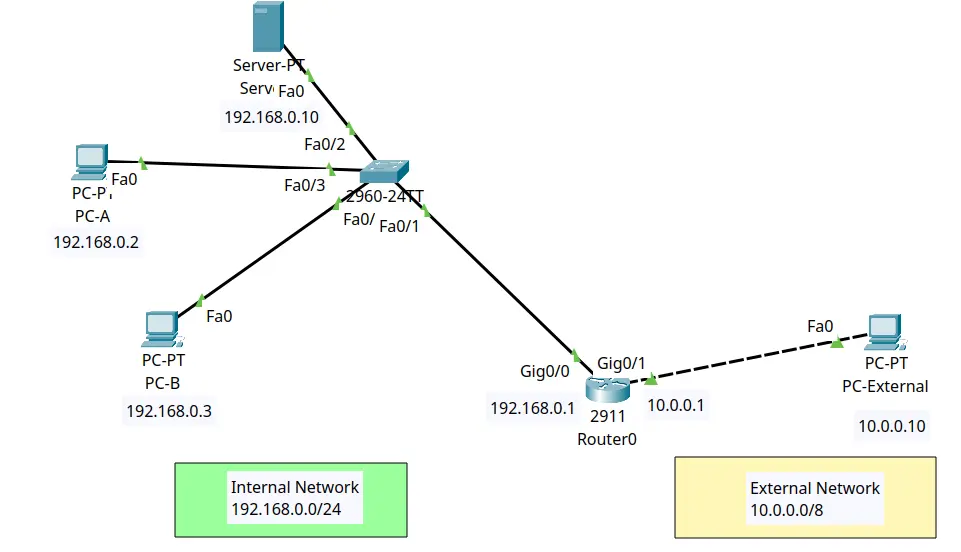
The figure below demonstrates the scenario we are going to use. In this scenario, we are going to use virtual machines with VirtualBox and Virtual Networks.
We use a scenario with virtual machines to make it easier for the reader to create a test environment before deploying in a production environment.
In this case, we are using VirtualBox’s “Internal Network” mode networks on the LANs between the computers and pfSense.
For the WAN network, between pfsense server and pfsense client, we are using VirtualBox “NAT network” using subnet “10.0.2.0/24”.
| Name | Client Site PfSense |
| WAN Subnet | 10.0.2.0/24 |
| LAN Subnet | 192.168.24.0/24 |
| LAN Address | 192.168.24.1 |
| InternalNetwork name | LAN1 |
| Cert CN | Client_VPN_Cert |
| Name | Server Site PfSense |
| WAN Subnet | 10.0.2.0/24 |
| LAN Subnet | 192.168.56.0/24 |
| LAN Address | 192.168.56.1 |
| InternalNetwork name | LAN2 |
| CA Name | site_vpn_CA |
| Cert CN | server_site_cert |
Note. For the suggested scenario we will have to disable private IP blocking in pfSense. That’s because in this tutorial we are using private IP on the WAN.
To disable private IP blocking on the WAN, go to Interfaces->WAN and uncheck the options: Block private networks and Block bogon networks.

Configuring OpenVPN Server Side
Let’s start the server-side settings of our site-to-site VPN.
We are assuming that you know how to install and configure pfsense in a VirtualBox virtual machine. If you don’t know and want to replicate the lab, you can click on the link below.
Creating the Certificate Authority
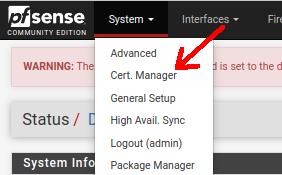
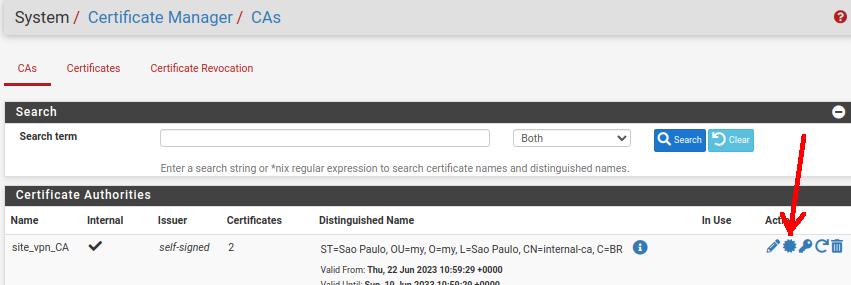
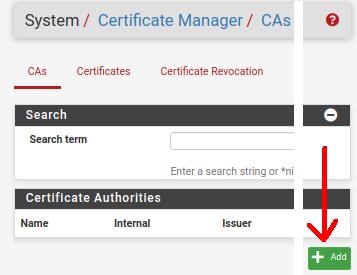
First, let’s create a certifying unit. To do this, click on “System” and then on “Cert Manager”.
Then, in the “CAs” tab, we will click on “Add” to be able to add a new Certificate Authority.

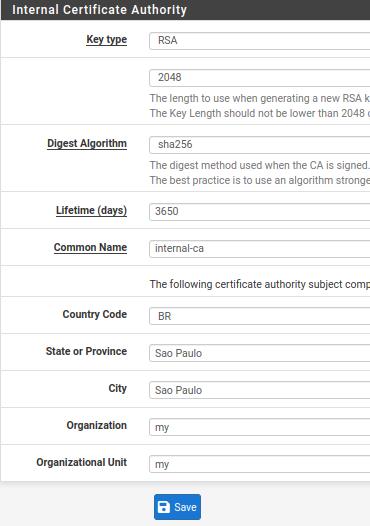
Next, let’s start filling in the fields in the figure below and explain what we should enter in each field.
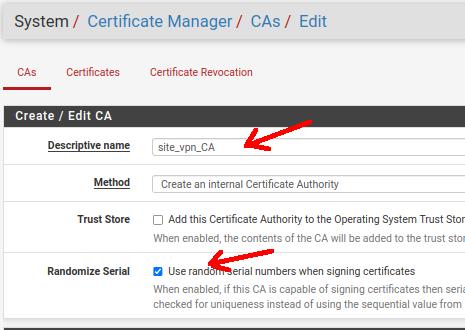
Descriptive name: Here we will give the name of the Certificate Authority. In our case we are using the name “site_vpn_CA”.
Method: Let’s create an internal certificate on the server. So let’s use the option “Create in the internal Certificate Authority”.
Trust Store: Allows you to add the certificate to the operating system’s Trust Store. However, we will not be using this option in this tutorial.
Randomize Serial: It will allow the certificate authority to sign certificates randomly and this improves security.
Key type: The type of key we are going to use for encryption and then the key size. In this case we are using a size of 2048.
DIgest Algorithm: The method used when the certificate authority is signed. Here, we’re going to use sha256.
Key type: The type of key we are going to use for encryption and then the key size. In this case we are using a size of 2048.
DIgest Algorithm: The method used when the certificate authority is signed. Here, we’re going to use sha256.
Lifetime: We are using the default which is almost 10 years. We can change this value to a date that meets our needs.
Coomon Name: Here we can use a name of our choice. In this case, we use “internal-ca”.
Country Code,State or Province,City and Organization: This is the part where we enter information about the country code, state, city and the name of the organization. In this case, we are using fictitious information from an organization located in São Paulo.
Next, let’s click on “Save” to create the new Certificate Authority.
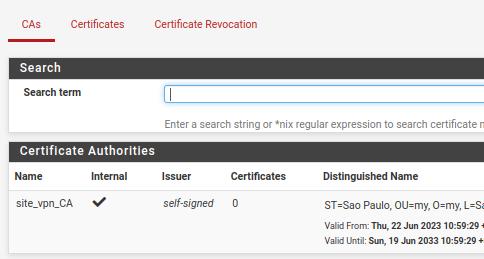
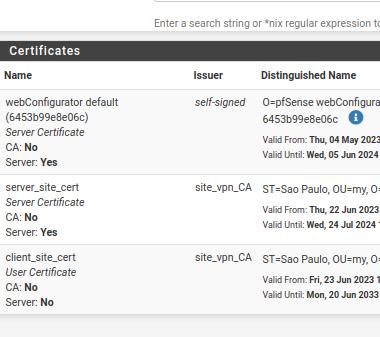
In the figure below, we can see that the Certificate Authority was successfully created.
Creating the OpenVPN Server Certificate
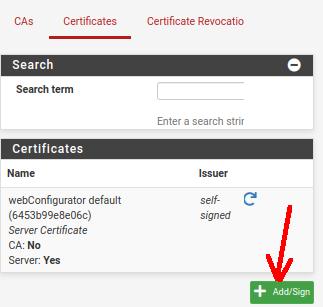
Now, let’s create the site-to-site server certificate for our OpenVPN. For this, we will click on “System” and then on “Cert Manager”.
After that, we will click on the “Certificates” tab and then we will click on “Add/Sign”.

Let’s start by describing the fields and values that were used in this OpenVPN server certificate.
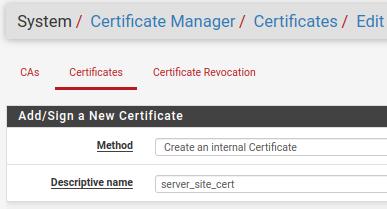
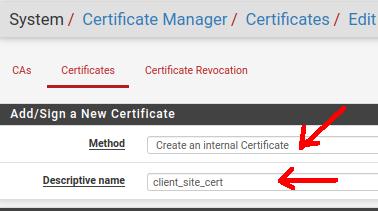
Method: In this case, we will use an internal certificate on the server. So let’s use the “Create an internal Certificate” option.
Descriptive name: The descriptive name for the certificate. In our case, the name is “server_site_cert”.
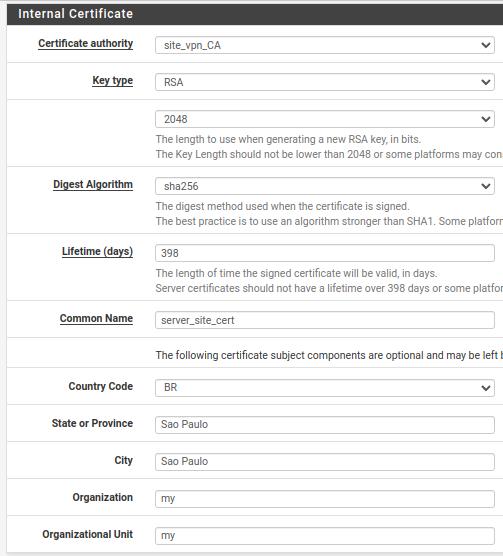
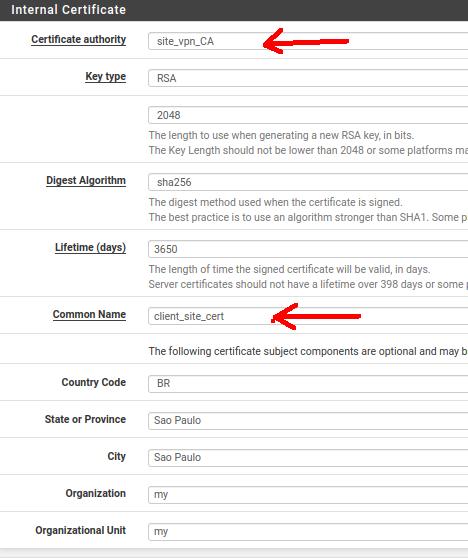
Certificate Authority: Here we are going to use the certificate authority that we created. In this case, our CA is “site_vpn_CA”.
We can see that many fields were filled in automatically with the information we entered when creating the Certificate Authority.
Lifetime: The Lifetime field must be filled in with a value less than or equal to 398. This way, we avoid that a Lifetime greater than 398 creates incompatibilities with some systems.
Common Name: Here we will put the name of the certificate “server_site_cert”.
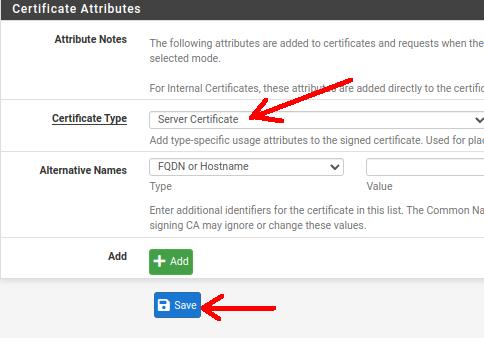
Certificate Type: in this field, it is important to change the certificate to “Server Certificate”.
Next, let’s click on “Save”.
After clicking on “Save” and we will see a screen like the screen below.

Creating the Site Client Certificate
Now, let’s create the certificate for the other pfsense that will connect to our OpenVPN server. In this case, we are assuming that our OpenVPN server will accept the connection from the OpenVPN client running on the pfsense client.
Now, let’s create the site-to-site client certificate for our OpenVPN. For this, we will click on “System” and then on “Cert Manager”. After that, we will click on the “Certificates” tab and then we will click on “Add/Sign”.

Let’s start by describing the fields and values that were used in this OpenVPN client certificate.
Method: In this case, we will use an internal certificate on the server. So let’s use the “Create an internal Certificate” option.
Descriptive name: The descriptive name for the certificate. In our case, the name is “client_site_cert”.
Certificate Authority: Here we are going to use the certificate authority that we created. In this case, our CA is “site_vpn_CA”.
We can see that many fields were filled in automatically with the information we entered when creating the Certificate Authority.
Lifetime: We are using the default which is almost 10 years. We can change this value to a date that meets our needs.
Common Name: Here we will put the name of the certificate “client_site_cert”.
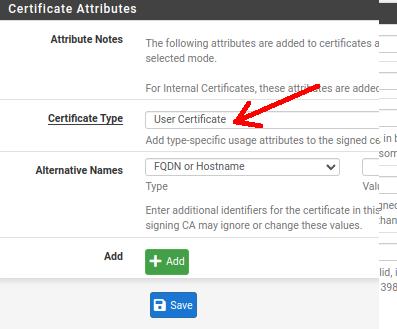
Certificate Type: in this field, it is important to change the certificate to “User Certificate”. That’s because, this will be the site-to-site client certificate.
Next, let’s click on “Save”.
After clicking on “Save” and we will see a screen like the screen below.
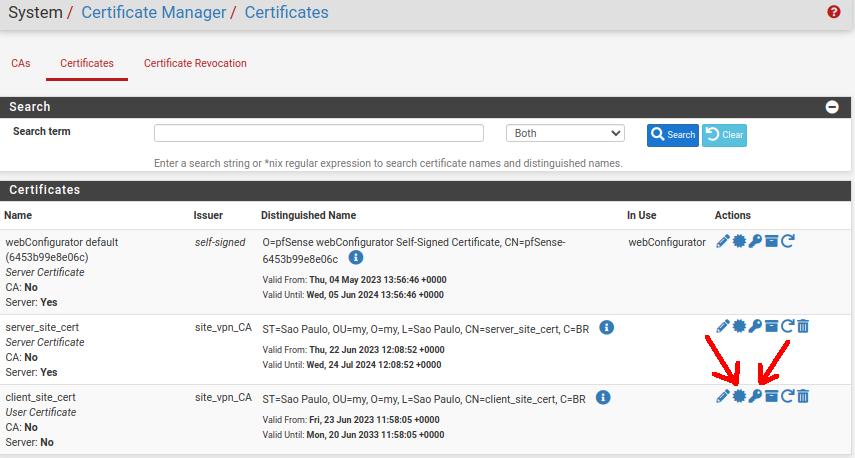
Export the certificates
Now, let’s export the client’s certificates and key. These certificates will be included in the site-to-site OpenVPN client configuration on the other PfSense.
First we will export the Certificate Authority certificate from the OpenVPN server. To do so, let’s click on System -> Certificate Manager -> CAs.
Let’s download the CA certificate.
Now let’s click on the Certificates tab and let’s export the OpenVPN client certificate and client key. In that case, let us download the client’s certificate and key to include this data in the site-to-site OpenVPN client configuration.
Configuring OpenVPN Server site to site
To configure the OpenVPN server in site to site mode, follow the steps below.
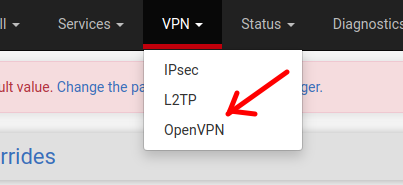
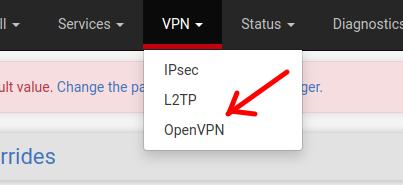
First we will select the VPN tab and then we will click on OpenVPN.
Next, on the Servers tab, click on “Add”.

Now let’s describe the information added in the fields of the figure below.
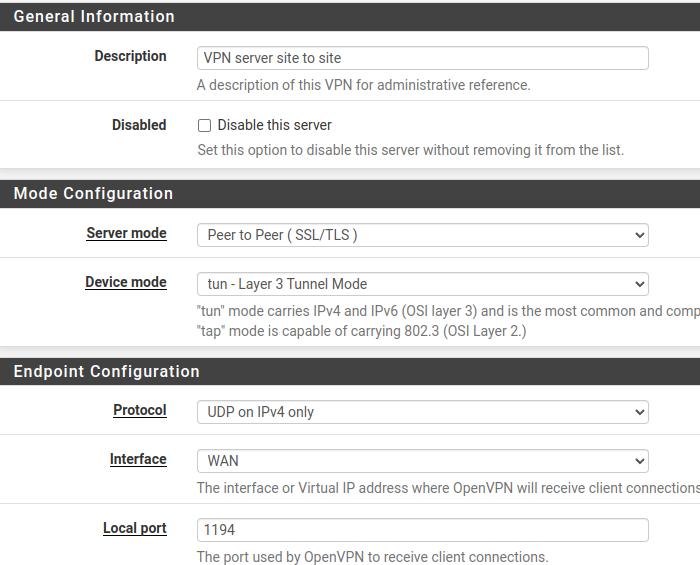
Description: let’s enter the name of our OpenVPN server that will be used for site-to-site connection.
Server mode: here we will choose the option “Peer to Peer (SSL/TLS)”. That’s because we are configuring OpenVPN site-to-site using TLS/SSL.
Device mode: We are going to use the “tun-Layer 3 Tunnel Mode” to allow Layer 3 (IP) traffic inside our VPN.
Protocol: we can choose between TCP and UDP in the transport layer. Furthermore, we can choose between IPv6 and IPv4 or use both at the same time. For this tutorial, we’ll just use UDP and IPv4.
Interface: Here we will indicate which interface the OpenVPN server will operate. In this case, we are using a VPN server to allow external access from clients. So let’s use the WAN interface.
Local Port: Informs the port that the OpenVPN server will use to wait for communication with clients. Let’s choose the default port 1194. However, if you are already using that port with another service, you can change the port so that there is no conflict.
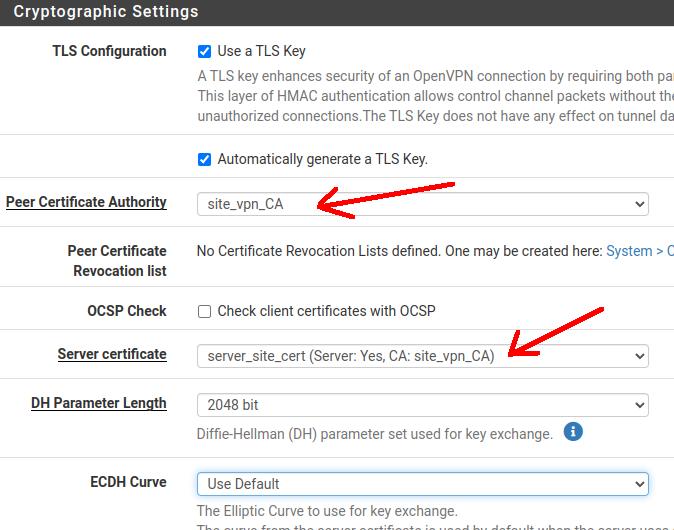
TLS Configuration: Let’s leave the fields related to the TLS configuration checked.
Peer Certificate Authority: Here we will select the Certificate Authority that we created for our VPN.
Peer Certificate Revocation list: For now we are not going to create the list to revoke certificates.
Server certificate: Let’s use the certificate we created for the site-to-site OpenVPN server.
DH Parameter Length: Let’s use a Diffie-Hellman (DH) length of 2048.
ECDH Curve: let’s default to the Elliptic Curve used for key exchange.
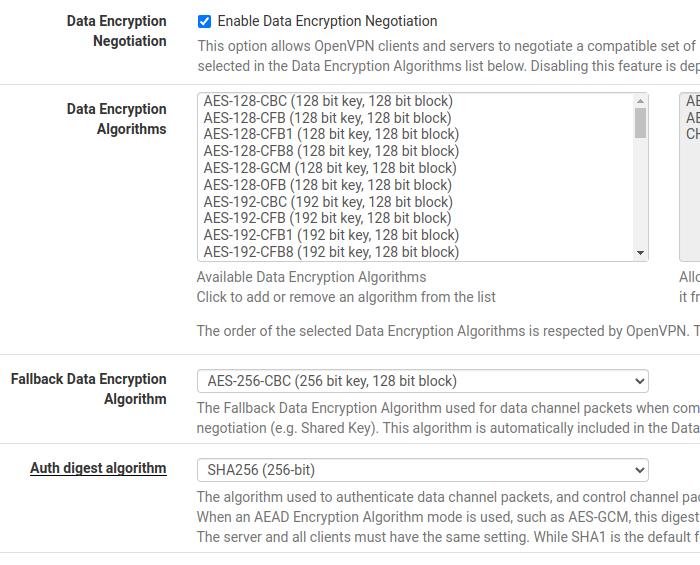
Data Encryption Negotiation: allows negotiation of the encryption algorithm between client and server.
Data Encryption Algorithms: here are the algorithms that can be negotiated between client and server.
Fallback Data Encryption Algorithm: Here we can indicate the algorithm that will be used when the negotiation of the algorithms listed above fails.
Auth Digest Algorithm: Here we will indicate the authentication method between VPN client and server.
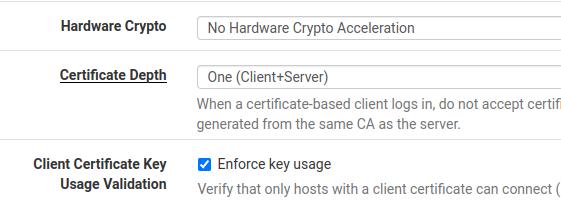
Hardware Crypto: As the name says, this field allows you to use hardware acceleration. However, we will not use it in this tutorial.
Certificate Depth: Let’s deny certificates with a lower hierarchy than the certificate created with the CA. This prevents the acceptance of certificates created with CAs that were generated along with take from the original CA.
Client Certificate Key Usage Validation: allows only clients with valid certificates to connect.
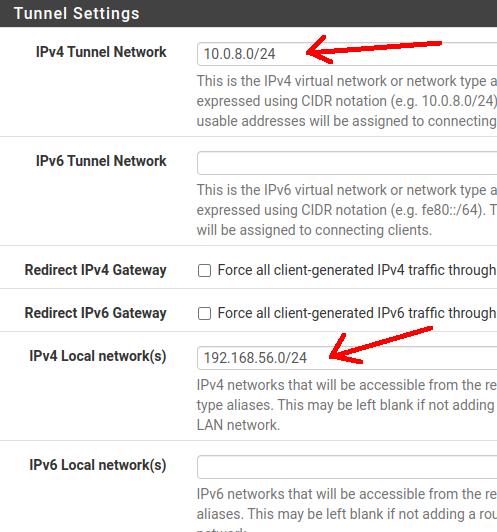
IPv4 Tunnel Network: Here we will indicate the network that will be used in the VPN tunnel between the client and the VPN server. It is worth mentioning, that we must use a network that is not used by another internal network. In our case, we are going to use the 10.0.8.0/24 network.
IPv6 Tunnel Network: Similar to IPv4. However, we will not use it in this tutorial.
Redirect IPv4 Gateway: Selecting this field will make clients use the OpenVPN server’s gateway as their default gateway. This way, all Internet traffic will go through the OpenVPN server. In this tutorial, we will not enable the Redirect Gateway.
Redirect IPv6 Gateway: Similar to IPv4. However, we will not use it in this tutorial.
IPv4 Local Network: Here we can define the local network that will be accessed by OpenVPN clients. In this case, let’s choose the OpenVPN server LAN network 192.168.56.0/24.
IPv6 Local Network: Similar to IPv4. However, we will not use it in this tutorial.
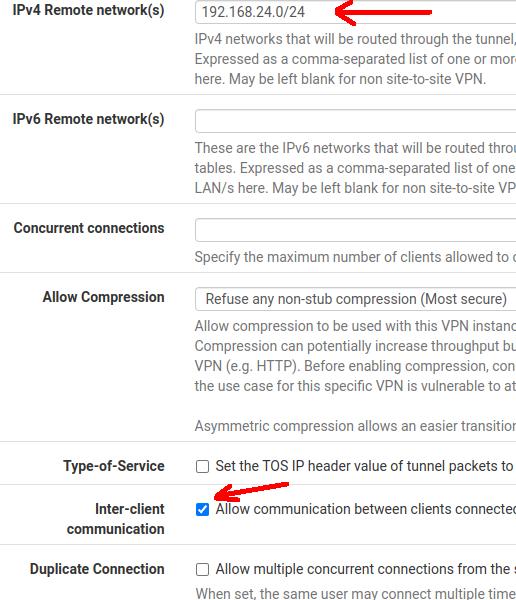
IPv4 Remote network(s): Here we will enter the client OpenVPN LAN network.
IPv6 Remote network(s): Similar to IPv4. However, we will not use it in this tutorial.
Concurrent Connections: Number of clients that can access the OpenVPN server at the same time. If we are running the OpenVPN server on more limited hardware, we can reduce the number of concurrent clients.
Allow Compression & Compression: allows compression within the VPN. However, we are not going to guarantee greater security.
Type-of-Service: This field can be checked when we want to insert some kind of quality of service for the VPN traffic.
Inter-Client Communication: If we check this option, OpenVPN clients will be able to communicate. This communication between clients will depend on the need of the VPN project.
Duplicate Connections: By checking this option, the same VPN user can maintain more than one VPN connection. It can be useful in case of multiple user devices.
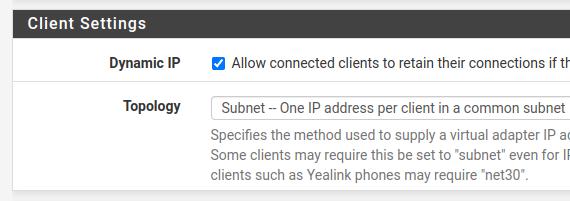
Dynamic IP: allows you to keep the client connection even if you change the IP.
Topology: We have the option of using “Subnet” to allow an IP for each client in the VPN network or to isolate clients using the “net30” option. In this tutorial we will use the option “Subnet”.
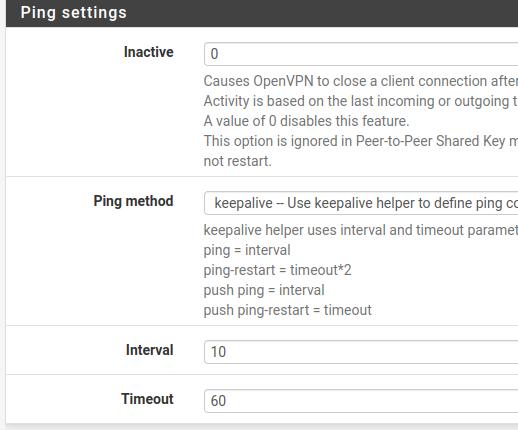
Inactive: Let’s use inactivity time = 0. That way, we’ll prevent the site-to-site client from being disconnected due to inactivity. When using the value 0 all other fields of the ping settings will be ignored.
For advanced settings, we leave the fields with the default information.
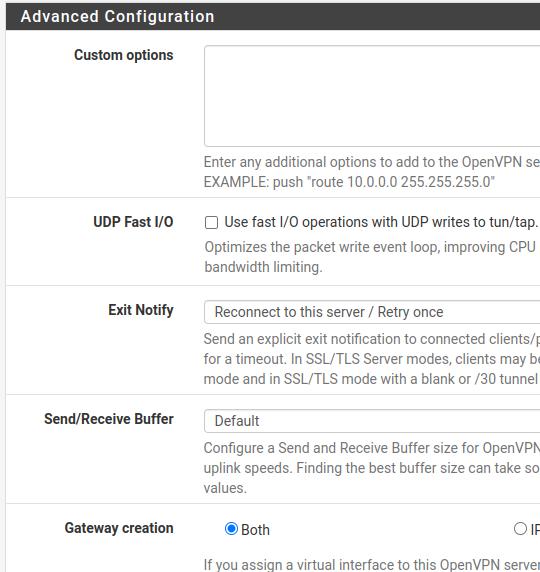
Custom Options: Here we can enter additional options such as a route.
UDP Fast I/0: An optimization with VPN operating on UDP and tun/tap.
Exit Notify: Send explicit notification for connection.
Send/Receive Buffer: Here we can indicate the size of the buffer. However, let’s leave the default.
Gateway Creation: Used to allow routes to virtual interfaces.
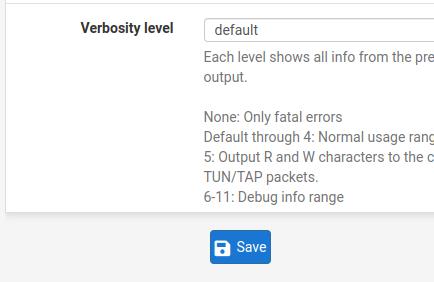
Verbosity Level: will indicate the level of detail of the VPN logs.
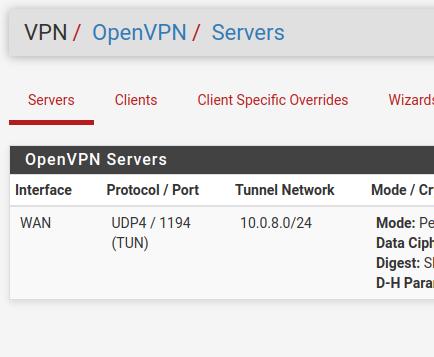
After clicking on “Save”, we will see a screen like the one in the figure below.
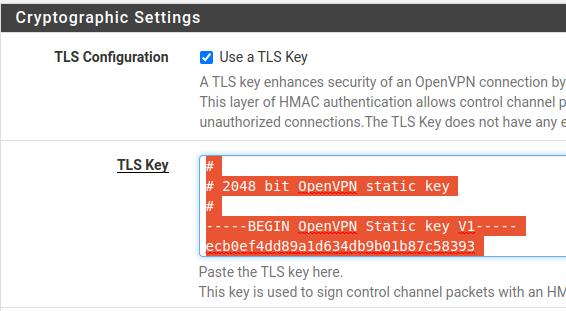
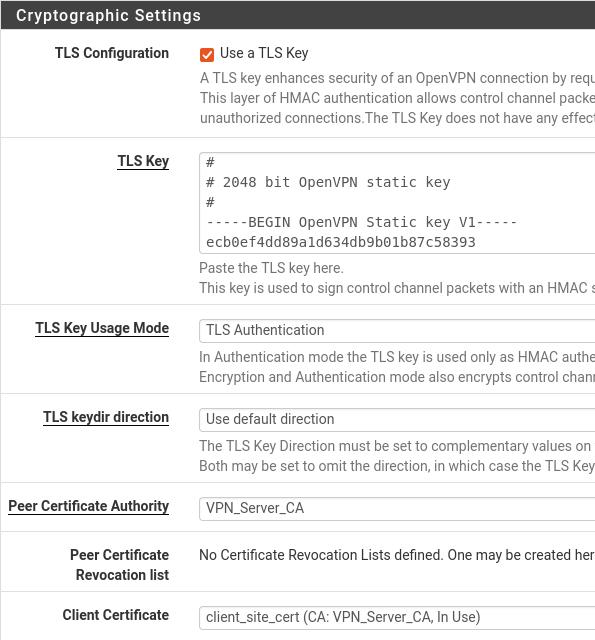
Now, we can click VPN->OpenVPN->Server and we will click the icon like the picture below to edit. Our goal is to copy the server’s TLS key into a file that we will then pass on to the Site VPN client.
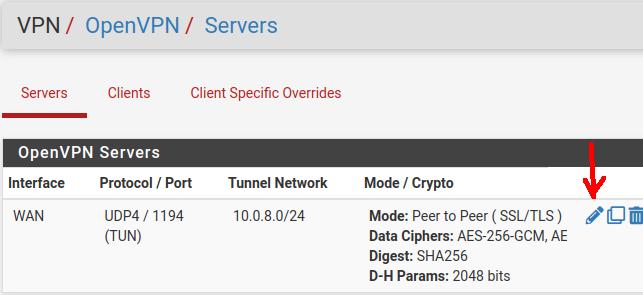
Now let’s go to the Cryptographic Settings section and let’s copy the TLS Key (select all and copy). After that we can save the content in a file with the name TLS_KEY_Server.txt.
We are going to send this file to the VPN Site Client together with the certificates that we have already downloaded earlier.
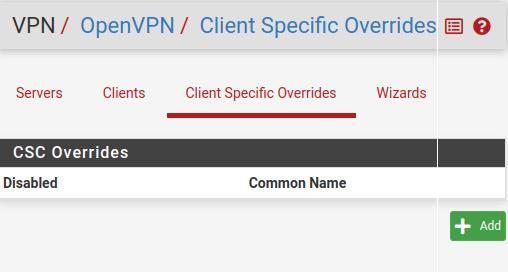
Creating Client-Specific Overrides
Now let’s create Client-Specific Overrides to allow binding of a certificate and client subnet. This way, this binding allows the creation of a route to the subnet.
In our case the subnet of the OpenVPN client site will be 192.168.24.0/24.
To access the Client-Specific Overrides we will click on VPN->OpenVPN-> Client-Specific Overrides
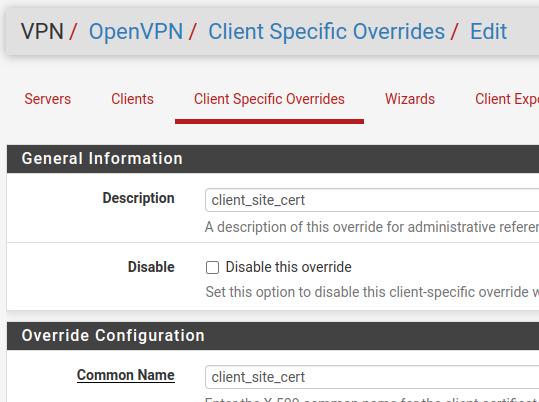
Now let’s give the name that will be used in our client VPN site. In this case we will use the name “client_site_cert”. We will use this name in the Description and Common Name fields.
Note. In the Common Name we must use the same Common name that we used in the configuration of our client’s certificate.
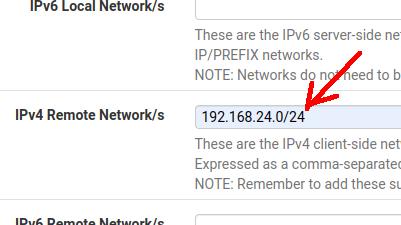
Now let’s look for the “IPv4 Remote Network/s” field and let’s enter the LAN subnet of our client VPN site.
In our case the LAN subnet of our VPN client is 192.168.24.0/24.
After that, let’s click SAVE.
Creating the rule on the Server Firewall
Now let’s create the firewall rule to allow our VPN connection.
For this, we will click on the Firewall menu and then we will select Rules -> WAN. After that we will click on Add to add a new rule.
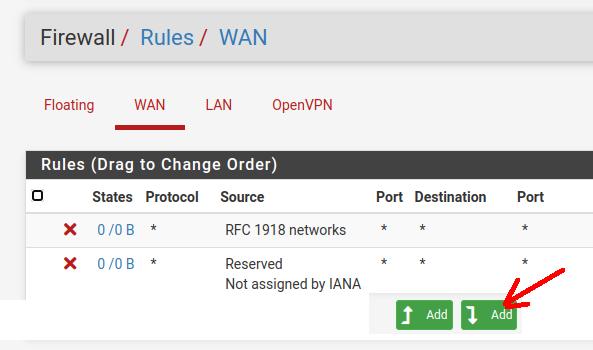
Now let’s comment on the rules that we are going to insert into the firewall.
Let’s use the options below.
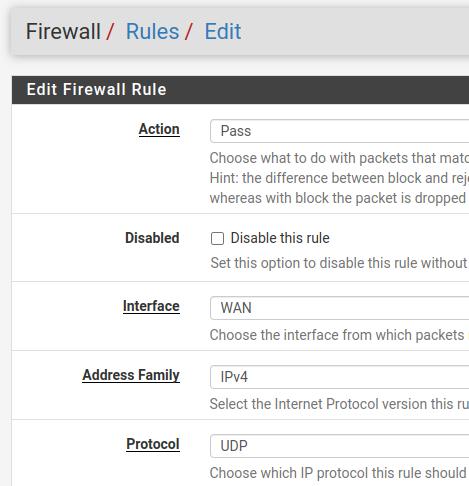
Action = Pass. To allow traffic to pass.
Interface = WAN. Let’s configure the rule for the WAN interface as this interface will receive VPN traffic.
Address Family= IPv4. We will use IPv4 in this configuration.
Protocol = UDP. Our VPN will use the UDP protocol.
The fields in the figure below refer to the origin and destination of the rule and will be described below.
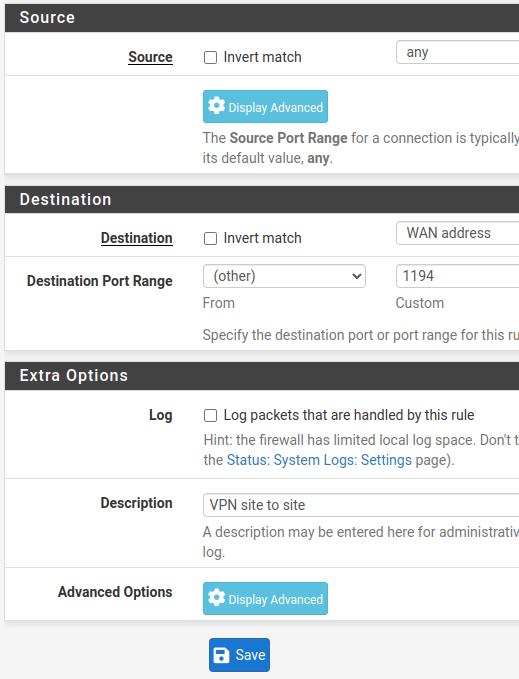
Source = any. In this case we are accepting traffic from any IPv4 when selecting “any”. It is worth noting that a security measure would be to identify the VPN Site Client’s IP and enter that IP here in this field.
Destination = WAN address. In this case we will leave the destination as the address of the WAN interface of the OpenVPN server.
Destination Port Range = 1194. Here we will use the default port of our OpenVPN server.
Description = VPN site to site. Here we will put a name to facilitate the identification of the rule.
Now we will click on SAVE and then on Apply Changes so that the settings are carried out.

Creating the tunnel rule on the VPN Server
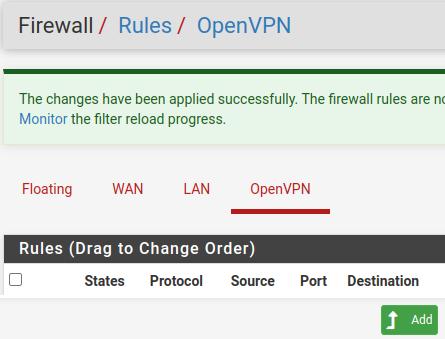
Now, still inside the Firewall->rules menu, let’s click on the OpenVPN option and click on ADD to add a new rule for the OpenVPN tunnel.

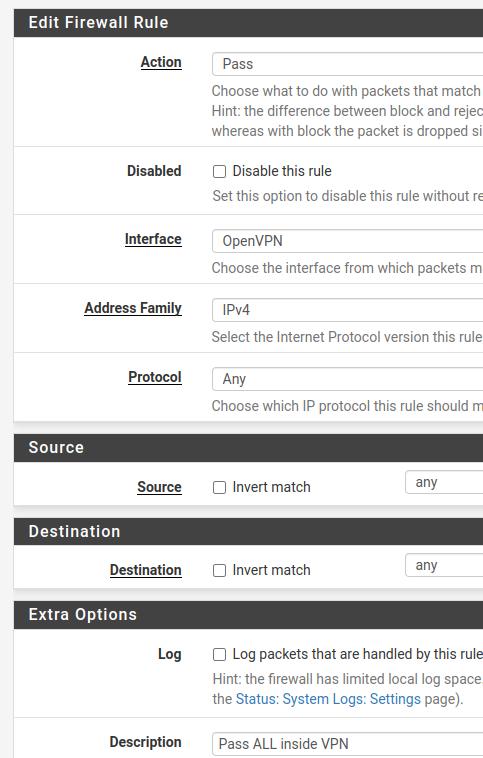
Now let’s describe the fields that we will use in the figure below.
Action= Pass. Allow traffic.
Interface = OpenVPN.
Address Family = IPv4. Let’s allow IPv4 traffic inside the VPN. However, you can enable IPv4+IPv6 traffic here as well.
Protocol = Any. We will allow any protocol within the VPN.
Source = Any.
Destination = Any.
Note. We can limit the subnets that will be accessed with the VPN by describing them in the Source and Destination fields. In this way, we can limit more to increase security.

Now we will click on SAVE and then on Apply Changes so that the settings are carried out.

Configuring OpenVPN on the other side (Client site)
Let’s perform the OpenVPN client-side settings. That is, let’s configure pfSense on the site-to-site client side of our VPN.
Importing Certificates
Now, let’s import the certificates that we had previously exported to the client when we were configuring the OpenVPN server.
Let’s click on System > Cert Manager and then let’s choose the CAs tab.

Then, in the “CAs” tab, we will click on “Add” to be able to add a new Certificate Authority.
Next, let’s start filling in the fields in the figure below and explain what we should enter in each field.
Now let’s name the VPN server’s CA and import the Certificate Authority.
Descriptive Name = VPN_Server_CA. Here we are just giving a name to the certificate authority.
Method = Import an existing Certificate Authority. Here we are going to use that file that we exported from our VPN server’s certificate authority.
Certificate Data= Here we are going to open the CA file of our VPN server and then we are going to select all the text and then we are going to paste it here.
The figure below shows the moment we selected the text from the VPN server CA file.
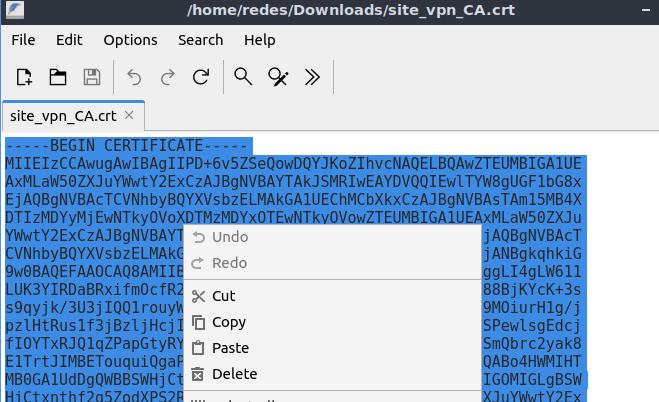
Below we are pasting the copied text into the “Certificate data” field.
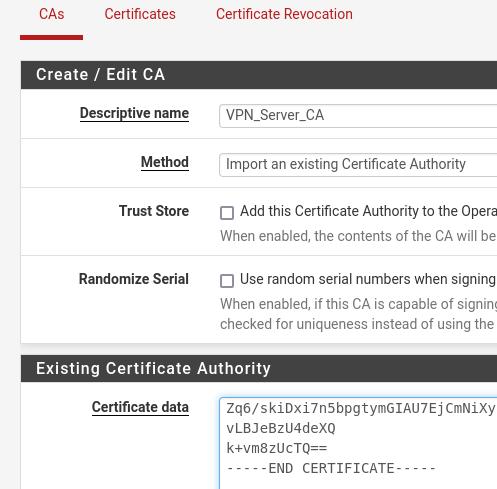
Then let’s click SAVE.
Adding Client certificate
Now let’s configure the size of the client certificate. For this, we will click on System > Cert Manager and then click on the Certificates tab.
Next, let’s click ADD to create a new certificate.
Now let’s fill in the fields with the information below.
Method=Import an existing Certificate. That’s because we are going to use the VPN client certificate that we had exported from the VPN server there.
Descriptive Name= Client_VPN_Cert. Just a name to describe the client certificate.
Certificate Type =X.509 (PEM) . The type of the certificate.
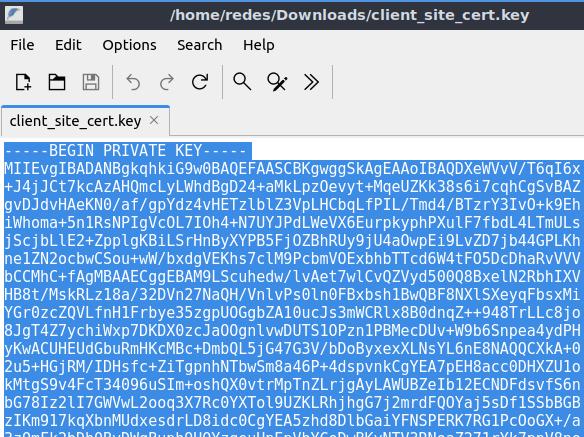
Certificate Data= Here we will open the client certificate file in some editor and we will copy all the content and paste it here in this field.
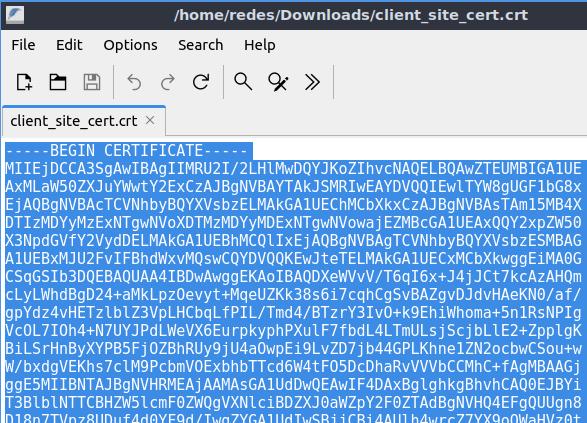
Private Key Data= Here we will open the client’s private key certificate file in some editor and we will copy all the content and paste it here in this field.
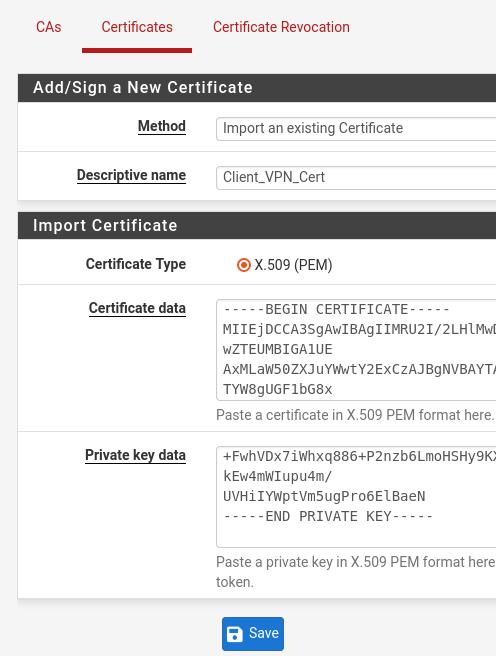
Then let’s click SAVE.
Creating the VPN Client Site
Let’s configure the OpenVPN client part. For this, we will click on VPN > OpenVPN and then click on the Client tab.
Next, let’s click Add to create our new client.
Now let’s describe the fields that will be used.
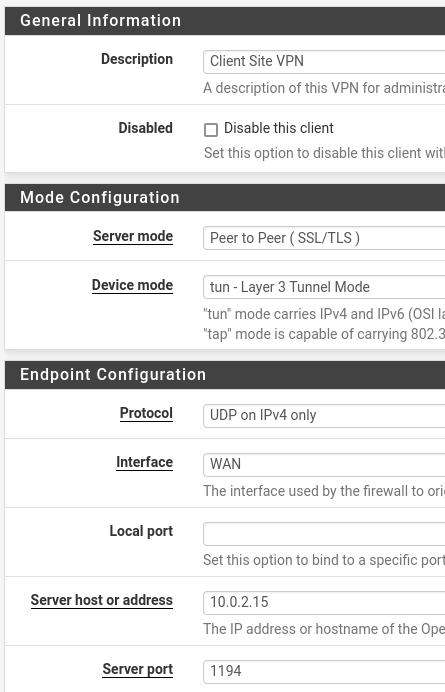
Description= VPN site client. Just the description of our VPN client.
Server Mode = Peer to Peer (SSL/TLS). We should use this mode as we use the same on the server side.
Device mode= tun. We are going to use the “tun-Layer 3 Tunnel Mode” to allow Layer 3 (IP) traffic inside our VPN.
Protocol =UDP on IPv4 only. Let’s use the same one we use on the server.
Interface= WAN. This is because we will use the WAN to connect with the OpenVPN server.
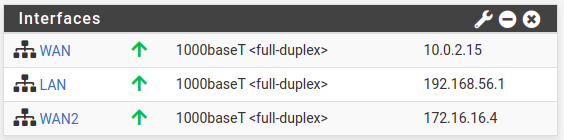
Server host or address = The IP of the WAN interface of the OpenVPN server. In our case the IP will be 10.0.2.15. In a real environment this IP will be the public IP of the OpenVPN server.
Server Port=1194. The same port we use on the server.
Enable authentication of TLS packets = Let’s check (Checked).
Automatically generate a shared TLS authentication key = Let’s uncheck this option (Unchecked).
TLS Key = Here we will paste the contents of the file where we copied the TLS Key from the VPN server.
In our case, we created the TLS_KEY_Server.txt file into which we copied the TLS Key of the VPN server.
Peer Certificate Authority= This will be the CA we import from the VPN Server.
Client Certificate= Here will be the client certificate that we imported at the beginning of the configuration.
Creating the OpenVPN tunnel
Now, still inside the Firewall->rules menu, let’s click on the OpenVPN option and click on ADD to add a new rule for the OpenVPN tunnel.
Now let’s describe the fields that we will use in the figure below.
Action= Pass. Allow traffic.
Interface = OpenVPN.
Address Family = IPv4. Let’s allow IPv4 traffic inside the VPN. However, you can enable IPv4+IPv6 traffic here as well.
Protocol = Any. We will allow any protocol within the VPN.
Source = Any.
Destination= Any.
Note. We can limit the subnets that will be accessed with the VPN by describing them in the Source and Destination fields. In this way, we can limit more to increase security.
Now we will click on SAVE and then on Apply Changes so that the settings are carried out.

Testing VPN
We can check in the Site VPN client by accessing the Status->OpenVPN menu.
If your VPN status is not yet UP. You can click on the “Restart OpenVPN Service” icon as pointed by the arrow in the picture below.
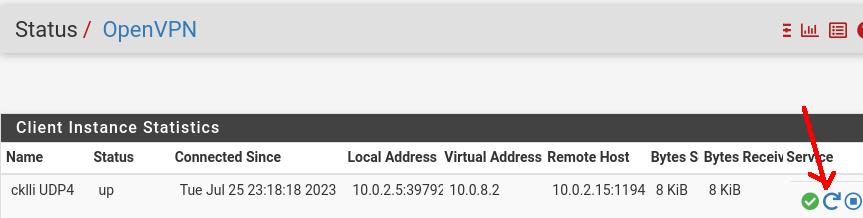
You can now ping a client on one side of the VPN for example from the 192.168.56.0/24 network to the 192.168.24.0/24 network.
To see the practice see the Video in the link below.

Juliana Mascarenhas
Data Scientist and Master in Computer Modeling by LNCC.
Computer Engineer
References:
https://docs.netgate.com/pfsense/en/latest /recipes/openvpn-s2s-tls.html
https://docs.netgate.com/pfsense/en/latest/recipes /index.html#openvpn
Tutorial: Using Port Forwarding in Packet Tracer
Tutorial: Web Server in Packet Tracer (Client-Server)

Email Server & Webmail Setup: Postfix, Dovecot, SnappyMail
Install Ubuntu Server 26 on VirtualBox (Step-by-Step)

How to Configure NAT in Packet Tracer (Step-by-Step)