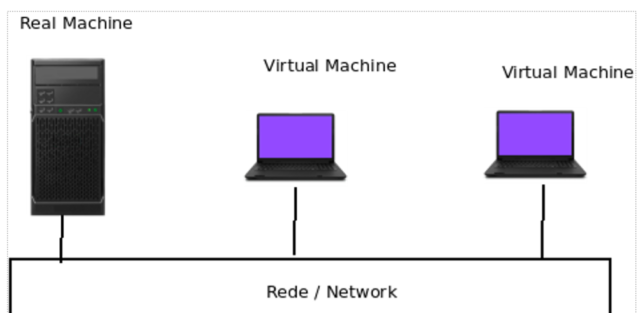
We present a tutorial on how to install pfSense on VirtualBox. The goal of this tutorial is to teach you how to create a pfSense virtual machine that can be accessed using the user’s real machine.
Acquiring the pfSense Image
To download pfSense, we will access the pfSense website and then go to the Downloads section.
https://www.pfsense.org/download/
After that, we will choose the latest version of pfSense.

Next, we will be directed to a page to choose the type of image. In this case, we will select the image type “AMD64 ISO IMPI/Virtual Machines“.

Now we will click on “ENTER CART”. It is worth noting that the subtotal should be 0.


Now, let’s create an account. If you already have one, you will just need to log in.

After creating the account, let’s click on “CART” as shown in the figure below.

Then, we will click on “Complete order“.

Now the file we want to download will appear. To do this, let’s click on “Download Now“.

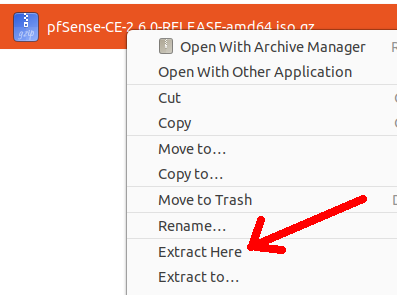
Once the download is complete, we can extract the file that came compressed in “.gz”.
We can extract via graphical interface as shown in the figure below.
Or we can extract via terminal using the gzip command.
To do this, we will go to the directory where we downloaded the pfSense image and execute the command below to decompress the file ending with “.gz”.
gzip -d netgate* 
After decompression, we will see the pfSense image extracted with the “.iso” extension.

Creating the Virtual Machine in VirtualBox
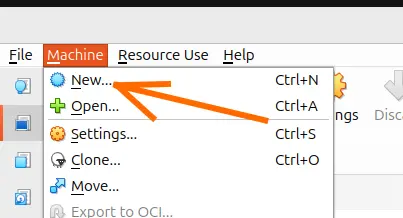
Now, let’s open VirtualBox, click on the “Machine” tab, and select the “New” option to create a new virtual machine.

Then, let’s name our virtual machine. In this case, we are naming it “my_pfsense”.

In the “ISO Image” section, we will select the image we unzipped “iso”. After that, we will select “Type = BSD” and “Version = FreeBSD 64 bit”.
- Name: Name of your virtual machine. In our example, we are using the name “my_pfsense”.
- Folder: The directory where we will store the pfSense virtual machine. ISO Image: We will select the pfSense “.
- ISO” image file that we downloaded and unzipped.
- Type: This will be the type of operating system. In our case, it is BSD.
- Version: Linux version, in this case we are using FreeBSD (64 bit).
Hardware
Now let’s click on “Hardware” and enter the information below.

- Base Memory: The minimum amount of RAM that will be allocated to the virtual machine. In this case, “1500 MB” is enough for our purposes. Remember that you can increase it according to your needs.
- Processors: The number of virtual processor cores allocated to our pfSense virtual machine. In this case, we will only use “1” core, but you can increase it according to your needs and the capacity of the host hardware.
Hard Disk
Now we will choose the size of the virtual disk. In the configuration mode we are setting up, the maximum disk size will be 16 GB.

However, this is only the maximum size and it will only be used if you install multiple applications or insert enough data to occupy this space.
We will use the VDI (Virtual Disk Image) type for our machine in VirtualBox.
After making the configurations, we will click on “Finish”.
Next, we will see a summary screen of our virtual machine configurations.

In this case, we will click on “Finish” to complete this phase of creating the virtual machine.
Creating a host-only interface in VirtualBox
We will create a “host-only” network in VirtualBox. The reason for creating this network is to allow your real machine to access the pfSense LAN interface.
Note: Creating a “host-only” network is optional, as the user could use the VirtualBox bridge network mode and access the pfSense LAN on your internal network.
However, we believe that using the “host-only” network is the most recommended for this learning scenario.
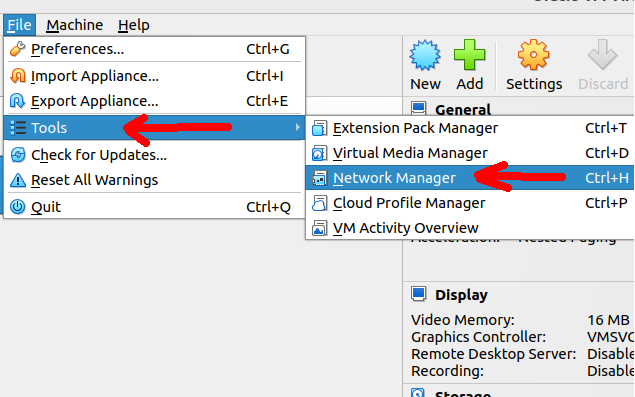
Next, we will click on “Create” to create a “Host-only” network.
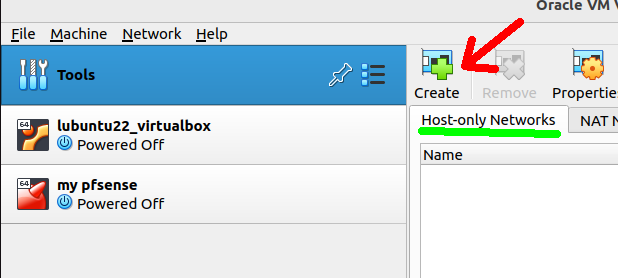
By default, VirtualBox will create a network called “vboxnet0” and this network will be in the range “192.168.56.0/24”.

Adding pfSense networks in VirtualBox
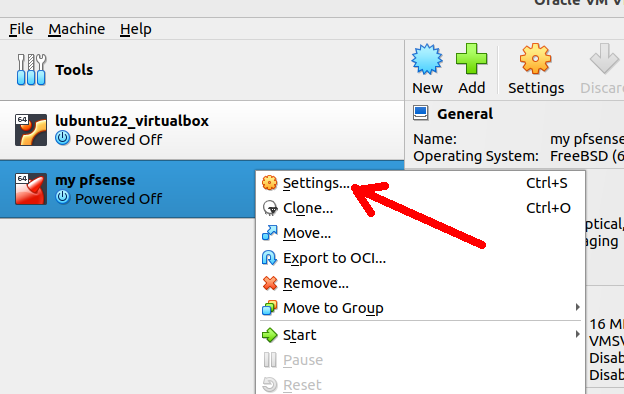
Now, we can see that a virtual machine has been created with the name we gave earlier “my pfsense”.
We will right-click on our virtual machine and select Settings.
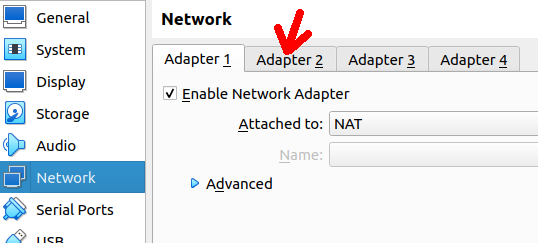
In “Adapter 1” we will leave the network adapter configuration as NAT.
Next, we will click on “Adapter 2”.
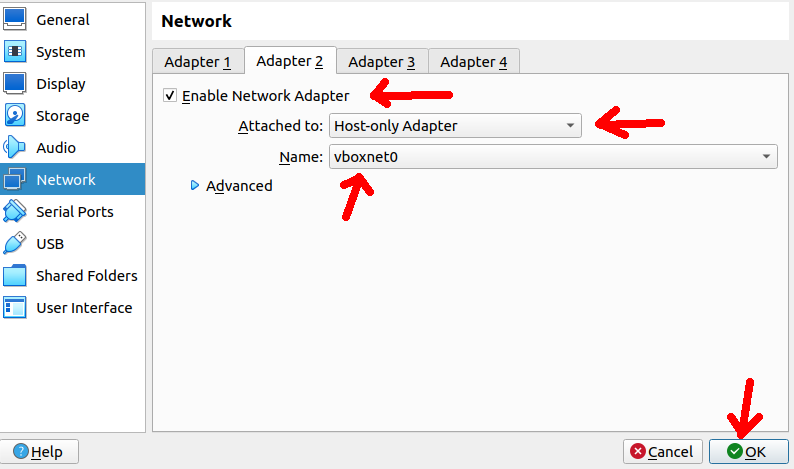
In “Adapter 2” we will select “Enable Network Adapter” and in “Attached to” we will select the “Host-only Adapter” option with the “Name” containing the name of our host-only network (vboxnet0).
After that, we will click on OK.
Initializing pfSense on the virtual machine
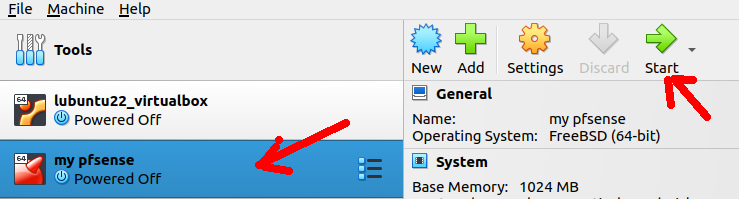
Now, we will select our virtual machine and click on Start, or we can double-click on our virtual machine to start it.
After agreeing to the terms, we will have the screen below where we will select “Install”.

Now we will choose the pfSense WAN interface. In this case, we will choose the first “em0” as this will be the interface we have already configured as NAT in our VirtualBox.

Next, we will select “Continue” and press “ENTER” to proceed with the installation.

Now the system will ask you which interface will be used for the LAN. In this case, we will use em1 which is set to “host-only” in our VirtualBox.

Now we will continue with the installation. Notice that the LAN IP in the figure below is different from the network we are using for “host-only” in VirtualBox.
In this case, I prefer to change this IP after the installation phase. So, we’ll leave it with the default IP that was already chosen by pfSense.

Now we will select the interface that will be used for configuration. In this case, we will select LAN because we want the pfSense configuration to be done through LAN.

After that, we will choose the type of pfSense we are going to install. In this tutorial, we are doing a pfSense CE installation from the community edition. So we will select “Install CE“

Next, we will select “Continue” to proceed with the installation.

Now we will enter the ZFS configuration. In this case, we are not using redundancy, so we will select the first option “Stripe – No Redundancy“

Next, we will select the disk that will be used for the installation. Remember that this disk is the virtual disk we will use in VirtualBox.

Now comes the question of whether we want to destroy the data on disk ada0. In this configuration, I don’t need this disk, so I can destroy it.

After that comes the step of selecting the version of pfSense CE. My suggestion is that you always choose the newest version and of the “Stable” type.

As soon as you press ENTER to select the version of pfSense CE, you will see that pfSense will start updating the repositories and downloading updates.

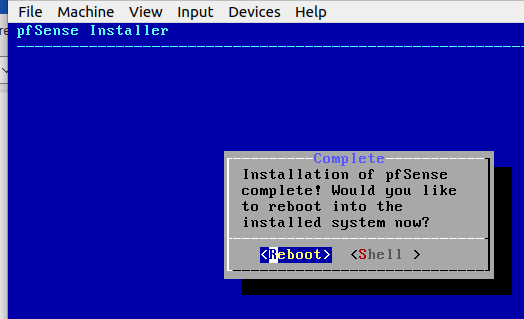
After the installations are done, we will press “ENTER”.

Before rebooting, let’s remove the pfSense installation media. To do this, go to the disc icon shown in the figure below and then click on “Remove disk from virtual drive“.
This disc icon is located at the bottom corner of the VirtualBox window.

Next, click on “Force Unmount” to ensure that the installation media is removed.
This process is important to avoid your pfSense getting stuck in a loop returning to the installation menu.

Now you can restart your pfSense virtual machine or perform the reboot. I prefer to shut down the virtual machine and start it again.
After the virtual machine has started, we will see a screen similar to the one below.
However, we can see that the LAN IP is different from the network we chose for our VirtualBox LAN, which is in “host-only” mode.

Changing the LAN IP of pfSense
We will change the LAN IP to be compatible with the host-only IP of VirtualBox.
In this way, we will be able to use the VirtualBox host-only network to access the WEB interface of our pfSense.
To change the LAN IP, we will type the number 2 + “ENTER”. Option 2 allows you to change the IPs of the interfaces “Set interfaces IP address“.
Then, we will type 2 again and press “ENTER” to select the LAN interface.
Next, for the question about obtaining IP on the LAN interface using DHCP, we will answer no = n.

Now we will assign an IP to the LAN interface within the IP range of our host-only network.
In this case, we are entering the IP 192.168.56.2 for the LAN interface and the mask 24.
Now press Enter for the question about the LAN IPv4 upstream gateway. This is because we will use the default configuration.

Next, we will decide if we want to use IPv6 on the LAN interface. In this case, we don’t want to, so we will type “n” and then press ENTER when asked what the IPv6 address would be.
After that, the question comes up whether we want to use DHCP on the LAN. In this case, we do, so we will answer with “y” and then enter the start of the network given by DHCP (192.168.56.100) and then the maximum (192.168.56.200).
Next, there’s a question about whether we want to revert the WEB configuration interface to HTTP. In this case, we will answer “n“.

After that, we will press ENTER.
We can now see that the LAN interface has the IP 192.168.56.2.

Accessing the pfSense WEB Interface
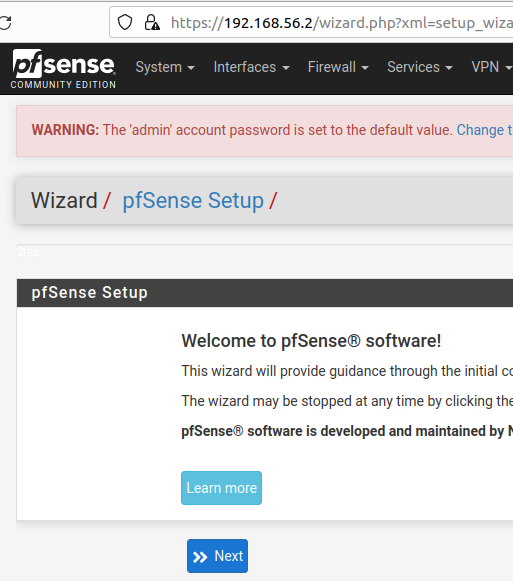
Now we will use the IP of our LAN to access the pfSense WEB interface. To do this, we will open a browser and type 192.168.56.2

After that, we will enter the username = admin and the password = pfsense.

And finally, we enter the pfSense configuration page. Now we can follow the setup Wizard or select the option we want from the top menu.

Or, if you prefer, you can use the “Wizard” configuration to set up the basics of pfSense.
Unblocking Access to Private IPs on the pfSense WAN
The last step is to unblock access from the WAN interface to private IPs. We do this unblocking because we are using VirtualBox with the interface in NAT mode for our pfSense WAN.
Ok Juliana, I still don’t understand. We need to unblock access to private IPs because VirtualBox will assign a private IP to your pfSense WAN interface if you are using VirtualBox’s NAT mode.
To unblock access to private IPs on the WAN, we will click on “Interfaces“.

Then, we will scroll to the bottom of the page and uncheck the option “Block private networks and loopback addresses“. Next, click on “Save“.

Then click “Apply Changes” to apply the changes we made regarding private IP blocking.

Now, I suggest shutting down the pfSense virtual machine and starting it again before continuing to use your pfSense.
We have now completed the installation of pfSense on VirtualBox.

Juliana Mascarenhas
Data Scientist and Master in Computer Modeling by LNCC.
Computer Engineer
See more:
Access Internet through site to site VPN
OpenVPN and PfSense Site to Site
Install and Configure OpenVPN Server on PfSense
Configure Load Balance with PfSense
Tutorial: Using Port Forwarding in Packet Tracer
Tutorial: Web Server in Packet Tracer (Client-Server)

Email Server & Webmail Setup: Postfix, Dovecot, SnappyMail
Install Ubuntu Server 26 on VirtualBox (Step-by-Step)

How to Configure NAT in Packet Tracer (Step-by-Step)