In this article, we will cover the installation and configuration of the Squid proxy server. Squid has been used by most private and public companies.
Thus, part of this popularization of Squid is related to the operational security of the tool and its flexibility.
In addition, this flexibility of Squid allows for an extensive range of access control.
Squid can operate on different operating systems, such as: Linux, Windows, BSD. In this tutorial, we will install it on Linux Ubuntu.
A very interesting point about Squid is its ability to use the GNU GPL license. This way, developers feel attracted to use the tool and contribute changes.
Analogously, it is worth highlighting that many service providers have also used Squid among their clients and servers.
Topics that will be covered in this post:
1) Squid Installation
We are going to do a practical presentation where we install Squid and do the initial configuration.
Windows users can obtain the tool by accessing the Squid website:www .squid-cache.org/. For Linux users, installation can be done using the repositories:
sudo apt-get install squid
After installation, we will check that Squid is running satisfactorily. To do this, we will use the following command:
sudo service squid status
To exit the screen above, we can use the key combination “Ctrl + c“.
2) Squid Configuration
After installation, we will begin the configuration phase.
To do this, we will access the directory “/etc/squid/“.
cd /etc/squid 
Next, we will create a copy of the original “squid.conf” configuration file. Let’s name the copy “squid.conf.backup“.
sudo cp squid.conf squid.conf.backupNow, let’s edit the file “squid.conf” and delete all lines from that file.
The reason we are deleting lines from the file is so that the reader can identify each part of the configuration in a segmented way.
sudo nano squid.conf
Note. It is possible to edit specific lines of the file as the reader acquires greater knowledge of the tool.
After deleting all lines from the “squid.conf” file, we will add lines that represent access ACLs.
Later, we will add the text below to the “squid.conf” file. Soon after, we will explain the meanings of the lines.
acl SSL_ports port 443 # https
acl Safe_ports port 80 # http
acl Safe_ports port 21 # ftp
acl Safe_ports port 443 # https
acl CONNECT method CONNECT

http_access deny !Safe_ports

http_access deny CONNECT !SSL_ports

http_port 3128

acl Minha_Rede src 192.168.10.0/24

http_access allow Minha_Rede

http_access deny all
Creating ACLs for Squid
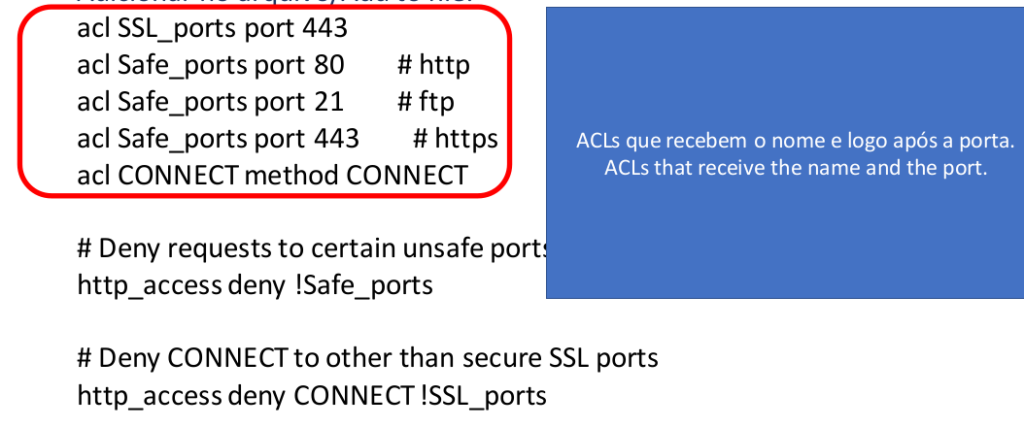
We present below the figure with the description of ACLs that receive the name and right after the port.
Initially, we are creating “acl” with the name “SSL_ports” receiving the port value 443.
Then, we will create “acl” with the name “Safe_ports” receiving the port value 80,21 and 443.

Blocking HTTP access to other ports
Now, let’s talk about the rule that blocks HTTP for ports that are not “Safe_ports”.
“http_access deny !Safe_ports”

- “http_access” = access using the HTTP protocol.
- “deny” = denies or blocks.
- “!Safe_ports” = “!” indicates no and then comes the name of the ACL “Safe_ports“. Therefore, we are denying access to http for ports that are not in the “Safe_ports” ACL.
This part Denies (deny) http access (http_access) to ports that are not (!) Safe_ports.
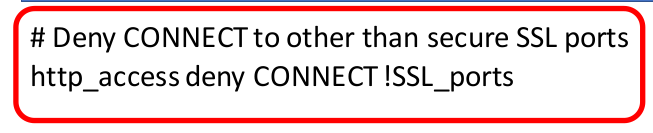
Deny connection to other ports
This part denies (deny) connection to ports that are not (!) SSL_ports.

Choosing the port Squid listens to
Later, we will specify the port that Squid will listen on. So, when a client wants to access a WEB server, it will send it to the Squid port.
Soon after, Squid will make the WEB request to the server.
In our case, we are using port 3128 TCP for Squid to listen and wait for client connections.


Filtering the source network in Squid
After that, we will create an ACL that states that the source network “src” will be “192.168.10.0/24”. We will name this ACL “Minha_Rede“.

In addition, this source network “Minha_Rede” will have permission (ALLOW) to access http traffic “http_access“. You you can change it to your internal network that you use with client machines.


Blocking everything that was not allowed in Squid
Soon after, we introduced a lockdown for everything else. This way, all traffic (ALL) that does not meet the initial ACLs will be blocked (DENY) = “ http access deny all“.


Restarting Squid
Next, we will restart Squid for the settings to take effect. Later, we will check the Squid status. After that, test the client’s internet connection.
sudo service squid restart
sudo service squid status
“Clear browser cache”
Also, if you have errors, we can check the syslog. So, for this we can use the command below:
sudo cat /var/log/syslog | grep squidTesting Squid Proxy
Now, let’s configure the client’s network and browser to point to the proxy.
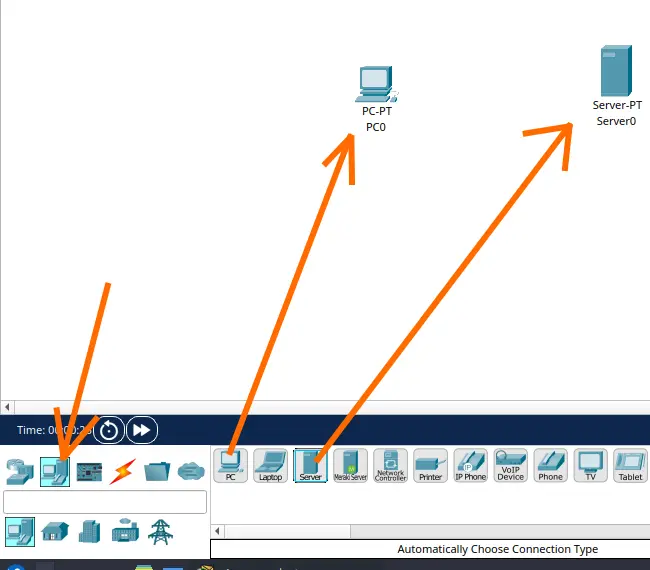
In our case, we are using a scenario like the one described below.

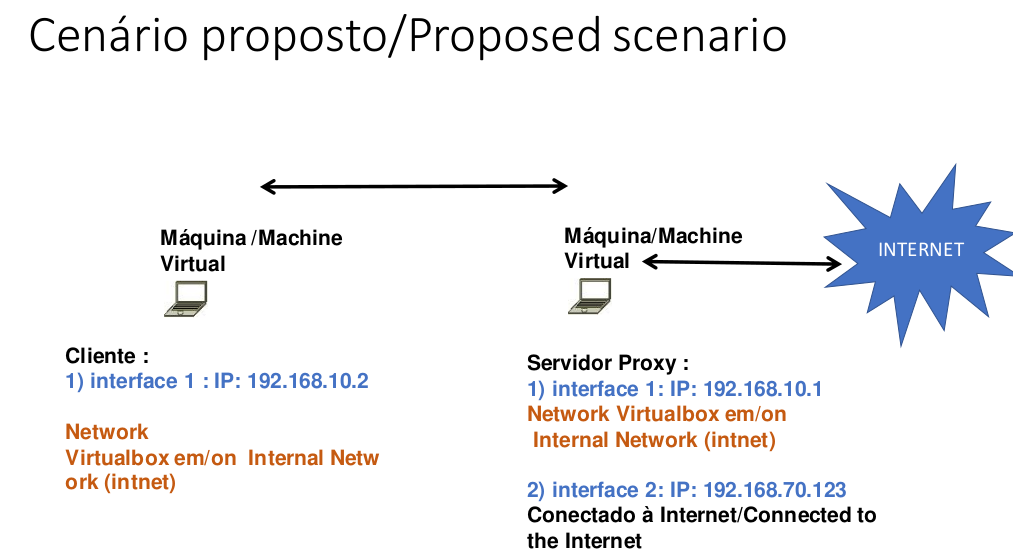
Alternatively, I will suggest a scenario using VirtualBox in the figure below.

We can see that we are using the network “192.168.10.0/24” in the LAN of our scenario.
The Squid proxy will have two interfaces.
- Internet connection interface: receiving IP via NAT or an IP within your network that accesses the Internet.
- LAN interfacewith IP “192.168.10.1”. This interface will be connected to the client machine’s network. In our case, this network is “192.168.10.0/24”.
The client will have an interface.
- LAN Interface with IP “192.168.10.2”. This interface will be connected to the Squid LAN interface. In our case, this network is “192.168.10.0/24”.
Configuring the client browser:
The client browser must point its proxy configuration to the Squid LAN interface IP and use the Squid proxy port.
To do this, let’s access the client machine’s browser and look for the browser’s proxy configuration.
In our case, Squid’s LAN interface is “192.168.10.1” and the port used is “3128“.

In the figure above, we have the Firefox browser configuration pointing to the Squid proxy IP.
Now try to access the Internet using the client.
Testing Squid ACLs
We will go through some tasks so that you can test the effectiveness of the ACLs configured.
Remember that after each change the Squid server must be restarted (sudo service squid restart).
Task 1: Changing the http and https ports
- Change port 443 and 80 in Squid.conf and try to access the internet with the client. For example, I will change port 443 to 555 and port 80 to 55.
acl SSL_ports port 555 # https
acl Safe_ports port 55 # http
acl Safe_ports port 21 # ftp
acl Safe_ports port 555 # https
acl CONNECT method CONNECT
...
Let’s restart Squid and then clear the browser cache.
sudo service squid restart
sudo service squid status
“Clear browser cache”
Now, let’s try to access the Internet with a client.
We can see that we cannot access the internet. This occurred because we removed ports 80 and 443 from the “Safe_ports” and “SSL_ports” ACLs.
These ports are used by web page protocols and have been swapped in our Squid.
After testing, we will return to the previous configuration.
acl SSL_ports port 443 # https
acl Safe_ports port 80 # http
acl Safe_ports port 21 # ftp
acl Safe_ports port 443 # https
acl CONNECT method CONNECT
...
Let’s restart Squid and then clear the browser cache.
sudo service squid restart
sudo service squid status
Task 2: Changing the originating network
Now let’s change our source network to a network we are not using.
- Modify the network “192.168.10.0/24” (or your network) in Squid.conf and try to browse with the client. For example, I’ll change it to a network I’m not using: “192.168.200.0/24”.
...
acl My_Network src 192.168.200.0/24
...
Let’s restart Squid and then clear the browser cache.
sudo service squid restart
sudo service squid status
“Clear browser cache”
Now, let’s try to access the Internet with a client.
We can see that we cannot access the Internet. This occurred because we modified the network that was allowed access and removed our internal network.
Consequently, the client will not be able to access the Internet because it is using a different network than the network we changed.
After testing, we will return to the previous configuration.
...
acl My_Network src 192.168.10.0/24
...
Let’s restart Squid and then clear the browser cache.
sudo service squid restart
sudo service squid status
3) Time-based configuration
Now, let’s start configuring Squid based on time. So, the idea is to use an ACL that works at a specific time.
In addition, it is important to show the table of abbreviations that Squid uses for time-based ACLs:
"acl aclname time [day-abbrevs] [h1:m1 -h2:m2]
day-abbrevs:
S - Sunday
M - Monday
T - Tuesday
W - Wednesday
H - Thursday
F - Friday
A - Saturday
h1:m1 must be less than h2:m2"
Next, we’ll configure Squid to only allow customers access at a specific time during certain days of the week.
Okay, again let’s edit our file “/etc/squid/squid.conf“. To do this, we will use the command below.
sudo nano /etc/squid/squid.confIn this case, we will choose the days “Sunday, Monday, Tuesday, Wednesday, Thursday, Friday, Saturday” equivalent to (Sunday, Monday, Tuesday, Wednesday, Thursday, Friday, Saturday). Additionally, we will choose a specific time (10:00-18:00).
Like this , notice that now the access permission “http_access allow Minha_Rede” receives the ACL “Mytime” .
So, this indicates that access will only be allowed during these days and at the specific time.

acl SSL_ports port 443 #
acl Safe_ports port 80 # http
acl Safe_ports port 21 # ftp
acl Safe_ports port 443 # https
acl CONNECT method CONNECT
http_access deny !Safe_ports
http_access deny CONNECT !SSL_ports
http_port 3128
acl My_Network src 192.168.10.0/24

acl Mytime time S M T W T F 10:00-18:00
http_access allow Minha_Rede Mytime

http_access deny all
Now, let’s describe the configuration we made.
First we introduce the new configuration after the line “acl Minha_Rede src 192.168.10.0/24” and before the line “http_access deny all“.
Our configuration starts with the acl: “acl Mytime time S M T W T F 10:00-18:00“. Let’s describe the acl fields.
- “Mytime” = the name we will give our ACL to control the time.
- “time S M T W T F 10:00-18:00” = Means that our ACL will use the days “Sunday, Monday, Tuesday, Wednesday, Thursday, Friday” and will use the time between 10:00 and 18:00 hours “10:00-18:00.
Now, let’s describe the “http_access allow My_Rede Mytime” line.
- “http_access allow Minha_Rede Mytime” = let’s give HTTP access permission to our ACL “Minha_Rede“. However, we are restricting this access permission to only act during the time defined in the ACL Mytime“.
Soon after comes the rule that blocks all traffic: “http_access deny all“. In other words, we will have traffic blocked if we attempt traffic that does not exactly comply with what was allowed “allow” in the lines above.
Let’s restart Squid and then clear the browser cache.
sudo service squid restart
sudo service squid status
“Clear browser cache”
Also, if you have errors, we can check the syslog. So, for this we can use the command below:
sudo cat /var/log/syslog | grep squidTesting the timing ACL
- Now, change the “Mytime” ACL indicating a time different from the current one and check if you are able to connect to the internet. (sudo service squid restart)
4) Domain-based configuration.
Next, we will configure the Squid proxy based on the domains that we intend to restrict. To do this, we will create a file and within that file we will insert the domains that will be blocked. ;
Okay, again let’s edit our file “/etc/squid/squid.conf“. To do this, we will use the command below.
sudo nano /etc/squid/squid.confNow let’s delete the old configuration from our “/etc/squid/squid.conf” and copy the settings below and insert it into our “/etc/squid/squid.conf “.

acl SSL_ports port 443
acl Safe_ports port 80 # http
acl Safe_ports port 21 # ftp
acl Safe_ports port 443 # https
acl CONNECT method CONNECT
http_access deny !Safe_ports
http_access deny CONNECT !SSL_ports
http_port 3128
acl Minha_Rede src 192.168.10.0/24

acl Domain_block dstdomain "/etc/squid/Domain_block.txt"
http_access deny Domain_block

http_access allow Minha_Rede
http_access deny all
Now, let’s describe the configuration we made.
First we introduce the new configuration after the line “acl Minha_Rede src 192.168.10.0/24” and before the line “http_access deny all“.
Our configuration starts with the acl: “acl Domain_block dstdomain “/etc/squid/Domain_block.txt”“. Let’s describe the acl fields.
- “Domain_block” = the name we will give our ACL to block domains.
- “dstdomain” = means target domains.
- “/etc/squid/Domain_block.txt” = here we have the file where we will insert the domains we want to block.
Now, let’s describe the “http_access deny Domain_block” line.
- “http_access deny Domain_block” = let’s block “deny” HTTP access permission “http_access” for our ACL “Domain_block“.
Remember that our ACL points to the destination domains that we inserted in the file “/etc/squid/Domain_block.txt”.
Soon after comes the one that allows http access to our network: “http_access allow Minha_Rede“. Next comes the rule that blocks all traffic: “http_access deny all“.
In short, computers on our network will be able to access any domain other than the domains entered in the file “/etc/squid/Domain_block.txt”..
Next, we will create the file where we will insert the domains. In this case, the file will be: ”Domain_block.txt” located within “/etc/squid/“.
So, let’s insert the domains into the file. To do this, we will use the command below.
sudo nano /etc/squid/Domain_block.txt
Then enter the domains below. It is important to insert the “.” before each domain.

.youtube.com
.facebook.com
Let’s restart Squid and then clear the browser cache.
sudo service squid restart
sudo service squid status
“Clear the client’s browser cache”
Also, if you have errors, we can check the syslog. So, for this we can use the command below:
sudo cat /var/log/syslog | grep squidTesting the “Domain_block” ACL
Now, let’s test whether the client machine can access the domains you have blocked.


5) Configuration based on URLs/words.
Next, we will restrict WEB pages based on the words in the URL. This way, when you need to block a URL, you can use a word from the URL.
Note. It is worth mentioning that this configuration here does not apply to HTTPS. So, for HTTPS we can use the domains blocking configuration.
Okay, again let’s edit our file “/etc/squid/squid.conf“. To do this, we will use the command below.
sudo nano /etc/squid/squid.confNow let’s delete the old configuration from our “/etc/squid/squid.conf” and copy the settings below and insert it into our “/etc/squid/squid.conf “.

acl SSL_ports port 443
acl Safe_ports port 80 # http
acl Safe_ports port 21 # ftp
acl Safe_ports port 443 # https
acl CONNECT method CONNECT
http_access deny !Safe_ports
http_access deny CONNECT !SSL_ports
http_port 3128
acl Minha_Rede src 192.168.10.0/24

acl Word_block url_regex -i "/etc/squid/Word_block.txt"
http_access deny Word_block

http_access allow Minha_Rede
http_access deny all
Now, let’s describe the configuration we made.
First we introduce the new configuration after the line “acl Minha_Rede src 192.168.10.0/24” and before the line “http_access deny all“.
Our configuration starts with the acl: “acl Word_block url_regex -i “/etc/squid/Word_block.txt” “. Let’s describe the acl fields.
- “Word_block” = o name that we will give our ACL to block words in URLs.
- “url_regex” = Extended Regular Expressions in URL, will be used to check the match of a regular expression in an entire URL.
- “-i” = case insensitive.
- “/etc/squid/Word_block.txt” = here we have the file where we will insert the words we want to block if they are in a URL.
Now, let’s describe the “http_access deny Word_block” line.
- “http_access deny Word_block” = let’s block “deny” HTTP access permission “ http_access” to our ACL “Word_block” .
Remember that our ACL points to the words that we inserted in the file “/etc/squid/Word_block.txt “.
Soon after comes the one that allows http access to our network: “http_access allow Minha_Rede“. Next comes the rule that blocks all traffic: “http_access deny all“.
In short, computers on our network will be able to access any URL that does not contain the words or regular expressions entered in the file “/etc /squid/Word_block.txt“.
Next, we will create the file where we will insert the words or regular expressions. In this case, the file will be:”Word_block.txt” located inside “/etc/squid/”.
So, let’s insert the words or regular expressions into the file. To do this, we will use the command below.
sudo nano /etc/squid/< strong>Word_block.txt
Now, let’s enter the words or regular expressions below. In this case, we want to block any URL that contains ubuntu, debian or mint.

ubuntu
debian
mint
Let’s restart Squid and then clear the client’s browser cache.
sudo service squid restart
sudo service squid status
“Clear the client’s browser cache”
Also, if you have errors, we can check the syslog. So, for this we can use the command below:
sudo cat /var/log/syslog | grep squidTesting the “Word_block” ACL
Now, let’s test whether the client machine can access the words or regular expressions that you have blocked. In this case, we try to access the websites in the figure below.

Squid and SquidGuard tutorial list:
A little more theory about Squid Proxy
Consequently, when acting between client and servers, Squid allows you to manage resources and cache content.
Thus, this content cache allows for better bandwidth optimization. This is because a resource previously accessed by one user can be accessed by other users.
This way, the most frequently accessed static content can be stored in the Squid cache.
Since this content is stored in the Squid cache, request access to this content is faster and avoids consuming Internet bandwidth.
In the same way, the use of Squid also allows the use of cache servers in a hierarchical manner.
So, this use of cache servers in a hierarchical manner enables optimization of network resources.
Likewise, the distributed use of Squid allows its use by websites. In addition, squid can be used at the other end, this is reducing resource consumption server-side.
In addition, according to Wikimedia Deployment Information, Squid can quadruple the capacity of WEB servers that are positioned after Squid.
So, since access to the content is stored in the Squid cache, part of the requests do not reach the WEB server.
This allows the WEB server to respond to a greater number of requests. Squid Proxy Installation and Configuration.
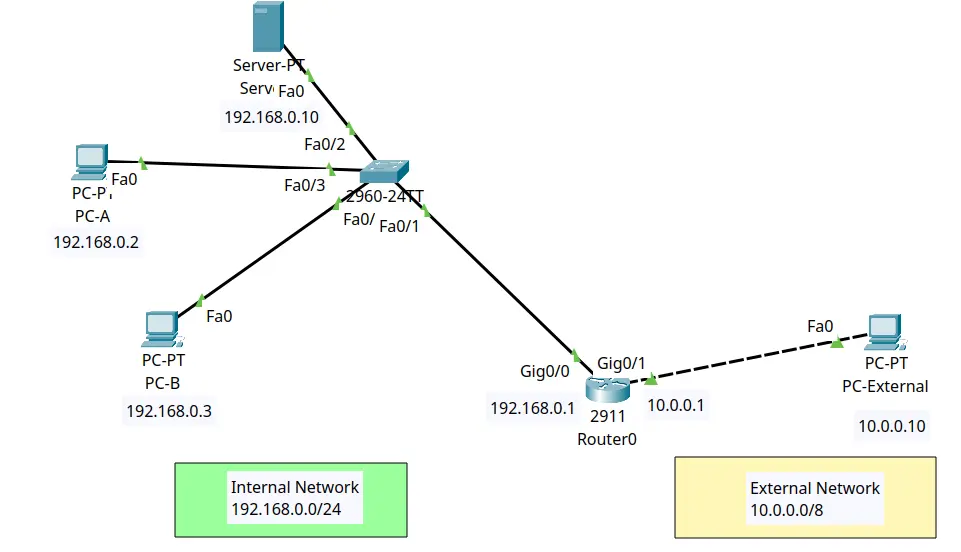
Scenario used for testing:
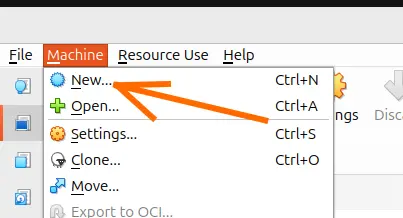
Configuring the client machine in VirtualBox:
Below we have the Virtualized network configuration of the client machine using VirtualBox. In this case we will use the network in “Internal Network” mode with the name “intnet”.

Configuring the Squid machine in VirtualBox:
Configuring the LAN interface of the virtual machine where the squid proxy is located in virtualbox. In this case, as we are using VirtualBox, we will use the network in “Internal Network” mode on the first interface.
Below, we have configured the WAN interface of the Squid proxy virtual machine. In this case, as we are using VirtualBox, we will use the network in NAT mode on the second interface.


Juliana Mascarenhas
Data Scientist and Master in Computer Modeling by LNCC.
Computer Engineer
In addition to this Squid Proxy Installation and Configuration post, see also:
SquidGuard: how to import blocklist?
SquidGuard : Installation and Configuration
Proxy Squid: User Authentication
Squid Proxy: Filter clients by IP and MAC
Squid Proxy for Linux Installation and Configuration
Tutorial: Using Port Forwarding in Packet Tracer
Tutorial: Web Server in Packet Tracer (Client-Server)

Email Server & Webmail Setup: Postfix, Dovecot, SnappyMail
Install Ubuntu Server 26 on VirtualBox (Step-by-Step)

How to Configure NAT in Packet Tracer (Step-by-Step)