We present Squid proxy rules to filter access from network clients with based on MAC and IP.
In this tutorial, we can use rules to block certain clients by address or filter content access.
In addition, we will take advantage of the configuration used in the post:Squid Proxy Installation and Configuration.
In this article, we will only focus on the settings listed below:
- 1) Rule based on client IP
- 2) Rule based on client MAC
- 3) Rule filtering domains by client MACs
Configuration used in Squid
Let’s use the same initial configuration file (squid.conf) that we used in the post: Squid Proxy Installation and Configuration.
The basic configuration can be seen below and if you want to understand better you can go to the post Squid Proxy Installation and Configuration.
acl SSL_ports port 443 # https
acl Safe_ports port 80 # http
acl Safe_ports port 21 # ftp
acl Safe_ports port 443 # https
acl CONNECT method CONNECT

http_access deny !Safe_ports

http_access deny CONNECT !SSL_ports

http_port 3128

acl Minha_Rede src 192.168.10.0/24

http_access allow Minha_Rede

http_access deny all
1) Rule based on client IP
In this case we will create a block list of IPs of the clients we want to block. Below we have the file “/etc/squid/squid.conf” changed to check the list of blocked IPs in a file “/etc/squid/SRC_IP.txt” :
acl Safe_ports port 80 # http
acl Safe_ports port 21 # ftp
acl Safe_ports port 443 # https
acl CONNECT method CONNECT

http_access deny !Safe_ports

http_access deny CONNECT !SSL_ports

http_port 3128
########################
acl SRC_IP src "/etc/squid/SRC_IP.txt"
http_access deny SRC_IP
#########################
acl Minha_Rede src 192.168.10.0/24

http_access allow Minha_Rede

http_access deny all
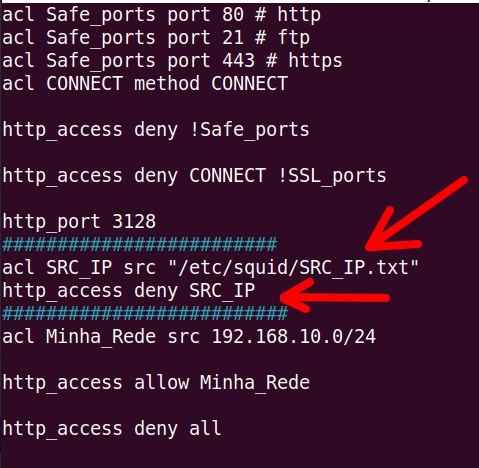
- ” acl SRC_IP src “/etc/squid/SRC_IP.txt” “ = Here, we have the ACL (SRC_IP) using the source IPs designated by the acronym (src). Therefore, the IPs that will be blocked are stored in the file ( “/etc/squid/SRC_IP.txt”).
- “http_access deny SRC_IP” = Then we use “http_access deny” to block http access the ACL “SRC_IP”.
To change the file “/etc/squid/squid.conf”, we can use the command below.
sudo nano /etc/squid/squid.conf
Now, let’s create the file “/etc/squid/SRC_IP.txt”. In this file, we will enter the IPs we want to block. To create the “SRC_IP.txt” file, we can use an editor. Using the command below.
sudo nano /etc/squid/SRC_IP.txt
Then add the IPs you want to block. Enter one IP per line. Example:
192.168.10.2192.168.10.5
Let’s restart Squid and then clear the browser cache.
sudo service squid restart
sudo service squid status
“Clear browser cache”
Now, let’s try to access the Internet with a client that has its IP on the block list.
2) Rule based on client MAC
Now let’s create a blocklist of MACs of the clients we want to block. To do this, we will insert the new rules for MAC blocking in the file “/etc/squid/squid.conf“.
acl SSL_ports port 443 # https
acl Safe_ports port 80 # http
acl Safe_ports port 21 # ftp
acl Safe_ports port 443 # https
acl CONNECT method CONNECT

http_access deny !Safe_ports

http_access deny CONNECT !SSL_ports

http_port 3128
########################
acl SRC_MAC arp "/etc/squid/SRC_MAC.txt"
http_access deny SRC_MAC
#########################
acl Minha_Rede src 192.168.10.0/24

http_access allow Minha_Rede

http_access deny all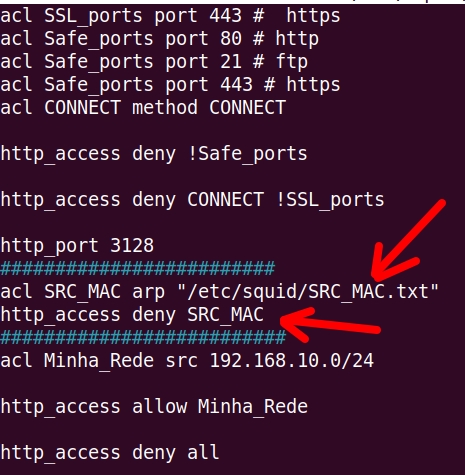
- (acl SRC_MAC arp “/etc/squid/SRC_MAC.txt”) = Here, the ACL (SRC_MAC) uses the source MACs (arp ) stored in the file ( “/etc/squid/SRC_MAC.txt”).
- (http_access deny SRC_MAC) = We then use “http_access deny” to block http access to the contained MACs in the file “/etc/squid/SRC_MAC.txt”.
To change the file “/etc/squid/squid.conf”, we can use the command below.
sudo nano /etc/squid/squid.conf
Now let’s create the file /etc/squid/SRC_MAC.txt. For this we can use an editor like nano. Let’s use the command below.
sudo nano /etc/squid/SRC_MAC.txtThen add the MACs of the computers you want to block. Place one MAC per line. As in the example below.
08:00:27:cb:e2:a008:00:27:55:11:11
Let’s restart Squid and then clear the browser cache.
sudo service squid restart
sudo service squid status
“Clear browser cache”
Now, let’s try to access the Internet with a client that has the MAC on the block list.
3) Rule filtering domains by client MACs
Now, we will block access to some domains of customers who have your MAC in the (/etc/squid/SRC_MAC.txt) file. This way, we can filter domains that certain customers cannot access.
Other clients on the network will be able to access the domains normally.
This type of domain filtering based on the client’s MAC can be interesting when we want to give priority to some clients on the network. We could do the same configuration for IP.
In our example, priority clients can access normally, while other clients are restricted from access.
acl SSL_ports port 443 # https
acl Safe_ports port 80 # http
acl Safe_ports port 21 # ftp
acl Safe_ports port 443 # https
acl CONNECT method CONNECT

http_access deny !Safe_ports

http_access deny CONNECT !SSL_ports

http_port 3128
########################
acl SRC_MAC arp "/etc/squid/SRC_MAC.txt"
acl Block_Domain dstdomain "/etc/squid/Domain_block.txt"
http_access deny Block_Domain SRC_MAC
#########################
acl Minha_Rede src 192.168.10.0/24

http_access allow Minha_Rede

http_access deny all
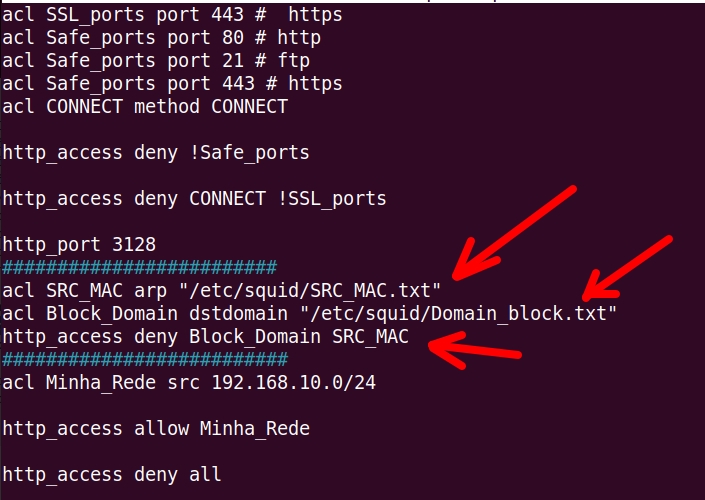
- (acl SRC_MAC arp “/etc/squid/SRC_MAC.txt”) = Here, the ACL (SRC_MAC) uses the source MACs (arp ) stored in the file ( “/etc/squid/SRC_MAC.txt”).
- (acl Block_Domain dstdomain “/etc/squid/Domain_block.txt”) = Here, we use the ACL (Block_Domain) to block the target domains (dstdomain) stored in the file (“/etc/squid/Domain_block.txt“).
- (http_access deny Block_Domain SRC_MAC) = In this case, we are blocking http access (http_access deny) to the ACL domains (Block_Domain) and that have their MACs in the ACL (SRC_MAC).
To change the file “/etc/squid/squid.conf”, we can use the command below.
sudo nano /etc/squid/squid.conf
Now let’s create the file /etc/squid/SRC_MAC.txt. To do this we can use an editor:
sudo nano /etc/squid/SRC_MAC.txtThen add the MACs you want to block. Place one MAC per line. Example:
08:00:27:cb:e2:a008:00:27:55:11:11
Now let’s create the file “/etc/squid/Domain_block.txt“. To do this we can use an editor with the command below.
sudo nano /etc/squid/Domain_block.txt
Then add the domains you want to block. Enter one domain per line. Example:
.simplificandoredes.com
Let’s restart Squid and then clear the browser cache.
sudo service squid restart
sudo service squid status
“Clear browser cache”
Now, let’s try to access the Internet with a client that has the MAC on the block list.
4) Block domains by IP in Squid
In this experiment, we will block some domains for some specific IPs. This way, other IPs on our network will be able to have unrestricted access to Internet domains.
However, we will block access from IPs that are in the “/etc/squid/SRC_IP.txt” list to the domains we specify in the “/etc/squid/Domain_block” list .txt“.
For this configuration, we will use the rules below in the file “/etc/squid/squid.conf”.
To change the file “/etc/squid/squid.conf”, we can use the command below.
sudo nano /etc/squid/squid.conf
acl SSL_ports port 443 # https
acl Safe_ports port 80 # http
acl Safe_ports port 21 # ftp
acl Safe_ports port 443 # https
acl CONNECT method CONNECT

http_access deny !Safe_ports

http_access deny CONNECT !SSL_ports

http_port 3128
########################
acl SRC_IP src "/etc/squid/SRC_IP.txt"
acl Block_Domain dstdomain "/etc/squid/Domain_block.txt"
http_access deny Block_Domain SRC_IP
#########################
acl Minha_Rede src 192.168.10.0/24

http_access allow Minha_Rede

http_access deny all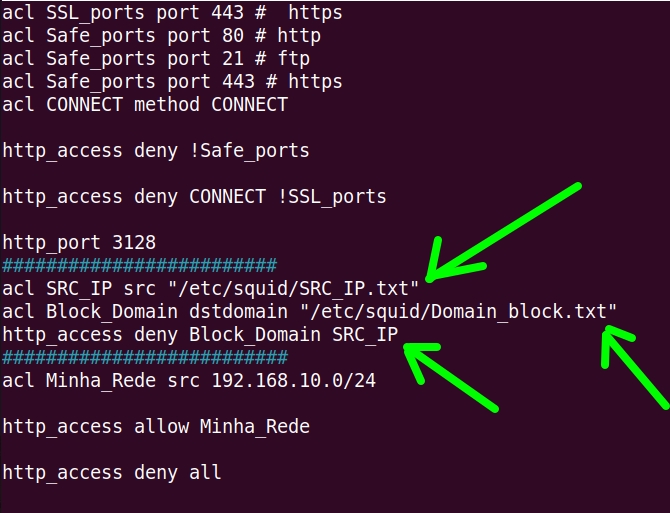
- (acl SRC_IP src “/etc/squid/SRC_IP.txt”) = Here, the ACL (SRC_IP) uses the source IPs (src ) stored in the file ( “/etc/squid/SRC_IP.txt”).
- (acl Block_Domain dstdomain “/etc/squid/Domain_block.txt”) = Here, we use the ACL (Block_Domain) to block the target domains (dstdomain) stored in the file (“/etc/squid/Domain_block.txt“).
- (http_access deny Block_Domain SRC_IP) = In this case, we are blocking http access (http_access deny) to the ACL domains (Block_Domain) and that have their IPs in the ACL (SRC_IP).
Now, let’s create the file “/etc/squid/SRC_IP.txt”. In this file, we will enter the IPs we want to block. To create the “SRC_IP.txt” file, we can use an editor. Using the command below.
sudo nano /etc/squid/SRC_IP.txt
Then add the IPs you want to block. Enter one IP per line. Example:
192.168.10.2192.168.10.5
Now let’s create the file “/etc/squid/Domain_block.txt“. To do this we can use an editor with the command below.
sudo nano /etc/squid/Domain_block.txt
Then add the domains you want to block. Enter one domain per line. Example:
.simplificandoredes.com
Let’s restart Squid and then clear the browser cache.
sudo service squid restart
sudo service squid status
“Clear browser cache”
Now, let’s try to access the Internet with a client that has its IP on the block list.
5) Checking for blocking in Squid logs
Checking the logs is an interesting way to check if our Squid proxy is actually blocking the domains that have been selected. To do this, we can access Squid logs related to access. We can find these logs in “/var/log/squid/access.log”.
To check the logs we can use the cat command like the example below.
sudo cat /var/log/squid/access.log 
Additionally, we can only check the logs related to what was blocked. To do this, we can use the command we used above and use a filter “ | grep DENIED”. In this case, we only want to see the logs that report access blocking.
To check just what was blocked in Squid we can use the command below.
sudo cat /var/log/squid/access.log | grep DENIED 
We can see in the figure below that requests from our client with IP “192.168.10.2” for the domain we blocked are in the logs as “DENIED”.

This means that requests for this domain were blocked in our Squid proxy.
Squid and SquidGuard tutorial list:
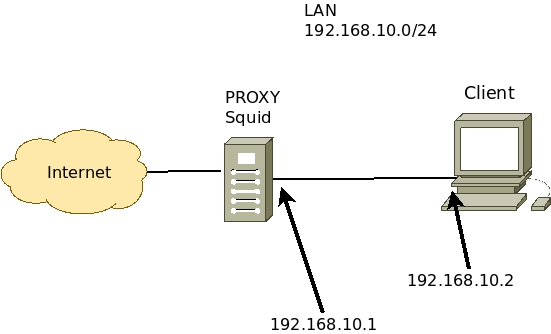
Scenario used
In our case, we are using a scenario like the one described below.
Alternatively, I will suggest a scenario using VirtualBox in the figure below.
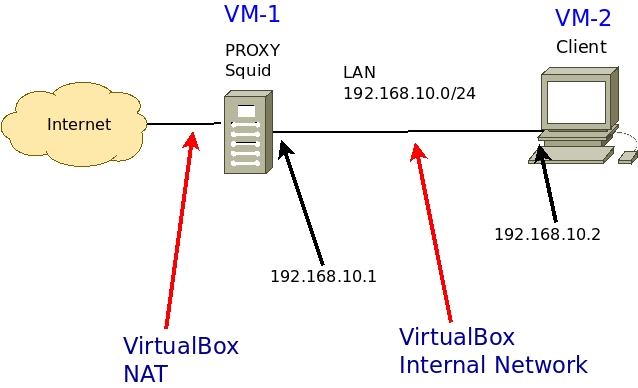
We can see that we are using the network “192.168.10.0/24” in the LAN of our scenario.
The Squid proxy will have two interfaces.
- Internet connection interface: receiving IP via NAT or an IP within your network that accesses the Internet.
- LAN interface with IP “192.168.10.1”. This interface will be connected to the client machine’s network. In our case, this network is “192.168.10.0/24”.
The client will have an interface.
- LAN Interface with IP “192.168.10.2”. This interface will be connected to the Squid LAN interface. In our case, this network is “192.168.10.0/24”.
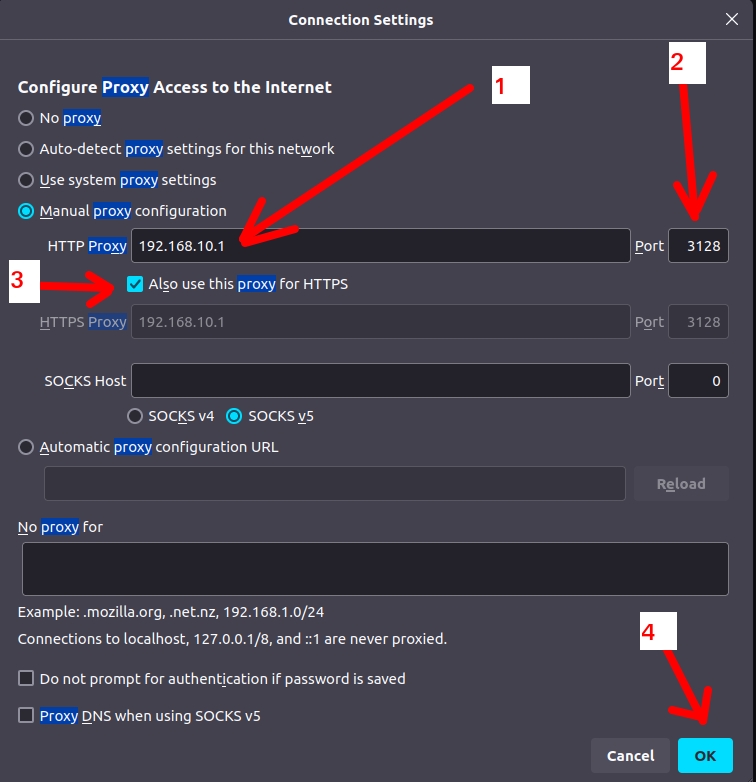
Configuring the client browser:
The client browser must point its proxy configuration to the Squid LAN interface IP and use the Squid proxy port.
To do this, let’s access the client machine’s browser and look for the browser’s proxy configuration.
In our case, Squid’s LAN interface is “192.168.10.1” and the port used is “3128“.

Juliana Mascarenhas
Data Scientist and Master in Computer Modeling by LNCC.
Computer Engineer
See more:
Socket TCP Python make a chat
Tutorial for creating a simple chat using TCP and UDP sockets in Python 3. The…
apt get behind proxy
Over time, I have often come across the need to configure apt get to work…
Best IDE for Python?
Finding the perfect IDE is a personal journey that depends on various factors such as…


