
We present the installation and configuration of SquidGuard. In addition, we present how to create a URL-based blocklist and a domain-based blocklist.
So we have configured SquidGuard to block specific URLs and domains on Linux.
To see the video, click HERE.
Additionally, we present the scenario used at the end of the video. This way, it is possible to recreate the presented scenario to make the proof of concept.
Furthermore, the possibility of recreating the scenario allows tests to be carried out with SquidGuard in controlled environments.
Scenario
The first step will be the presentation of the scenario. Thus, we created a virtualized scenario to provide more accessible proof of concept.
In addition, newcomers to the SquidGuard tool can do the tests before introducing the tool into a production environment.
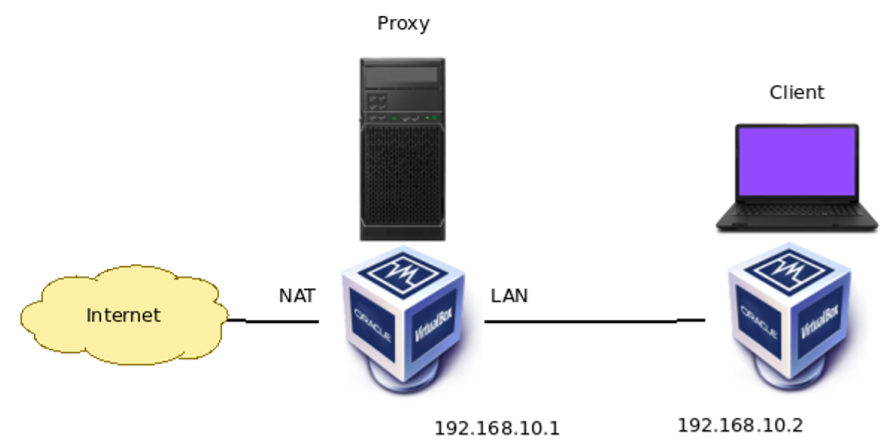
For this scenario, we use VirtualBox. This way, we raised two virtual machines to take on different roles. So, we use one virtual machine to host the client and another virtual machine to host the proxy.
The client virtual machine has only one network interface virtualized and connected to another network interface in the proxy virtual machine.
Additionally, the proxy virtual machine has two network interfaces. In this way, the proxy can use one interface to access the Internet and the other interface to provide content to the client.
Setting up the client virtual machine
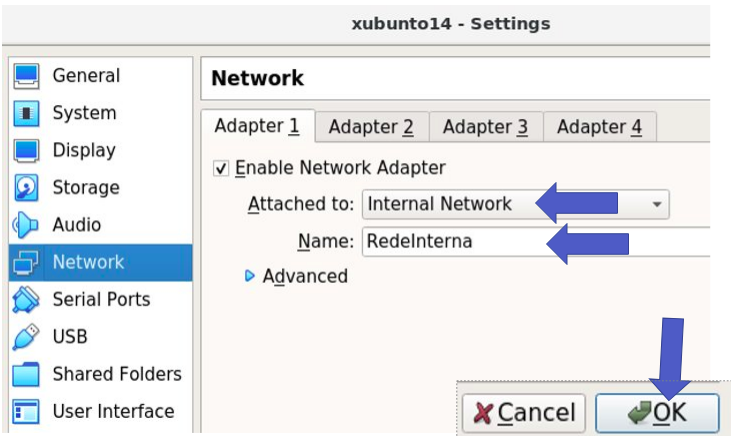
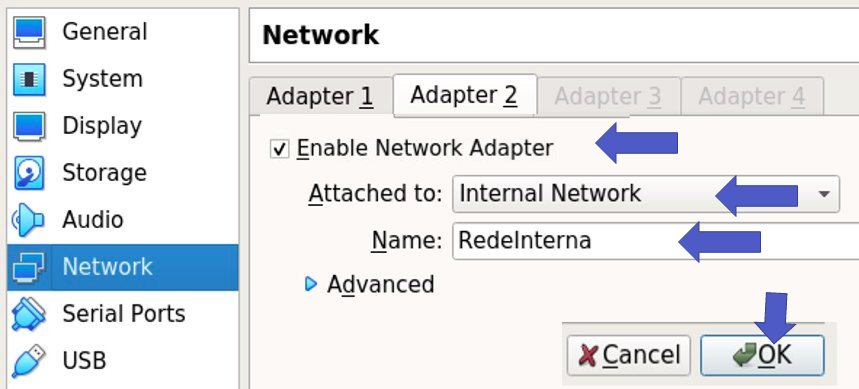
In the client’s virtual machine, we used the network in Internal Network mode and gave the network the name “RedeInterna”. This way, the network will be used exclusively for communication between the client machine and the proxy.
After booting the client machine, we set the address of the virtualized interface. Consequently, it is essential to put an IP and mask that allows the client and proxy to communicate.
We use the IP “192.168.10.2” for the client and the mask “/24”. Also, we include the gateway as the interface that the proxy will use.
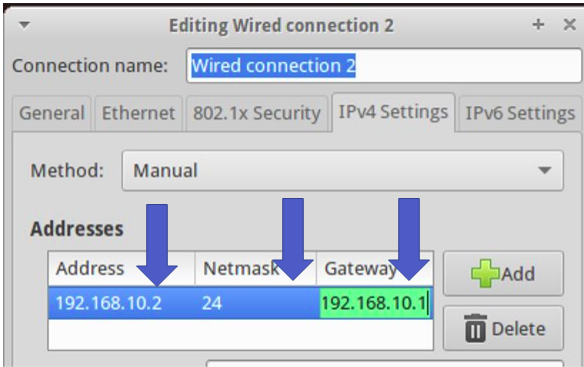
After the configuration, we can restart the interface and use the command “ip addr “ to check if the IP was correctly assigned to the interface.

Setting the proxy in the browser
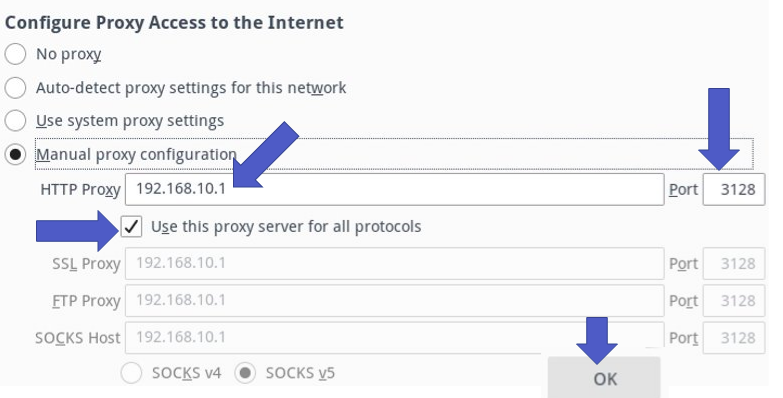
The next step is configuring the proxy address in the client’s browser. Thus, we need to enter the IP of the proxy interface that will be connected to the client. In this case, we use IP “192.168.10.1” to be used on the proxy LAN interface.
Finally, it is worth noting that choosing the port where the proxy will wait for requests is necessary. Thus, we will use port 3128, as this will be the port configured in the proxy.
Configuring the Proxy Virtual Machine
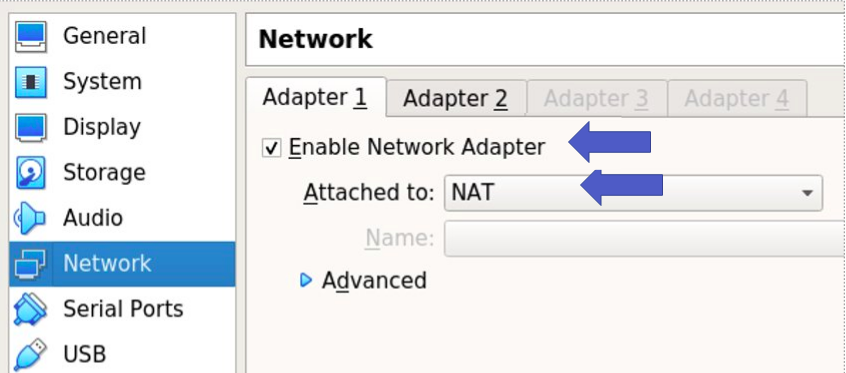
Let us configure the first proxy virtual machine interface as NAT mode. This way, the proxy will use this interface to gain access to the Internet.
In this virtualized scenario, NAT is created between the virtual machine and the real machine. Therefore, the real machine must have access to the Internet.
Let us configure the other proxy virtual machine interface as Internal Network. Also, this interface must have the same name as the interface configured on the client. So let us edit the name to “RedeInterna”.
When starting the proxy virtual machine, we must assign the correct settings for each interface. For that, we can check the MAC of each virtual interface in VirtualBox. We present this procedure in the attached video.
After checking the MACs of the interfaces, let us configure the first interface as DHCP. That is because this interface will get IP automatically. After all, the interface is in NAT mode in VirtualBox.
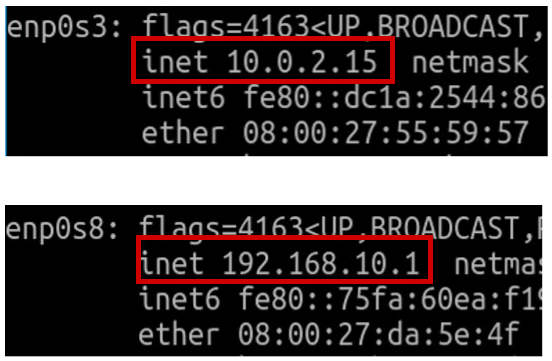
We will configure the other interface manually. Also, we must use the same IP that the client is accessing. Therefore, we will use the IP “192.168.10.1” and the “/24” mask. In this way, we will allow the client and the proxy to establish communication.
Below is the result of the “ifconfig” command. Consequently, we can see that the interfaces were correctly configured.
Install SquidGuard
To install squidguard on Ubuntu we can use apt-get. Also, we present an alternative way for those who use yum.
sudo apt-get update
sudo apt-get upgrade
sudo apt-get install squid
sudo apt-get install squidguardAlternatively for those who use yum:
yum install squid
yum install squidGuardConfiguring SquidGuard
The first step is to insert a configuration line into “squid.conf”. Then, let us edit the “/etc/squid/squid.conf” file and insert the configuration line.
Then, as a suggestion, we can create a copy of the “squid.conf” file. After creating the copy, we can delete the squid.conf file and insert the configuration below.
sudo cp /etc/squid/squid.conf /etc/squid/squid.OLD

sudo nano /etc/squid/squid.conf
Inside the squid.conf file we will delete the previous settings and we will insert the text below.
acl Pass_ports port 80 # http
acl Pass_ports port 443 # https
## Deny requests to no Pass ports / Nega acesso as portas nao Pass
http_access deny !Pass_ports
#porta que o squid vai ouvir / Squid listen port
http_port 3128
url_rewrite_program /usr/bin/squidGuard -c /etc/squidguard/squidGuard.conf
http_access allow allThe first two lines describe the ports that will be allowed to access the proxy. In this way, we indicate ports 80 and 443, HTTP and HTTPS, respectively.
We then make an ACL to deny HTTP access to all ports other than ports 80 and 443 = “http_access deny !Pass_ports”.
After that, let’s indicate the port that the proxy will wait for communication. In this case, we choose to use port 3128.
Afterward, we enter the configuration related to the Squidguard configuration file using the url_rewrite_program configuration. This configuration indicates that squid must obey the settings in the squidGuard.conf.
Finally, we use the line to allow full access with the ACL “http_access allow all”. That way, our configuration file will block what is in squidGuard.conf. Consequently, we will allow access to everything not in our squidGuard.conf.
Creating files for blocklist
Now let us create the files that will block domains or URLs ( blocklists ). Therefore, Let us create a directory called dalbert inside “/var/lib/squidguard/db/”.
Although we use the name dalbert, we can use any other name. It is noteworthy that we are using a subdirectory to organize the block lists.
sudo mkdir -p /var/lib/squidguard/db/dalbert/Next, we are going to create two blocklists. So, the first block list will be blocked by URL, and we will use the name “block_url”.
Inside the “block_url”, we can insert URLs we want to block. Thus, we present an example of a blocked URL while recording the video that generated this post.
sudo nano /var/lib/squidguard/db/dalbert/block_url
www.google.com
The next blocklist created will be used to block domains. So we will name this blocklist “block_domain”. So, inside this block list, we will add domains we want to block, like in our video example.
sudo gedit /var/lib/squidguard/db/dalbert/block_domain
facebook.com
Configuring squidGuard.conf
Now let us configure the main Squidguard file. So, let us comment the lines that we are not going to use and let’s introduce our changes.
The lines below indicate the path to the database = “dbhome /var/lib/squidguard/db” and the path to the squidguard logs = “logdir /var/log/squidguard” .
dbhome /var/lib/squidguard/db
logdir /var/log/squidguardNext, let us introduce a rule before ACLs. This “dest block” rule will be used to block targets in the blocklist files we created.
Thus, we need to inform the location of these files. In our case, we created the blocklist files inside the dalbert directory. Therefore, we will insert that directory.
That way, when squidGuard searches the database “dbhome /var/lib/squidguard/db”, it will also search inside the dalbert directory.
dest block {
domainlist dalbert/block_domain
urllist dalbert/block_url
}Let us comment the other ACL rules and only allow the default rule. Thus, we will include in the default rule the release of traffic that is not blocked by the blocklist, ie, “!block”.
This way, any destination not in the “dest block” rule can be accessed. Remember that blocking domains or URLs occur because they were inserted into the block_domain and block_url files.
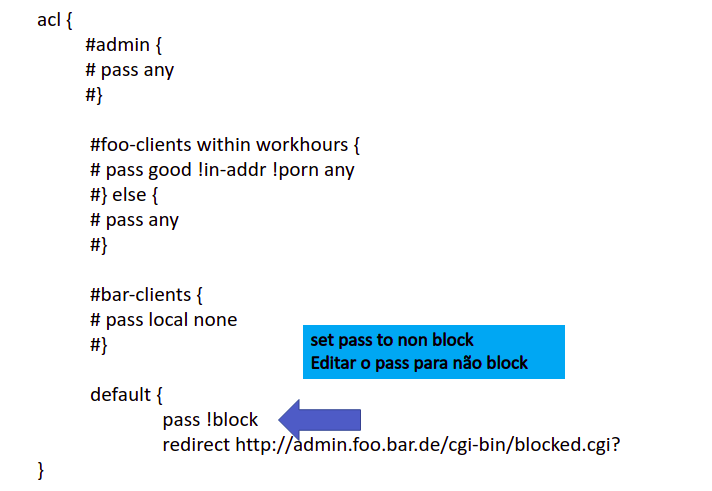
Below we have the contents of the squidGuard.conf file.
#
# CONFIG FILE FOR SQUIDGUARD
#
# Caution: do NOT use comments inside { }
#

dbhome /var/lib/squidguard/db
logdir /var/log/squidguard

#
# TIME RULES:
# abbrev for weekdays:
# s = sun, m = mon, t =tue, w = wed, h = thu, f = fri, a = sat

#time workhours {
#	weekly mtwhf 08:00 - 23:59
#	date *-*-01  08:00 - 23:59
#}

#
# SOURCE ADDRESSES:
#

#src admin {
#	ip  		1.2.3.4  1.2.3.5
#	user		root foo bar
#	within		workhours
#}

#src foo-clients {
#	ip		172.16.2.32-172.16.2.100 172.16.2.100 172.16.2.200
#}

#src bar-clients {
#	ip		172.16.4.0/26
#}

#
# DESTINATION CLASSES:
#
# [see also in file dest-snippet.txt]

#dest good {
#}

#dest local {
#}

#dest porn {
#}

#dest adult {
#	domainlist	BL/adult/domains
#	urllist		BL/adult/urls
#	expressionlist	BL/adult/expressions
#	redirect http://admin.foo.bar.de/cgi-bin/blocked.cgi?#clientaddr=%a&clientname=%n&clientuser=%i&clientgroup=%s&targetgroup=%t&url=%u
#}

#
dest block {
	domainlist dalbert/block_domain
	urllist dalbert/block_url
}
# ACL RULES:
#

acl {
	#admin {
	#	pass	 any
	#}

	#foo-clients within workhours {
	#	pass	 good !in-addr !porn any
	#} else {
	#	pass any
	#}

	#bar-clients {
	#	pass	local none
	#}

	default {
		#pass	 local none
		#pass any
		pass !block
		redirect http://admin.foo.bar.de/cgi-bin/blocked.cgi?clientaddr=%a&clientname=%n&clientuser=%i&clientgroup=%s&targetgroup=%t&url=%u
	}
}
Database update
Now let’s create or update the database. For that, let’s use the command below.
sudo squidGuard -b -d -C allSquid permission
Next, let’s grant squid permission to the database files. For this we will use the command below.
sudo chown proxy:proxy -R /var/lib/squidguard/db/Restart the squid
Now let’s restart squid to use the added settings. For that, let’s use the command.
sudo service squid restartCheck logs
If the proxy present errors, we can check the logs. Thus, we present below some commands to check the logs.
sudo cat /var/log/squidguard/squidGuard.log
sudo cat /var/log/squid/access.log
sudo cat /var/log/squid/cache.log | grep GuardNow run the tests on the client. See the tests made in the video HERE.
See more:
Proxy Squid: User Authentication
Squid Proxy for linux Installation and Configuration
Squid Proxy: Filter clients by IP and MAC

Juliana Mascarenhas
Data Scientist and Master in Computer Modeling by LNCC.
Computer Engineer


