Hi everyone, today we will show how to install and configure a server APACHE using HTTPS.
For those who have more questions and want to learn a little more about installing the APACHE Server, we have an installation and initial configuration video:
What is motivating you to use https?
HTTPS will provide greater security for those who do not know and those new to WEB services.
It is not the video’s intention to discuss the encryption key or which encryption would be better than another.
In this way, we intend to see a basic configuration of a server with HTTPS.
The first thing we have to do is install apache2.
So, we will use the commands below, assuming this machine does not have apache2 installed.
sudo apt-get update This will update the repositories and after that, we will install apache2 :
sudo apt-get install apache2 Confirm the operation. Ok apache2 has been installed. Now let’s go to the configuration.
Creating HTTPS Server Certificate
So let us go to the part of the Apache HTTPS Server configuration. So let us create the keys with the command described above.
Let us use the command below.
sudo openssl req -x509 -nodes -days 300 -newkey rsa:2048 -keyout /etc/ssl/private/apache_ssl.key -out /etc/ssl/certs/apache_ssl.crt “openssl” is a command line openssl tool present in most Linux distributions.
“req” which is for certificate signing request management.
“-x509” is used for data management of the “x-509” certificates and is often used for self-signed certificates.
Consequently, this is what we are going to work on here. Since the certificate is self-signed, we do not need a certifying entity.
“-nodes” tells us that we do not want to have a passphrase for the certificate. That is because we will make HTTPS requests and do not want them to have a passphrase. In this way, we want the request to occur usually.
“-days” field informs the days of validity of your certificate. This way, we can specify the number of most suitable days.
“-newkey rsa:2048” informs that We will create a new certificate using the RSA key with 2048 bits.
In addition, this key can also be changed and can use another cipher in addition to using a different amount of bits.
“-keyout” is the path to the private key. So here I am saying that this is in : “/etc/ssl/private/apache_ssl.key”.
“-out” informs the path to the certificate. So here my certificate is in “/etc/ssl/certs/apache_ssl.crt”. That’s the name I’m giving the certificate.
The OpenSSL command autocompletes when we press TAB.
We could put the certificate in other places as well.
So, let us give an Enter, and it will start asking some questions.
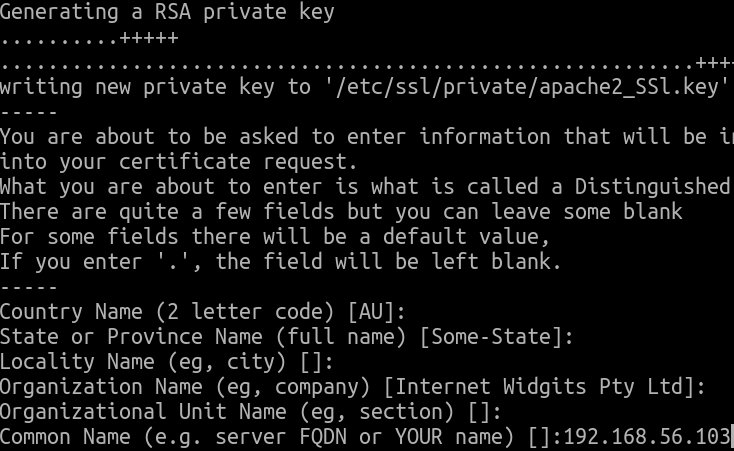
If we are doing this configuration for a company and a domain, then answer the certificates questions correctly.
However, here we are doing a tutorial, and we are not going to answer the first, second, fourth, or fifth.
Here it is essential to answer with the domain or IP.
We are working with a machine without using domains, so let us put the IP then “192.168.56.103” .
Additionally, we will not put in an email address.
Setting the default-ssl
Okay, let’s go to the next step. Now let’s go into:
cd /etc/apache2/sites-availableAnd let’s edit this file here:
sudo nano default-ssl.confLet’s enter the ServerName with the IP of the machine. Now let’s see what we’re going to edit in the file. Here at the beginning we will put: ServerName 192.168.56.103
<IfModule mod_ssl.c>
	<VirtualHost _default_:443>
		ServerAdmin webmaster@localhost

		ServerName 192.168.56.103
That is, the IP that we registered in the certificate. Now, we come to these lines and let’s change the certificate and key path. So come on.
#   A self-signed (snakeoil) certificate can be created by installing
#   the ssl-cert package. See
#   /usr/share/doc/apache2/README.Debian.gz for more info.
#   If both key and certificate are stored in the same file, only the
#   SSLCertificateFile directive is needed.
SSLCertificateFile	/etc/ssl/certs/apache_ssl.crt
SSLCertificateKeyFile /etc/ssl/private/apache_ssl.key
There are two lines, the first one shows where the certificate is.
We put the certificate inside: “/etc/ssl/certs/”.
Now, let us change the name to the name of our certificate: /etc/ssl/certs/apache_ssl.crt.
Now let’s indicate the location of the private key: “/etc/ssl/private/apache_ssl.key”.
Ok, everything is fine, check for a typo. Now, let’s save and go to the next step.
Enabling SSL Modules
To activate the SSL modules, let’s use these commands here and then we’ll restart APACHE2 So let’s activate the modules.
The first module we need to use is:
sudo a2enmod ssl now let’s activate the :
sudo a2ensite default-ssl.confNote that after executing this command, the default-ssl module will be activated.
This way, this command will activate the module, and it will also appear in the sites-enable directory.
Checking Apache HTTPS Server Errors
Now we will do this command: “sudo apache2ctl configtest” to check if we made a mistake in the configuration. It’s good to check before moving on.
sudo apache2ctl configtest Here we have a warning notice that the Server name is just an alarm. Informing that the server name needs to be configured correctly and is using “127.0.0.1”.
It can be changed later.
What matters is that the syntax is OK.
Assuming we don’t want this alert, we can use the:
sudo nano /etc/apache2/apache2.confMoreover, let us edit apache2.conf. Let us go to the global configuration and add “ServerName 192.168.56.103” being “192.168.56.103” the IP of your WEB server.
Let us save and close “apache2.conf” and now let us check the syntax.
sudo apache2ctl configtest And the alarm is gone.
Restarting APACHE
Now let’s restart apache2.
sudo service apache2 restart Ok we can check the status.
sudo service apache2 statusOk apache2 is working correctly.
We can see if apache2 is listening on the correct ports:
sudo netstat -anlp We now have port 443 used by apache2 and we already had port 80 being used by apache2. Everything is OK.
Testing the HTTPS Apache Server
Let us test it with the browser. So let us open the browser here, and we will create a private tab. OK, “https://192.168.56.103”.
This way, we are not using a certification unit, so the browser will ask, and we will confirm.
Okay, it’s working with https. In this case the server is running both https and also runs via http on port 80.
We can verify this by running http only. “http://192.168.56.103”. OK so you’re listening on both ports.
More tutorials
2 – Apache HTTPS Server configure
3 – Installing servers in Docker
See also:
- PfBlockerNG: Exception List for Clients
- Squid Proxy for linux Installation and Configuration
- Virtualizing the Raspberry Pi – Raspbian
-

Juliana Mascarenhas
Data Scientist and Master in Computer Modeling by LNCC.
Computer Engineer
Tutorial: Using Port Forwarding in Packet Tracer
Tutorial: Web Server in Packet Tracer (Client-Server)

Email Server & Webmail Setup: Postfix, Dovecot, SnappyMail
Install Ubuntu Server 26 on VirtualBox (Step-by-Step)

How to Configure NAT in Packet Tracer (Step-by-Step)