Before moving on to messaging systems theory, let’s create a container based on the RabbitMQ image available on Docker Hub.
Our roadmap in this article will be: installing docker, installing docker-compose, creating the yml article with system parameters, verifying the functioning of the container via portainer.
Tutorial RabbitMQ:
Lesson 01: RabbitMQ #1 – Messaging Systems
Lesson 02: RabbitMQ #2 – RabbitMQ in docker-compose
Lesson 03: RabbitMQ DLX with Java Spring
Related articles will always be referenced throughout the text. Don’t worry if you need a concept that hasn’t been explained yet. Throughout the text I will give a brief description of some components.
For more about RabbitMQ read the article: RabbitMQ #1 – Messaging Systems
Installing Docker
Firstly, this tutorial is based on Linux systems specifically Ubuntu.
This article introduces docker installation step by step – docker article. I will put the basic commands in this article. However, if you are not familiar with Docker, or have any questions… I advise you to read the article cited above.
First, update your linux before and after installing docker.
sudo apt-get update

sudo apt-get install docker.io

sudo apt-get update

sudo apt-get upgrade
Ready …. wait for the installation to finish and run the command.
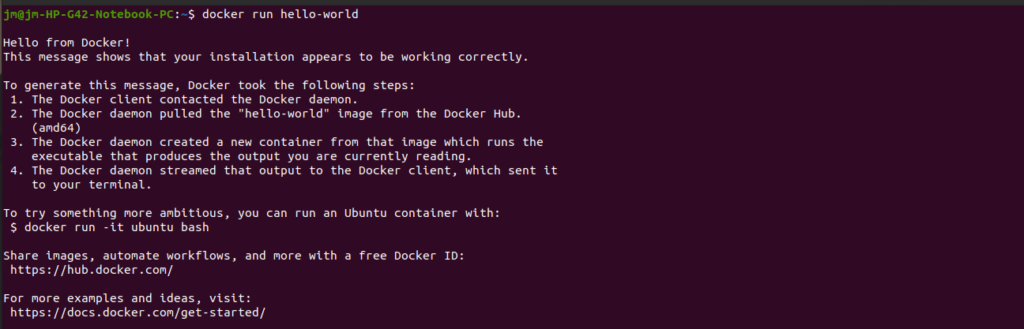
docker run hello-worldIf everything went well, something similar should appear on your screen.
RabbitMQ in Docker
There are two image options that can be used to create the container with RabbitMQ. The first consists of the official RabbitMQ image on the docker hub. This image comes with RabbitMQ with basic settings. However, you will need to manually set the permission for the web manager. This is because the API is disabled by default.
First option – official image
If this is your choice, run the command to download the official image. However, you also want to use the web API for management… so run the commands below.
sudo docker pull rabbitmq

sudo docker images
Running by the image name generates a new container.
sudo docker run -it <id_da_imagem> bash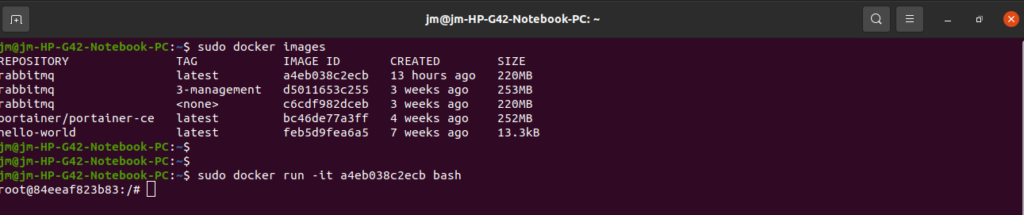
You can check by container id to run the correct container. If you run run on the image name, an additional container will be created. In this case we want to run the existing container.
docker ps -a 
That way, when using the exec command instead of run, we will just be running the container. Replace with the id of the container on your machine.
docker exec -it <id_container> bashSecond option – docker compose
From now on I will use docker compose to create the container. Therefore, the .yml file will contain the necessary parameters for the container. If you still don’t know what docker-compose is, read this article that describes this tool.
First, we need to create both the directory that will store the file and the .yml. Like for example via terminal on linux.
mkdir dockercompose
cat > docker-compose.yml
After executing the file creation command, press CTRL+D to save the file.
Thus, the next step will be to fill the .yml configuration file with the information to lift the container. The complete file follows below, however, I will detail it for your complete understanding.
Detailing file-docker-compose
Continuing our topic, in this step you will define the configuration parameters of your docker container. Therefore, it is necessary to know exactly what is being specified. Because a wrong configuration could interfere with the functioning of your system.
Defining the service
First, you will be determining a service. However, we can define any service class like: front-end, foo, redis and others. In our application scenario we will use rabbitmq. Pay attention to the indentation, it identifies the hierarchy of the commands.
services:
        rabbitmq:
               image: rabbitmq:3-management
               container_name: rabbitmq_management
In this field we will specify the image to be used and the name of the container. I opted for the unofficial image (rabbitmq:3-management) for convenience. In this case, the web management API is already activated. We just need to map the ports used in the communication.
Speaking of which, the next code snippet will determine the port mapping between the host and the container. The ports parameter is associated with the rabbitmq parameter. As well as: volume, environment and restart.
Communication ports
ports:
    - 25672:25672 # (erlang) communication between the nodes and CLI tool
    - 15672:15672 # communication with the web management API
As described in the configuration itself, ports 25672 and 15672 respectively specify the communication of:
- Rabbitmq nodes and the CLI tool (system policy)
- Management web API with the host
Data persistence and mapping
In volumes, we define the mapping of the data used in the queues and messages trafficked. Thus, this data that was previously restricted to the container will be stored on the host.
volumes:
    - /docker_conf/rabbitmq/data/:/var/lib/rabbitmq/
In turn, the environment parameter defines the login and password information for accessing the rabbitmq management API. It is possible to create queues, exchanges and define policies transparently to the user.
User and system parameters
environment:
     - RABBITMQ_DEFAULT_USER = admin
     - RABBITMQ_DEFAULT_PASS = passw123
The restart command defines when the container should be started. In our case, we use always as the value for this parameter. This means that the container will use the host as a reference. Consequently, whenever there is a restart of the host, the container will also restart.
restart: alwaysIn the same way as the previous one, volume, I disregard data persistence. However, notice that this does not belong to the service parameter. In this case, this data persistence is related to the container configured by docker-compose.
Container’s logs
volumes:
    logs-folder:
        name: ${log_rabbitmq_management}
        driver: local
For our case, we will map the system log information. Therefore, we use the logs-folder parameter with the name and driver information.
To learn more about the docker-compose file configuration commands, access the specification on github.
Up a container with docker-compose rabbitmq
Very good! Once the file has been properly configured it remains for us to start docker-compose. To do this, go to the file directory via terminal and type the command below.
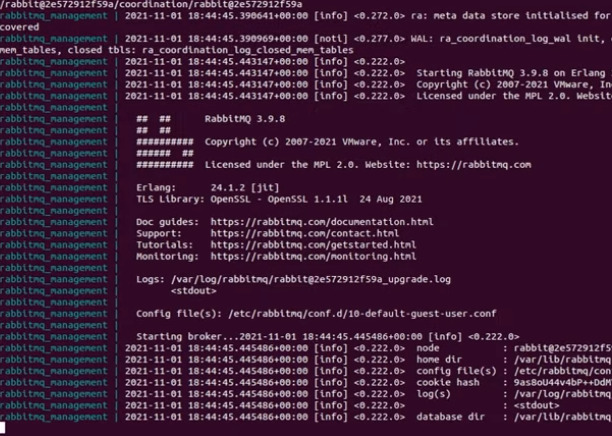
docker-compose upThe return on the screen will be the output of the initialization of the container. Consequently, it will look something like the figure below. If there is no error, and the rabbitmq symbol has appeared on your screen the container by docker-compose with rabbitmq has been successfully raised.
Okay, but now you know how it works and you don’t need to see the output of docker-compose. To prevent all this information from being printed on the screen use -d.
docker-compose up -dThe output of this command will be similar to the one shown in the figure.

Ready! Your container is ready to be used. If you were unable to run the docker-compose up command, there may be a permission issue. For this, access the post “Group permission – docker compose does not work”.
Tutorial RabbitMQ:
Lesson 01: RabbitMQ #1 – Messaging Systems
Lesson 02: RabbitMQ #2 – RabbitMQ in docker-compose
Lesson 03: RabbitMQ DLX with Java Spring
Related Articles
- Docker Installation
- Portainer: Installation and Configuration
- Group permission – docker compose not working
- RabbitMQ #1 – Messaging Systems