Currently, traditional systems cannot meet all the demands of customer requests. Therefore, vertical investment is often necessary, that is, increasing the capacity of servers in order to increase processing capacity. As a solution, we can use RabbitMQ DLX with Java Spring.
For this and other reasons, new software architectures have emerged. RabbiMQ is one such solution.
Being characterized by a message-oriented system with origin in distributed systems, it provides asynchronous communication based on the AMQP protocol.
Tutorial RabbitMQ:
Lesson 01: RabbitMQ #1 – Messaging Systems
Lesson 02: RabbitMQ #2 – RabbitMQ in docker-compose
Lesson 03: RabbitMQ DLX with Java Spring
If you want to get started, you can follow the tutorial RabbiMQ in docker with docker-compose.
Note: Remember that to configure docker-compose you need permission (see RabbitMQ #2 – RabbitMQ in docker-compose
RabbitMQ
This messenger concept is grounded in the matter of distributed systems within computing. It is characterized by a message-oriented communication, which can be classified as persistent or transient.
Additionally, messaging systems (messaging systems) can be clustered and have scalability, fault-tolerant, with asynchronous communication. Furthermore, it is intuitive to say that it operates as a distributed system.
SimplificandoRedes – What is a messaging system?
What is an Exchange?
We can compare an exchange, in RabbiMQ, with a mail. This component is responsible for receiving, analyzing and forwarding messages. In other words, an Exchange is responsible for routing messages.
The parameters analyzed and the type of exchange influence the routing of a given message. The most simplistic type is fanout. This exchange category works in broadcast mode. Therefore, forwarding the received messages to all queues connected to us.
There are other categories of exchanges within the architecture of RabbiMQ, they are: direct, topic, head, default, and dead letter exchanges.

What is a Dead Letter Exchange?
Within a message production and consumption scenario, it is possible to say that there will be “lost” messages in the queues. Therefore, these messages were not retrieved by any consumer for some reason.
We have a specific treatment for these messages. Let us think about it… it is fair to say that if a message has not been retrieved, it can be routed elsewhere. This location could be an exchange.
Thus, dead letter exchanges, as their name suggests, are exchanges that receive “forgotten” messages. They, for some reason, were not requested; however, they are consuming space in queues and operating exchanges.
Let’s get our hands dirty…
Our aim now is to create a user application that defines the parameters of a DLX – Dead Letter eXchange.
Our programming language of choice is Java with Spring Boot framework. However, RabbitMQ is cross-language. Then, you can choose another programming language you like, like Python.
Connecting to RabbiMQ
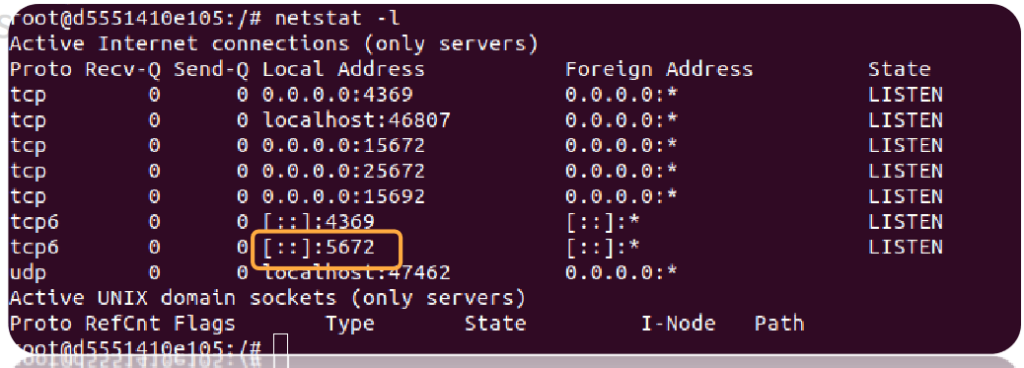
The first step in any application is to connect to the server/system. In this case, we need to specify some parameters like: IP, username, password, and port.
Note: Make sure your machine’s port is open to make the connection
In the code below we will create a factory of type ConnectionFactory to define the connection parameters. After specifying the setHost, setUsername, setPassword and port we must create the connection itself.
OK, we’ve created the connection to the server. Now the next step is the creation of the TCP channel to be used by the producer (application that generates the messages).
ConnectionFactory factory = new ConnectionFactory();
factory.setHost("172.24.0.2");
factory.setUsername("admin");
factory.setPassword("pass123");
factory.setPort(5672);
Connection connection = factory.newConnection();

Channel channel = connection.createChannel();
Once this is done, we can set the exchange parameters. Now, through this created channel we can declare (if it doesn’t already exist) the exchanges and queues.
Declaring Exchanges
We then use the exchangeDeclare method of the channel class to declare asDLX and an Exchange of type Topic. The parameters of these methods are: NAME, X_CATEGORIA.
Very well, let us declare our exchanges. However, we need the queues to connect consumers to them. Therefore, we declare the DLX_QUEUE queue to connect with the DLX_NAME.
//declare the exchanges (main and dlx)
channel.exchangeDeclare(DLX_NAME,"topic");
channel.exchangeDeclare(EXCHANGE_NAME,"topic");

// declare the queues: consumer, dlx
channel.queueDeclare(DLX_QUEUE,false,false,false,null);
In this following code snippet, we will define the parameters using a dictionary “(MAP<string, object>)”. First, we will be instantiating a dictionary inside the map variable. From there, we will create the DLX configuration.
The parameters are pretty intuitive. The first relates to the lifetime of a message – TTL – Time To Live. Therefore, it tells the system that a message can only remain in the queue for 10 seconds before being directed to a DLX.
After defining the condition, we need to define the destination. Note the third line of code below. In this case, the DLX DLX_NAME is the message destination that fulfills the requirement. In other words, exceed the TTL.
In the following parameter, we will define the label to be used. A label is an identification; through it, we define where the message goes.
So the routing key will be: DLX_BIDING_KEY. The routing key is associated with the message, while the binding key is associated with the queue.
We have defined all DLX requirements. Now we need to add these parameters to our system configuration.
We now create the CONSUMER_QUEUE queue, where we are sending our map mapping (dictionary) with all the DLX information. Below are described the properties of a queue. It is important to note that these are of boolean type (true and false).
//queue-related parameters: durable, unique and auto-deleting
channel.queueDeclare(queue, durable, exclusive, autoDelete, null) ;
The last parameter is reserved for arguments related to system configuration. It is precisely at this point that we send the map as an argument to the method.
Map<String, Object> map = new HashMap<String,Object>();
map.put("x-message-ttl",10000);
map.put("x-dead-letter-exchange",DLX_NAME);
map.put("x-dead-letter-routing-key",DLX_BINDING_KEY);
channel.queueDeclare(CONSUMER_QUEUE,false,false,false,map);
We need to define the bindings for the exchanges and queues to connect. Every biding has an associated label, the biding keys. Along with the routing keys, the binding keys are used during the message routing phase.
Notice that all the configuration was performed through the created channel (channel.method). Now it is no different, and we will use queueBind to define the connections between queues and exchanges.
We define the connection between the DLX and its respective queue in the first binding. In practice, we tell RabbitMQ that every message that arrives with a routing key compatible with the binding key of the DLX queue will be forwarded to DLX by the exchanges operating the system.
In the second binding we are associating the CONSUMER_QUEUE queue to the EXCHANGE_NAME exchange with the BINDING_KEY label.
Note: the .# operator is related to the match between the routing key and the binding key.
//bindingkey from dlx and consumer
channel.queueBind(DLX_QUEUE,DLX_NAME,DLX_BINDING_KEY+".#");
channel.queueBind(CONSUMER_QUEUE,EXCHANGE_NAME,CONSUMER_BINDING_KEY+".#");

connection.close();
Here we have the complete code from the previous walkthrough. In this tutorial, we code a Java application to define the parameters of RabbitMQ exchanges. In future posts, we will create the producer and consumer. So we can analyze the behavior of the system.
package DLX;

import com.rabbitmq.client.AMQP;
import com.rabbitmq.client.Channel;
import com.rabbitmq.client.Connection;
import com.rabbitmq.client.ConnectionFactory;

import java.io.IOException;
import java.util.HashMap;
import java.util.Map;
import java.util.concurrent.TimeoutException;

public class DlxConfig {
//DLX
private static final String DLX_NAME = "dlxExchange";
private static final String DLX_QUEUE = "dlxQueue";
private static final String DLX_BINDING_KEY= "dlxrk";

//EXCHANGE of the system
private static final String EXCHANGE_NAME = "mainExchange";

//CONSUMER
private static final String CONSUMER_QUEUE = "queueConsumer";
private static final String CONSUMER_BINDING_KEY = "bkConsumer";

public static void main(String[] args) throws IOException, TimeoutException {
ConnectionFactory factory = new ConnectionFactory();
factory.setHost("172.24.0.2");
factory.setUsername("admin");
factory.setPassword("pass123");
factory.setPort(5672);
Connection connection = factory.newConnection();

Channel channel = connection.createChannel();

// declare the exchanges (main and dlx)
channel.exchangeDeclare(DLX_NAME,"topic");
channel.exchangeDeclare(EXCHANGE_NAME,"topic");

// declare the queues: consumer, dlx
channel.queueDeclare(DLX_QUEUE,false,false,false,null);

Map<String, Object> map = new HashMap<String,Object>();
map.put("x-message-ttl",10000);
map.put("x-dead-letter-exchange",DLX_NAME);
map.put("x-dead-letter-routing-key",DLX_BINDING_KEY);
channel.queueDeclare(CONSUMER_QUEUE,false,false,false,map);

//bindingkey from dlx and consumer
channel.queueBind(DLX_QUEUE,DLX_NAME,DLX_BINDING_KEY+".#");
channel.queueBind(CONSUMER_QUEUE,EXCHANGE_NAME,CONSUMER_BINDING_KEY+".#");

connection.close();

}
}
See more:
Tutorial RabbitMQ:
Lesson 01: RabbitMQ #1 – Messaging Systems
Lesson 02: RabbitMQ #2 – RabbitMQ in docker-compose
Lesson 03: RabbitMQ DLX with Java Spring
If you want to know about another communication protocol, HTTP go to:
HTTP Client – GET and POST requests with JAVA API
HTTP Protocol – How Does It Work?
Theoretical lesson on what RabbitMQ is.
How does RabbitMQ work in practice? In this video you can see the behavior of the system through user applications in Java Spring boot.

Juliana Mascarenhas
Data Scientist and Master in Computer Modeling by LNCC.
Computer Engineer