Configuring NAT (Network Address Translation) is essential to connect private networks to the internet. If you are not yet familiar with the basic concept of address translation, I recommend reading our article on what is NAT.
In this guide, we will configure NAT Overload (PAT), allowing multiple internal devices to share a single public IP.
1. Topology and Network Planning
For this lab, we will use the following structure:
- Internal Network (Inside): 192.168.0.0/24
- External Network (Outside): 10.0.0.0/8
- Router: Cisco ISR 2911
- Switch: Switch
- Default Gateway of the internal network computers: 192.168.0.1
If you need to review how to structure your first simulations, check out our guide Packet Tracer: first network 2 PCs.

PCs Configuration Checklist (Crucial)
Before moving to the router, ensure that the internal PCs have been configured correctly.
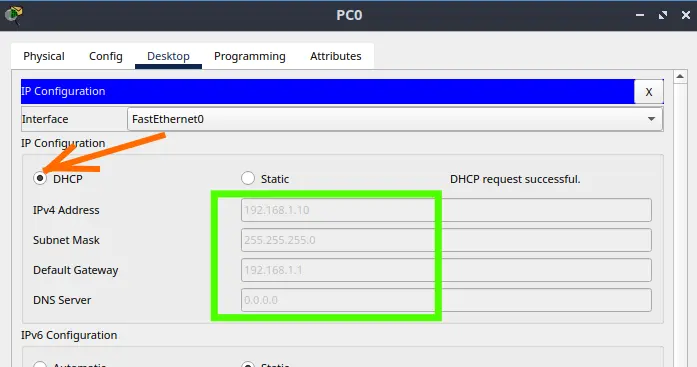
- PC0: IP 192.168.0.2 | Mask 255.255.255.0 | Gateway 192.168.0.1
- PC1: IP 192.168.0.3 | Mask 255.255.255.0 | Gateway 192.168.0.1
Below, we have the configuration for PC0.

Below, we have the configuration for PC1.

Server Configuration
Now let’s start the server configuration.
Server0: IP 10.0.0.2 | Mask 255.0.0.0

2. Configuring the Router Interfaces
Access the Cisco 2911 router CLI and define the roles of each interface. If you have doubts about the basic router configuration in this environment, you can take a look at Packet Tracer: network with 1 router.
Router> enable
Router# configure terminal

! LAN Interface - PCs
Router(config)# interface GigabitEthernet0/0
Router(config-if)# ip address 192.168.0.1 255.255.255.0
Router(config-if)# ip nat inside
Router(config-if)# no shutdown
Router(config-if)# exit

! WAN Interface - "Internet & Server"
Router(config)# interface GigabitEthernet0/1
Router(config-if)# ip address 10.0.0.1 255.0.0.0
Router(config-if)# ip nat outside
Router(config-if)# no shutdown
Understanding the Commands: Inside vs Outside
This paragraph explains the logic behind the commands applied above. These two commands tell the router in which direction the traffic should be translated. The ip nat inside command marks the interface as “internal” (your private network), while ip nat outside points to the “internet” (public network).
Without these markings, the router wouldn’t know when to swap the PC’s private IP for the router’s public IP. Imagine them as “Entry” and “Exit” signs at customs: they define where the document verification (translation) must occur.
3. Configuring NAT Overload (PAT)
Explanation of the ACL and Overload logic for beginners. Before running the commands, understand why they are necessary:
- Why use an ACL? Think of the ACL as a “guest list”. It tells the router: “Only packets coming from the 192.168.0.0 network are allowed to have their addresses swapped”. Without the ACL, the router wouldn’t know which traffic should be translated.
- Why use Overload? Since we only have one public IP (10.0.0.1) for several PCs, the
overload(also called PAT) allows the router to use different “ports” for each PC. It’s like a building with a single number (IP), but multiple apartments (Ports). This allows everyone to browse at the same time using the same outbound IP.
For those who want to understand a practical application of this technique in the real world, also see our post on what is CGNAT, which uses similar principles on a large scale.
Now, we create the Access Control List (ACL) and enable the translation:
enable
configure terminal
! Creating the permit list (Internal Network)
! We use the Wildcard Mask 0.0.0.255 for the /24 network
Router(config)# access-list 1 permit 192.168.0.0 0.0.0.255

! Associating the list to the outbound interface with Overload
Router(config)# ip nat inside source list 1 interface GigabitEthernet0/1 overload

4. Verification Test
To confirm that everything is working:
Go to PC0 and open the Command Prompt. Type ping 10.0.0.2 (External Server IP).

On the Router, use the command below to see the translation in real time:
Router> enable
Router# show ip nat translations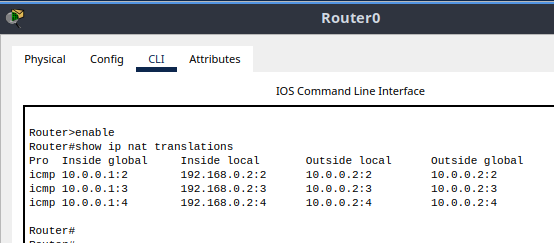
Complete Script for Quick Practice
Copy and paste this script into your 2911 router CLI to replicate the configuration instantly:
enable
configure terminal
hostname R-2911-NAT
interface GigabitEthernet0/0
 ip address 192.168.0.1 255.255.255.0
 ip nat inside
 no shutdown
exit
interface GigabitEthernet0/1
 ip address 10.0.0.1 255.0.0.0
 ip nat outside
 no shutdown
exit
access-list 1 permit 192.168.0.0 0.0.0.255
ip nat inside source list 1 interface GigabitEthernet0/1 overload
end
write memory
Then press ENTER.
Do you have any doubts about the Wildcard Mask or PAT ports? Leave your comment below!

Juliana Mascarenhas
Data Scientist and Master in Computer Modeling by LNCC.
Computer Engineer