Let’s address the topic related to container handling in Docker. In addition, we will use practical examples of handling containers using Docker.
Here, let’s check the images we have and let’s run containers in the background.
Also, check resource consumption in a container Docker.
Therefore, we can verify the efficiency of a container in the consumption of resources such as memory and processing.
We will also learn the different ways to run a container. In this case, let’s run, for example, a shell in a container and run a command in a container.
Furthermore, we will do the executions inside the container without necessarily establishing interactivity.
Next, we will demonstrate how to save changes to a container and turns it into an image.
That way, we can maintain the state of everything we install and configure inside a container. Consequently, this allows us to replicate the container with the settings we want.
Once we create an image of a container, we can pass this image on to other people.
Consequently, we can use as an example a programmer who has created an entire environment within the container and can now save the container’s image and make it available to his colleagues.
Check Docker Images
Firstly, let’s check the images we already have. That way, to check the images we
use the command below:
sudo docker images 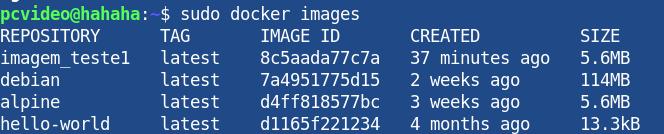
We see here those images that we used in the post: Lesson 01. So, with this command, we can observe the images we have at the moment.
Another interesting thing we can see is that the Alpine image is taking up 5.6 MB. In this way, we can verify how the use of container optimizes the use of resources.
This is perhaps one of the reasons that makes me more and more amazed at working with containers.
Run a container in the background
This form of container execution is interesting when we want to use a container without performing direct interactivity with the container.
For this, we will use the command below:
sudo docker run –td --name meu_teste alpine “-t” Indicates that we are going to allocate a pseudo TTY
“-d” Indicates that we are going to run the Docker container in the background.
“–name” Indicates that we are going to pass a name to our container. In this case, the name of our Docker container will be “meu_teste”.
“alpine” Indicates the image we will use in our container.

Check consumption of Docker container resources
Previously, we created a container and can see that we have not entered the interactive mode. That is because we are running the container in the background.
However, we might be left with the doubt if the Docker container is working. So, to solve this doubt, we can use the command below:
sudo docker ps So, we can see that the container appears on the screen after the above command.
Now let us suppose that we want to check how the resource consumption of one or more Docker containers is doing. For this, we will use the command below:
sudo docker stats 
Using the above command, we can see a table separating each container by its ID and name. In addition, the command shows us how much the containers use memory, CPU, and bandwidth.
So this information given by the above command gives us an interesting insight into the resources available and how much we can still use. Also, Docker allows us to limit the amount of processing and memory.
This way, we can limit the number of resources each container will use.
Thus, limiting a container’s resources can be helpful when we have containers running in parallel, and we do not want a container to use resources destined for other containers.
We’ll talk more about this resource limitation in containers in the future.
Running in a Docker container
We’ll show you how to run a shell in a container and how to run commands directly inside the container.
Run Shell in Docker container
Let us run a shell in a container we have already created. For this, we will execute a command that allows us to access the container running in the background and execute a Shell in that container.
For this, we will use the command below.
sudo docker exec -it meu_teste sh “exec” Indicates that we will execute a container.
“-t” Indicates that we are going to allocate a pseudo TTY.
“-i” Indicates that we are going to use interactivity with the container.
“meu_teste” This is the name we gave to the container.
“sh” Indicates that we are going to use the shell.

We are now inside the container shell and can check the contents of the container using the command ls.
ls There is an interesting point about containers in the background which is the question below.
How to terminate a Docker container in the background?
Many believe executing the exit command in the terminal will terminate the container. However, this answer is not valid.
That is because the command exit takes us out of the container terminal, and the container continues to run in the background.
Let’s test it by running the exit command in the container terminal.
exit However, if we run the command below, we will verify that the container is still running.
sudo docker stats So, to terminate a container in the background, we need to exit the terminal using the exit command. And then, run the command below.
sudo docker stop my_container “stop” Indicates that we are going to terminate the container.
“my_container” Indicates the name of our container.
It is worth noting that the command “sudo docker stop” can also be used together with the container ID instead of the container name.
And so, we finish the container.
What if we want to restart that same container?
We can use sudo docker start command and container name or ID. As in the command below.
sudo docker start my_container Execute a command in a container Docker
Another interesting issue is that sometimes we do not want to access the container to execute commands.
In this case, we can run the command directly in the container without having to access the container.
Therefore, we can use, i.e., the need to execute the “netstat” command inside a container without having to access the terminal of that container.
The command below demonstrates how to execute a command inside a container. In this case, we are running the command netstat inside the container “meu_teste”.
sudo docker exec -it meu_teste netstat -rn “exec” Indicates that we will execute a container.
“-t” Indicates that we are going to allocate a pseudo TTY.
“-i” Indicates that we are going to use interactivity with the container.
“meu_teste” This is the name we gave to the container.
“netstat -rn” Indicates that we are going to use the command “netstat -rn”. We use this command when we want to check a host’s route table.

Using the above command, we can check the container’s route table. Therefore, the command presents the routing table using “netstat -rn”.
Save changes to a Docker container
Docker has an essential function that allows us to save changes, such as installing programs and settings made in a container.
That way, we can generate an image of the Docker container and ensure that our installations and changes are in the Docker image.
So let us create our Docker image. In this case, we are going to use an Alpine image, and we are going to make changes to the container.
Now, let us access the container and create a directory inside “/home”.
So let us create a directory, and we will show the created directory. This example shows us that the container changes will be saved in the new image we will create.
So, any container that runs using our image will contain the directory we created.
So let’s initially run the shell inside the container with the command we described earlier.
sudo docker exec -it meu_teste sh After that, let’s access the “/home” directory. For that we will use the command cd described below.
cd home Next, let’s create our directory. For this, we will use the command mkdir. In this case let’s call the directory “my_directory”.
mkdir meu_diretorio Now, we can verify that the directory we created is inside the container. For this, we can use the command ls.
ls Finally, let’s exit the container terminal using the command exit.
exit It is worth remembering that the exit command does not terminate the container that was executed in the background.
Now, let’s run the command below to save the container in an image.
sudo docker commit meu_teste imagem1 “commit” This is the command that creates the Docker image.
“meu_teste” This is the name we gave the container.
“imagem1” This will be the name of our Docker container image.

We can verify that we now have a new image. For that we will use the command below.
sudo docker images 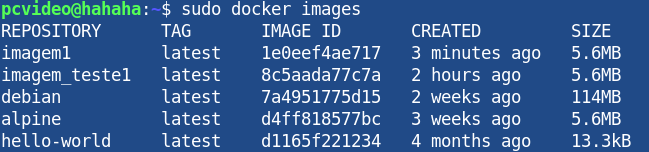
With the command above, we can verify that our newly created image is now available.
Running a container with our Docker image
Now let’s run a new container that will use the image we created earlier. That way, we can verify that the changes that were created in the image are inside the new container.
sudo docker run -it --name novo_container imagem1 
Now, we have shell access to the new container, and consequently, we can check if the changes are inside the container.
For that, let us access the home directory with the command below.
cd home Next, let’s run the ls command to list the directories and files.
ls 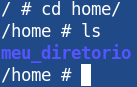
Finally, we can see that the directory we created earlier is in the new container. This way, we could verify that we created a new image from a container modified by us.
In this post, we present an example that can be replicated for different experiments with Docker containers.
Therefore, we suggest that you start practicing Docker container today.
- See more posts from our Docker tutorial
- Article 01 – Docker Installation
- Article 02 – Docker: Handling Containers
- Article 03 – Docker: Installing servers in Docker
- Article 04 – Portainer : Installation and Configuration

Juliana Mascarenhas
Data Scientist and Master in Computer Modeling by LNCC.
Computer Engineer