Let us introduce the installation of VNC on raspberry pi. For that, we will use the RealVNC server on the raspberry pi.
This way, the customer will be able to access the raspberry pi without the need to use another monitor.
Initially, we will access the raspberry pi device. So, let us assume that raspberry pi has already been installed and that we have ssh access to the device.
For those who wish to install and enable the device, click HERE.
1) Accessing raspberry pi
Once we have installed and configured SSH, we will access it using another machine on the network.
ssh pi@ip In our case it was
ssh pi@192.168.1.109 Enter the password you used when installing raspberry pi.
Once logged in we will have this screen:
1) tela
2) Setting the ssh server as a permanent service
Now, let’s configure the ssh server, so it is always active on raspberry pi startup. For that, let’s use the command:
sudo systemctl enable ssh.service 3) Updating repositories and upgrades
Now we will update the repositories, and then we will check if there are any updates to the raspberry pi.
In this way, we will use the commands below.
sudo apt-get update sudo apt-get upgrade 4) Installing Real VNC
After that, let’s install the realvnc server. This will be our VNC server. So, let’s use the command:
sudo apt-get install realvnc-vnc-server Enabling VNC on raspberry pi startup
Once RealVNC is installed we will enable the VNC service on rapsberry pi startup. For this, let’s use the command:
sudo systemctl enable vncserver-x11-serviced.service Creating a password for VNC
sudo vncpasswd -service Now let’s edit the file: /root/.vnc/config.d/vncserver-x11
sudo nano /root/.vnc/config.d/vncserver-x11 Let’s add the following lines:
SecurityTypes=VncAuth UserPasswdVerifier=VncAuth Checking the ports that VNC opened
Let’s look at the ports that VNC has opened and are waiting for connections. Therefore, we will use one of these ports to connect to the VNC server.
sudo netstat -anlp | grep :595) Restarting raspberry pi
Now let’s reset the device. For this we will use the command:
sudo reboot 6) Accessing the raspberry pi with VNC.
To access the raspberry pi VNC server, we have to use a VNC viewer. There are several VNC viewers. VNC viewers are available for Windows, Linux, iOS, and Mac.
We will use the remmina. Let us install remmina:
sudo apt-get install remmina Inside the remmina we will type the IP and port used by the VNC server.
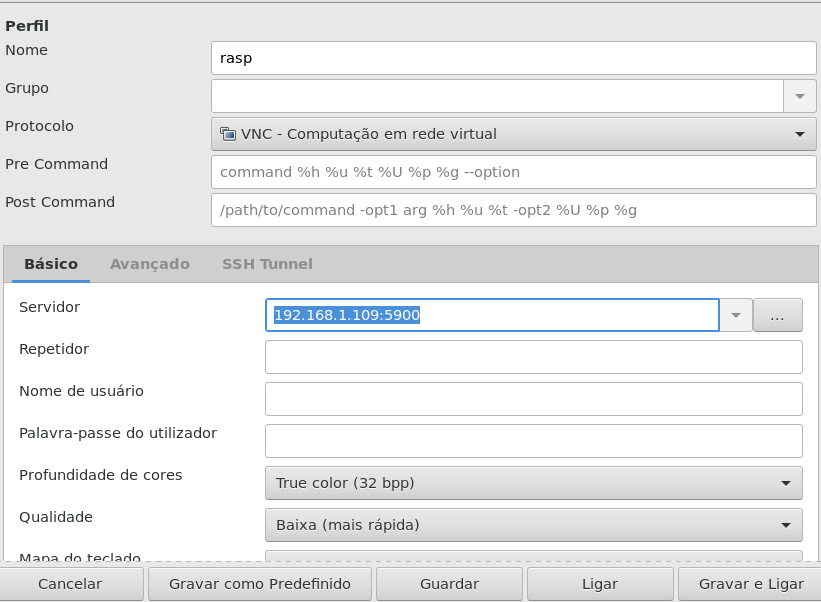
Now let’s make the connection by clicking save and connect.
Congratulations, we re accessing raspberry pi using VNC. Install VNC on Raspberry pi.
- Raspberry Pi: installation and configuration
- Apache HTTPS Server configure
- Proxy Squid: User Authentication
- Squid Proxy: Filter clients by IP and MAC
- PfBlockerNG: Exception List for Clients

Juliana Mascarenhas
Data Scientist and Master in Computer Modeling by LNCC.
Computer Engineer