
Zabbix can be installed on a Raspberry Pi easily and quickly. Thus, we will present all the steps to show how to install Zabbix on Raspberry Pi.
In addition, using Zabbix with Raspberry Pi can be a low-cost solution for monitoring small businesses and home networks. In this way, we will have reduced hardware costs and lower energy consumption.
Consequently, our comparison uses a traditional computer for monitoring versus a Raspberry Pi.
- Choosing the Zabbix Installation
- How to know the OS version of Raspberry Pi?
- Installing the Zabbix repository on the Raspberry Pi
- Installing Zabbix server and Zabbix agent
- How to create the zabbix database?
- Importing the initial Zabbix schema
- Setting up the database in zabbix_server.conf
- Starting the Zabbix Server
- Accessing Zabbix Server
Choosing the Zabbix Installation
First, let’s go to the zabbix website https://www.zabbix.com/. Next we’ll click on the Downloads tab.

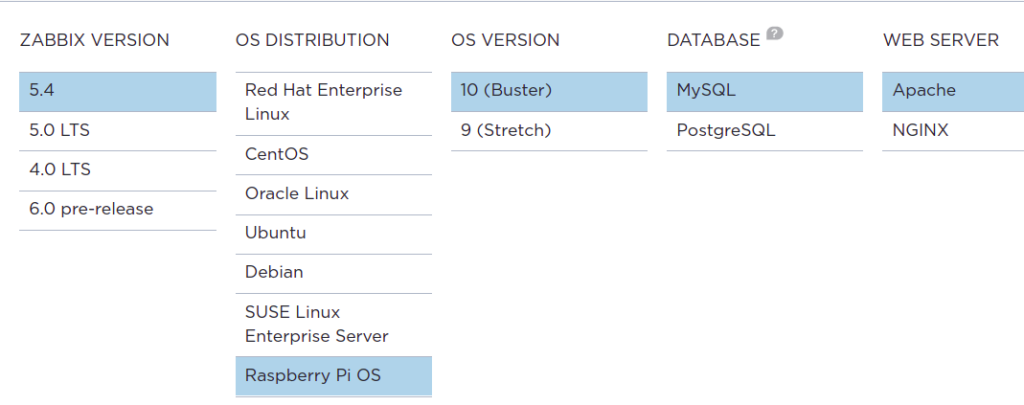
Next, let us choose the Zabbix version and the Raspberry Pi version. After that, let us choose the database type and the WEB server used.
This tutorial will use the MySQL database and WEB apache2 server.
How to know the OS version of Raspberry Pi?
To find the Raspberry Pi operating system version, we can open the terminal and use the command; “cat /etc/os-release“.
This way, we will have the version presented on the screen.
cat /etc/os-releaseInstalling the Zabbix repository on the Raspberry Pi
After selecting the Zabbix version + database + WEB server, we can download the file. This option appears on the page where we selected the Zabbix version above.
In our case,well download zabbix-release_5.4-1+debian10_all.deb . However, depending on the season, there may be a new version in the repository.
So it is worth checking out. To download, let us use the command below:
wget https://repo.zabbix.com/zabbix/5.4/raspbian/pool/main/z/zabbix-release/zabbix-release_5.4-1+debian10_all.deb Eventually, we can download using our web browser by just using the link.
Next, let us open the terminal and use dpkg to install Zabbix. For that, let us go into the same folder where we downloaded the Zabbix file and use the command below.
sudo dpkg -i zabbix-release_5.4-1+debian10_all.deb Next, let’s use the command:
sudo apt update Installing Zabbix server and Zabbix agent
After installing the repository, we will start installing the Zabbix server + Zabbix frontend + Zabbix Agent. For this, we will use the command below.
sudo apt install zabbix-server-mysql zabbix-frontend-php zabbix-apache-conf zabbix-sql-scripts zabbix-agent How to create the zabbix database?
First, let us install an SQL server. For that, we are going to use the mariadb-server. So let us use the command below:
sudo apt-get install mariadb-serverNow let us create the Zabbix database. For that, we need to verify that the database is working correctly. Thus, let us create the database password:
sudo mysql -uroot -p password123 Next, let’s create the database after the password:
mysql> create database zabbix character set utf8 collate utf8_bin; mysql> create user zabbix@localhost identified by 'password'; mysql> grant all privileges on zabbix.* to zabbix@localhost; mysql> quit; Importing the initial Zabbix schema
Now let’s import the initial scheme. Remember to use the same password you created for the database:
sudo zcat /usr/share/doc/zabbix-sql-scripts/mysql/create.sql.gz | mysql -uzabbix -p zabbix Setting up the database in zabbix_server.conf
Now, let’s open a terminal and access the zabbix_server.conf file. For that, we can use an editor like nano. Example:
sudo nano /etc/zabbix/zabbix_server.conf Next, let us search for the line with the word ( DBPassword=). But first, let us put the password we created before:
DBPassword=password123 Starting the Zabbix Server
Now let’s start Zabbix Server + Apache + Zabbix Agent. For that, let’s use the command below:
sudo systemctl restart zabbix-server zabbix-agent apache2 After that, we will enable the servers. This way, the servers will boot together with the operating system. For that, let us use the command below.
sudo systemctl enable zabbix-server zabbix-agent apache2 Accessing Zabbix Server
Now let’s make the first access to Zabbix Server. To do this, let’s open the browser and type:
http://server_ip/zabbix In this case, the server_ip is the server’s IP that we installed Zabbix on. If we use the browser within the server, we can use IP 127.0.0.1.
Otherwise, use the ifconfig command to know our Zabbix server IP.
Raspberry Pi: installation and configuration
Virtualizing the Raspberry Pi – Raspbian
Arpwatch: Installation and Configuration

Juliana Mascarenhas
Data Scientist and Master in Computer Modeling by LNCC.
Computer Engineer


