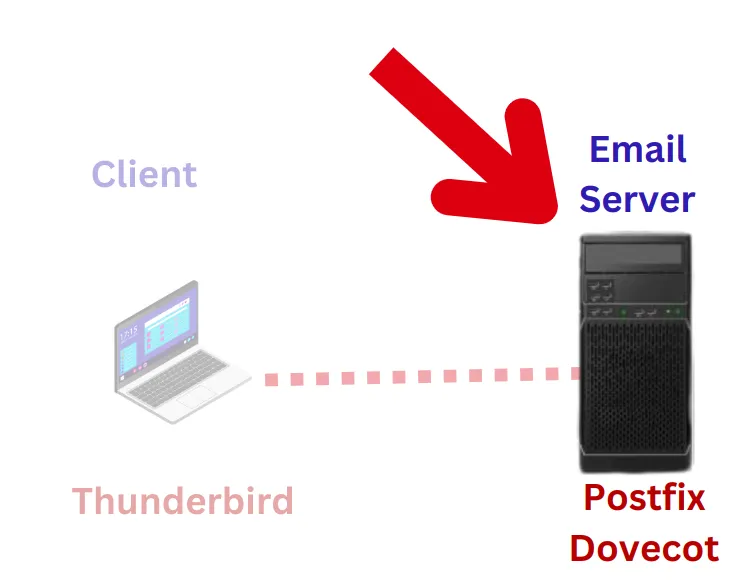
In this tutorial we will implement and validate in an isolated manner an MTA (Postfix), an MDA (Dovecot) and a modern and secure MUA (SnappyMail) in a private network environment, using only packages from the official Ubuntu main repository.
The objective of this tutorial is to allow the understanding of the email architecture at the application layer in a modular way.
PART 1: Server Preparation
In this step, we will use a machine with Ubuntu LTS.
Step 1: Network Update and Identification
Before installing the packages, it is crucial to define the server identity. We will use the “.test” suffix (reserved by RFC 2606 for local testing) to avoid route conflicts on the Internet.
Update the system package list:
sudo apt update && sudo apt upgrade -y

Set the fully qualified domain name (FQDN) of the server to mail.network.test:
sudo hostnamectl set-hostname mail.network.test

Open the static resolution file /etc/hosts:
sudo nano /etc/hosts

Add the line associating your Server’s IP to the configured name. Keep the loopback lines (127.0.0.1) intact:
Server_IP mail.redes.test mail

PART 2: Configuration and Isolated Validation of the MTA (Postfix)
In this step, the goal is to bring the sending SMTP server online and ensure it is capable of receiving messages and delivering them physically in the Maildir directory format.
Step 2: Postfix Installation and Configuration
Postfix will be our MTA (Mail Transfer Agent).
Install Postfix and the mailutils terminal utility:
sudo apt install postfix mailutils -y

During the installation, the text-mode wizard (dpkg) will ask crucial questions. Configure exactly like this:
General type of mail configuration: Select option 2 which means Internet Site.

System mail name: Type exactly the name you entered. In our case, it was mail.network.test.

Next, there will be a question for the root and postmaster recipient. Since we are not going to use this configuration in this tutorial, we will just press ENTER.

Then comes a question about whether you will accept emails for other destinations. In our case, we will press ENTER.

After that comes the question about using Postfix on local networks and we will also press ENTER.

Then comes the question about the user’s mailbox limit. In this case, we will press ENTER because we will insert the value in the configuration file.

Now comes the question about using characters for local address extension and we will just press ENTER.

And finally, comes the question about which IP version Postfix will use. In this case, we will check 1 to allow IPv4 and IPv6.

Open the main Postfix configuration file:
sudo nano /etc/postfix/main.cf

Adjust the parameters to enable storage in the Maildir format and preventively fix blank numerical limits:
myorigin = $mydomain
mailbox_size_limit = 0
mydestination = $myhostname, localhost.$mydomain, localhost, $mydomain
home_mailbox = Maildir/
(Pedagogical note: home_mailbox = Maildir/ defines that emails will not be saved in a single mbox file, but as individual files inside the user’s folder. Leaving mailbox_command empty guarantees direct delivery by the local agent. The mailbox_size_limit = 0 prevents fatal syntax errors in the Postfix local agent if the installer wizard is left blank).
Apply the new settings by restarting the service:
sudo systemctl restart postfix

Step 3: Test User Provisioning
Each email account in this model corresponds to a real user in the Linux operating system.
Create the user ana with the default bash shell and home directory:
sudo useradd -m -s /bin/bash ana

Set a simple password for laboratory purposes (e.g., ana):
sudo passwd ana

Step 4: SMTP Sending and Physical Delivery Test (MTA Validation)
Now, we will validate if Postfix is operational and successfully performing local deliveries.
Install swaks (Swiss Army Knife for SMTP), an excellent test SMTP packet injector:
sudo apt install swaks -y

Trigger a test email to the user ana using the active local domain:
swaks --to ana@network.test --from ana@network.test --server localhost

You will see a message like the one in the figure below after typing the command.

Now, let’s verify if the message was sent to the user’s mailbox, which in our tutorial is the user ana. To do this, we will use the command below.
sudo ls -la /home/ana/Maildir/new/
And we will see the message we sent as in the figure below.

(If Postfix worked, you will see at least one text file with a long name corresponding to the sent message. This successfully concludes the MTA validation!)
DIAGNOSIS AND DEBUGGING (In case the Maildir folder is not created): If the command returns a queue ID (
queued as [ID]) but the directory does not appear in Ana’s home, check which domains your Postfix is accepting locally for delivery:postconf mydestinationIf the server automatically assumed the server’s network system domain (e.g.,
network.test), repeat the trigger adapting the corresponding domain:swaks --to ana@network.test --from ana@network.test --server localhost
PART 3: Configuration and Isolated Validation of the MDA (Dovecot)
Now that we know there are physical emails deposited on the disk by Postfix, we will install Dovecot to allow access and structured reading of these mailboxes via the IMAP protocol on port 143.
Step 5: Dovecot Installation and Configuration
Dovecot will be our MDA (Mail Delivery Agent).
Install the necessary Dovecot modules (there is no need to install pop3d if access is strictly via Webmail/IMAP):
sudo apt install dovecot-core dovecot-imapd -y

The Modern Approach via local.conf: Instead of changing extensive and polluted files like 10-mail.conf and 10-auth.conf that change layout between system updates, we will create a local configuration file that overrides the default settings cleanly and directly.
Create and edit the /etc/dovecot/local.conf file:
sudo nano /etc/dovecot/local.conf

Add the following storage and security configurations.

mail_driver = maildir
mail_home = /home/%{user | username}
mail_inbox_path = %{home}/Maildir
mail_path = %{home}/Maildir

auth_allow_cleartext = yes

namespace inbox {
  inbox = yes

  mailbox Sent {
    special_use = \Sent
    auto = subscribe
  }
  mailbox Drafts {
    special_use = \Drafts
    auto = subscribe
  }
  mailbox Trash {
    special_use = \Trash
    auto = subscribe
  }
  mailbox Junk {
    special_use = \Junk
    auto = subscribe
  }
  mailbox Archive {
    special_use = \Archive
    auto = subscribe
  }
}
(Note: In Dovecot 2.4+, the old global directive mail_location was deprecated by the upstream. We use the new specific parameters mail_driver, mail_path and explicitly set mail_inbox_path as empty to override the system’s default mbox /var/mail/%{user}, allowing the Maildir driver to operate perfectly).
- Apply the modifications by restarting the Dovecot service:
sudo systemctl restart dovecot

Step 6: IMAP Access and Reading Test (MDA Validation)
To prove that Dovecot is working, we will simulate the action of an email client via terminal, authenticating to the server and reading the message that Postfix delivered in Step 4.
- Connect to the local IMAP listening port using the
telnetutility:

telnet localhost 143
(You should receive Dovecot’s successful connection banner).
- Execute the login command in the IMAP protocol with the credentials of the user
ana:
. login ana ana

(The expected response is . OK [CAPABILITY ...] Logged in, indicating that Dovecot successfully integrated with the Linux PAM module and authenticated the local user).
- Instruct Dovecot to select and open the user’s default inbox folder (INBOX):
. select INBOX

(Dovecot will return the folder properties, including a count of the messages it found and indexed in the physical Maildir folder. Example: * 1 EXISTS).
- Request Dovecot to fetch the content of the first message in the queue:
. fetch 1 body[]

(Dovecot will interpret the physical file that Postfix saved in /home/ana/Maildir/new/ and output in a structured way the SMTP header, the subject and the message “This is a test mailing” in the terminal console).
- Safely end the session and close the connection:
. logout

(If you managed to read the message, this definitively validates your MDA! The local email engine is 100% tested, functional, and ready).
PART 4: Secure Webmail Interface (SnappyMail)
With the email infrastructure (MTA + MDA) validated, we will install SnappyMail (MUA). Since SnappyMail is stateless, it connects directly to IMAP and SMTP in real-time. There is no need to install or configure any SQL database (like MariaDB/MySQL), making the installation extremely clean and secure.
Step 7: Apache and PHP Web Server Installation (main repository only)
We will install the basic web infrastructure using only the native packages from the main Ubuntu repository.
- Install Apache and the basic PHP extensions required for SnappyMail:
sudo apt install apache2 php php-curl php-mbstring php-xml php-zip php-gd php-intl libapache2-mod-php -y

Step 8: SnappyMail (MUA) Download and Manual Deployment
To ensure that students learn to obtain updated and secure software in a professional manner, they must learn to navigate autonomously on the project’s GitHub releases page (Releases) to get the link for the latest production package.
Create the webmail destination folder in Apache (or ensure it is created cleanly):
sudo mkdir -p /var/www/html/snappymail
GitHub navigation instructions:
In the browser of a client or physical machine, access the official SnappyMail releases page [https://github.com/the-djmaze/snappymail/releases]
https://github.com/the-djmaze/snappymail/releases
Identify the most recent release that has the green “Latest” tag at the top of the page.

Scroll down the page, passing the release notes (Release Notes), until you find the “Assets” section of that release block. If the section is hidden, click to expand it.
Locate the compressed file in .tar.gz format (e.g., snappymail-2.38.2.tar.gz).

Important Security/DevOps Note: I generally avoid choosing the “Source code (zip)” or “Source code (tar.gz)” files. These contain the raw development source code, which is not compiled and does not include the necessary dependencies, which will result in a directory indexing error in Apache.
After copying the file ending in .tar.gz , we will use the command below to extract and send it to the correct folder.

sudo tar -xvzf snappymail* -C /var/www/html/snappymailSet the correct access permissions so that the web server user (www-data) can read and write to the application’s temporary configuration files:
sudo chown -R www-data:www-data /var/www/html/snappymail
sudo find /var/www/html/snappymail -type d -exec chmod 755 {} \;
sudo find /var/www/html/snappymail -type f -exec chmod 644 {} \;


Restart the Apache web server to ensure all permissions are applied:
sudo systemctl restart apache2

Step 9: Domain Configuration in the SnappyMail Administration Panel
SnappyMail has an exclusive web panel for administrators to configure destination servers.
In the browser of a client machine or the server machine itself, go to the SnappyMail administration panel:
http://Server_IP/snappymail/?admin
Log in using the default SnappyMail administration credentials:
User: admin
Password: SnappyMail generates a unique random password on the first boot for security reasons. To find out the password generated for your server, run the following command in the terminal:
sudo cat /var/www/html/snappymail/data/_data_/_default_/admin_password.txt
Copy the password displayed in the terminal and use it to log into the administration panel.

Change the default password immediately in the panel’s security menu to ensure server integrity.
Configure the local domain:
On the left side menu, click on “Domains”.

We can observe that our domain “mail.network.test” is already listed.
If you click on the listed domain, we will see the configuration below for IMAP.

By clicking on SMTP, we will see the configuration below.

If your domain has not been added or you want to make changes and create new domains, you can use the figures above as a basis for your configuration. Then, you can click on the “Add Domain” button.
Fill in the fields of the figure above according to your domain configuration.
If you have made any changes, click on “Save” to save the settings.
PART 5: Practical Test on the Client
Now, you can use a second virtual or physical machine connected to the same subnet to access the Webmail.
Step 10: Webmail Access
On the client machine, open the web browser and use the IP of your Webmail Server.
http://Server_IP/snappymailLog in using the account created in Step 3:
User: ana@network.test
Password: ana

Validation: You will instantly see the test message sent via swaks in Step 4 in the inbox. Now you can send new emails directly through the SnappyMail graphical interface and check the immediate delivery!
As soon as you log into the email, a screen will appear asking you to enter the name and the label that will appear in the user’s email.

Next, you will see the screen with the user’s emails.

Now, let’s send an email from ana to ana herself. This will be our first test. To do this, click on “New Message” and then enter ana’s email “ana@network.test” and the email subject. Next, type something in the email and click on “Send“.

Next, we will click on the icon to refresh the Webmail and we will see our email in the mailbox, as in the figure below.


Pedagogical Analysis Notebook (Debugging)
If any error occurs during delivery or authentication, we can use a few commands to allow us to act like true infrastructure engineers, investigating the log files in real time.
Email Transmission Logs (SMTP/IMAP) via systemd (modern Ubuntu):
sudo journalctl -u postfix.service -u dovecot.service -fWeb Server Logs (Apache/PHP):
sudo tail -f /var/log/apache2/error.logShow the last 50 log messages generated specifically by the Dovecot server.
sudo journalctl -u dovecot.service -n 50 --no-pagerShow the last 50 log messages generated specifically by the Postfix email server:
sudo journalctl -u postfix.service -n 50 --no-pagerSee more:
How to install and configure NGINX on Linux
How to Set Up a Postfix and Dovecot Email Server on Linux: A Step-by-Step Guide
Build Your Own DNS Server: A Step-by-Step Guide using BIND9
Tutorial for SSH Public Key Authentication

Juliana Mascarenhas
Data Scientist and Master in Computer Modeling by LNCC.
Computer Engineer