This tutorial will demonstrate how to configure Suricata in Network IPS on your network. Therefore, we want to use Suricata to protect other machines or servers within the network.
There are several ways to use Suricata to provide protection within the network. In this case, we will use a rule that prevents unwanted access to other TCP ports that have not been released in Suricata.
The rules used in this tutorial were the rules used in : Part 2: Install Suricata on Linux
This tutorial is part of the Suricata Linux Course.
Lesson 1: Install Suricata on Linux
Lesson 3: Suricata Network IPS
Link to the Suricata course on YouTube:
Proposed scenario
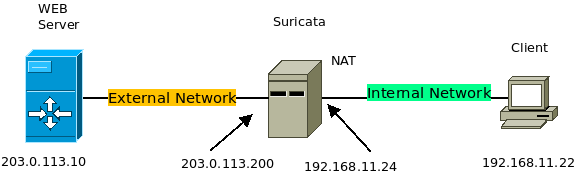
In this scenario, we are going to use Suricata between two networks. We have the external network containing a WEB server and the internal network with a computer acting as a client. Thus, using this scenario, we assume that we want to create specific rules for accessing the WEB server. In this case, we will use Suricata to only allow HTTP traffic to the WEB server.
Consequently, Suricata will discard and log all traffic to the non-HTTP WEB server.
Used scenario
Change our suricata rule
We need to change the rule we created earlier to ensure that Suricata blocks any TCP traffic that is not destined for port 80(HTTP). To do this, we will use the command below to create and edit the file “redes.rules ”.
sudo nano /etc/suricata/rules/redes.rules Next, we will modify the existing rule by removing the “$HOME_NET “ and inserting the “any”. This way, we will discard TCP packets that are not to port 80 on any network.
drop tcp any any -> any !80 (msg:"TCP Scan ?"; flow:from_client;flags:S; sid:992002087;rev:1;) 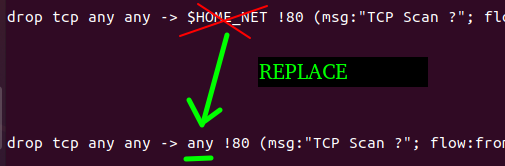
After that we will save.
Next we will reset the suricata rules with the command below.
sudo kill -USR2 $(pidof suricata) Configuring the suricata machine as a router
This tutorial will configure the Suricata machine to act as a router between the internal network “192.168.11.0/24” and the external network “203.0.113.0/24”. In addition to acting as a router, we will create a NAT rule that translates the IPs of the internal network “192.168.11.0/24” into an IP of the external network.
Thus, we create a scenario similar to inserting the Suricata between the Internet and your internal network. Additionally, this type of scenario could be used between two networks of your company.
Creating the forwarding permission
Now we need to enable forwarding on the Suricata machine. For this, we will insert a line in the “/etc/sysctl.conf” file. So, let’s use the command below to insert the line by command:
sudo nano /etc/sysctl.conf Next we will add the line at the end of the file:
net.ipv4.ip_forward = 1 You can tell me: Juliana this line is already in the file. The answer is yes. However, on most systems this line will be commented out, especially if you have never configured the server to forward packets. If you wish, you can uncomment the line instead of inserting the line “net.ipv4.ip_forward = 1”.
Now let’s reload the file using the command :
sudo sysctl -p 
Checking the interface connecting the external network
Before configuring NAT, we need to identify which is our network interface that connects our external network. That is because the client’s connections within the internal network will be routed through this interface that connects to our external network. So, let us use the command below to identify the interfaces and networks.
ip route 
We can see in the figure above that our external network is “enp0s3”. That’s because this interface “enp0s3” is associated with the network that we defined as external “203.0.113.0/24”.
Creating a NAT for the internal network
Let’s edit the file that pre-reads the firewall rules. In this file, we will perform two procedures. The first will be to perform a NAT to the internal network, and the second will be to forward the traffic to the NFQUEUE. For this, we will edit the file “/etc/ufw/before.rules”. So, let’s use the command below:
sudo nano /etc/ufw/before.rules And let’s insert the lines below.
*nat

:POSTROUTING ACCEPT [0:0]

-A POSTROUTING -s 192.168.11.0/24 -o enp0s3 -j MASQUERADE

COMMIT
Thus, these lines will allow the translation from the internal network to the external network to be done. However, it is worth noting that in configuring these lines, we must introduce our network interface used in the external network. Thus, in our case, the interface for the external network is “enp0s3” and the network used in our internal network is “192.168.11.0/24”.
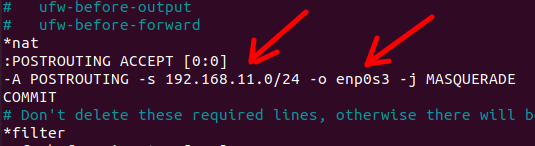
The figure above maps the internal network “192.168.11.0/24” to go out through the external interface “enp0s3”.
Sending routing traffic to NFQUEUE
Unlike what we did in the previous post, now we will configure the Suricata to work as a network IPS. Thus, we need to create rules in the firewall to send the traffic that will be routed to the Suricata NFQUEUE. Let’s change the UFW’s “before.rules” file to do this change.
-I FORWARD -j NFQUEUE 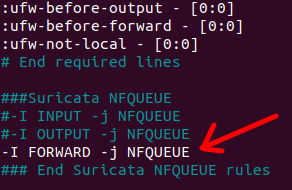
In the figure above, we commented on the previous rules “#-I INPUT -j NFQUEUE” and “#-I INPUT -j NFQUEUE”. Therefore, we commented these lines because we are no longer interested in filtering the traffic that comes to the Suricata machine but the traffic that the Suricata forwards. However, if we want to filter traffic directed to the Suricata machine, we can uncomment the INPUT and OUTPUT lines.
Below is the file “before.rules”.
#

# rules.before

#

# Rules that should be run before the ufw command line added rules. custom

# rules should be added to one of these chains:

# ufw-before-input

# ufw-before-output

# ufw-before-forward

*nat

:POSTROUTING ACCEPT [0:0]

-A POSTROUTING -s 192.168.11.0/24 -o enp0s3 -j MASQUERADE

COMMIT

# Don't delete these required lines, otherwise there will be errors

*filter

:ufw-before-input - [0:0]

:ufw-before-output - [0:0]

:ufw-before-forward - [0:0]

:ufw-not-local - [0:0]

# End required lines


###suricata NFQUEUE

#-I INPUT -j NFQUEUE

#-I OUTPUT -j NFQUEUE

-I FORWARD -j NFQUEUE

### End Suricata NFQUEUE rules


# don't delete the 'COMMIT' line or these rules won't be processed

COMMIT
NOTE. If you choose to use another firewall, remember to redirect forwarding traffic to the Suricata NFQUEUE
Now let’s restart the UFW firewall using the commands below.
sudo ufw disablesudo ufw enable Testing the lock
Now let us open two ports on the external network machine with an apache WEB server. For this, we are going to use the APACHE2 server and the SSH server. Port 80 is used on WEB servers for the HTTP protocol, and port 22 is used for the SSH protocol.
In this case, we want Suricata to block access to the SSH server as the only traffic that will not be dropped will be traffic to the WEB server on port 80.
We can use the commands below to check if the WEB server and SSH protocol ports are open.
sudo netstat -anp | grep :80 sudo netstat -anp | grep :22 
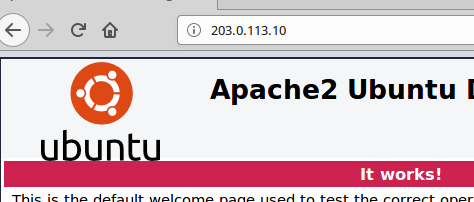
Now, let’s access the WEB server using a browser and typing the IP of the WEB server “203.0.113.10” on the client machine.
Next, let us try to access the SSH server installed on the machine with the WEB server. For this, we can use the command below:
ssh user@203.0.113.10 In the figure below, we can see that we did not have access to the SSH server. Therefore, Suricata has blocked access to all TCP ports other than port 80.

Checking logs on suricata.
Now let’s go to the suricata machine and open the log file. For this, we will use the command below:
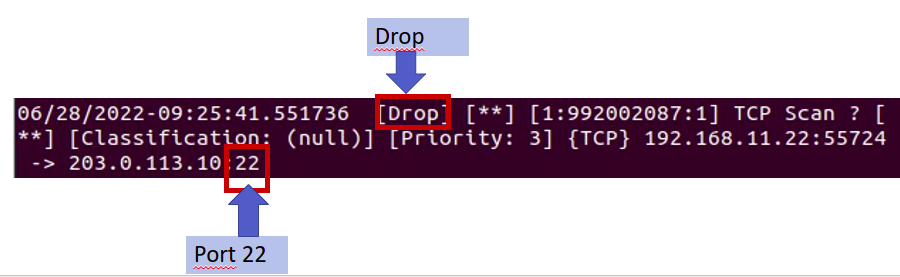
cat /var/log/suricata/fast.log We can see the result of the lock log in the figure below. In this case, we can verify that the IP of the client “192.168.11.22” tried to access port 22 of the IP of the WEB server “203.0.113.10”.
Topology in VirtualBox
In the figures below, we will demonstrate our scenario used to create the Suricata experiment using VirtualBox. That way, we can create the same scenario for studies and proof of concept.
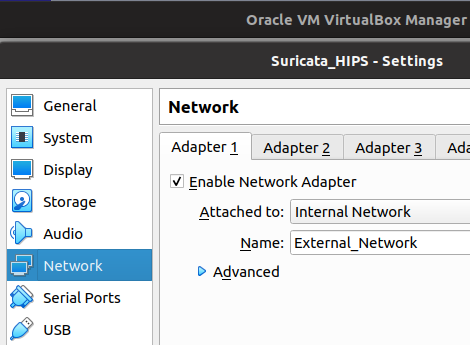
The figure below demonstrates the network configuration of the virtual machine hosting Suricata. Thus, we use the Adaptpter 1 interface to belong to the external network “External_Network”.
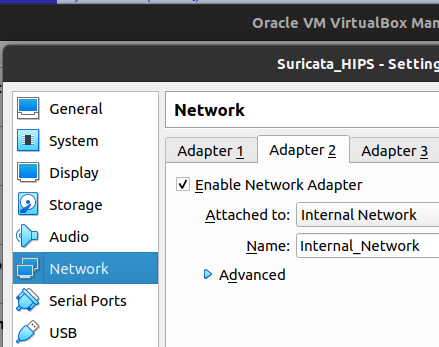
The figure below demonstrates the other network configuration of the virtual machine hosting Suricata. Thus, we use the Adaptpter 2 interface to belong to the external network “Internal_Network”.
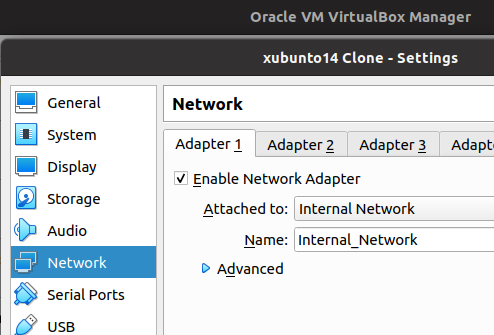
The figure below demonstrates the network configuration of the virtual machine hosting the internal network client. Thus, we use the Adaptpter 1 interface to belong to the external network “Internal_Network”.
The figure below demonstrates the network configuration of the virtual machine that hosts the WEB server. Thus, we use the Adaptpter 1 interface to belong to the external network “External_Network”.

Are you enjoying the Suricata course? Comment on the YouTube channel, and feel free to make suggestions.
This tutorial is part of the Suricata Linux Course.
Lesson 1: Install Suricata on Linux
Lesson 3: Suricata Network IPS
See more:
Part 1: Install Suricata on Linux
Part 2: Suricata Host IPS