We will present here a configuration of Suricata in Host IPS mode. That way, using this configuration, the reader can use Suricata to protect a machine hosting a service or to protect user machines.
In this tutorial we will use the Suricata in IPS mode acting in NFQUEUE mode. This way, packets are sent to the Suricata and then they can be blocked or allowed.
Let’s start the tutorial by creating a test rule. However, the reader can use Suricata’s ready-made rules and change the alert field to drop to make the Suricata drop packets that meet some attack rule .
We are assuming the same scenario and the same Suricata configuration created in the previous post: https://simplificandoredes.com/en/install-suricata-on-linux/
This tutorial is part of the Suricata Linux Course.
Lesson 1: Install Suricata on Linux
Lesson 3: Suricata Network IPS
Link to the Suricata course on YouTube:
Proposed scenario
Create a rule for IPs
Let’s create a custom rule. Thus, we aim to block any connection attempt to any port other than port 80.
We are simulating that we want to protect a WEB server from possible scans by other TCP ports.
In this case, let’s create a rule file called “redes.rules”. Also, let’s create this file “redes.rules” inside “/etc/suricata/rules/”.
For this, we will use the command below to create and edit the file “redes.rules”.
sudo gedit /etc/suricata/rules/redes.rules Next, let’s insert the rule below:
drop tcp any any -> $HOME_NET !80 (msg:"TCP Scan ?"; flow:from_client;flags:S; sid:992002087;rev:1;) This rule says “We will discard packets that come from any source and come from any port to our internal network other than port 80.” Also, let’s log the lock with the message “TCP Scan ?“. And let’s analyze the flow that comes from the client and that has the flag tcp = SYN.”
We will specify below the main fields of this rule.
“drop” It means that we will drop packets that meet this rule.
“tcp” We are focusing the rule on the TCP transport layer protocol.
“any any” In this case, the first “any” refers to any source IP and the second “any” refers to any source port. Therefore, “any any” indicates any IP and any port.
“->” In this case, we are using traffic direction. That is, we are assuming a traffic that comes from the origin “any any“.
“$HOME_NET “ Here we have the networks that belong to our Home Net described in the file “suricata.yaml”
“!80” = Not port 80. That is, any traffic going to any port other than 80.
“msg:”TCP Scan ?” The message that will appear in the Suricata logs
“flow:from_client;flags:S” Let’s analyze the flow that comes from the client and that has the flag tcp = SYN.”
“sid:992002087” The ID for the rule we just created. Be careful not to use the same sid as another rule of your Suricata.
“rev:1” The version of your rule.
Inserting the new rule in Suricata
Let’s go into “/etc/suricata/suricata.yaml”
sudo nano /etc/suricata/suricata.yaml Make sure your network is on “$HOME_NET “.
Now, let’s add the path to the new rule that we finished creating in the previous session. So let’s go to the end of the file and we’ll look for the line “rule-files” and we’ll insert the line below.
- /etc/suricata/rules/redes.rules 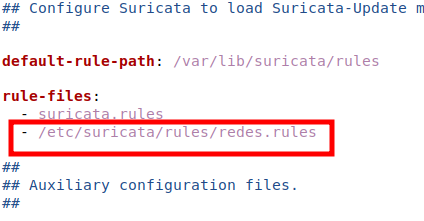
Turning Suricata into IPS host
Now let’s raise the Suricata in IPS mode. For that, let’s stop the Suricata process that is running on the machine with the command below.
sudo service suricata stop Or
sudo systemctl stop suricata.service Now, let’s change how the Suricata process starts. For this we will use the command below to open the editor.
sudo systemctl edit suricata.service Next we will insert the lines below.
[Service]
ExecStart=
ExecStart=/usr/bin/suricata -c /etc/suricata/suricata.yaml --pidfile /run/suricata.pid -q 0
Type=simple
The lines initially start the service configuration (ExecStart=”) and then start a new way to start the service (ExecStart=”). The “Type=simple” option allows systemd management to the Suricata.
The line “ExecStart=/usr/bin/suricata -c /etc/suricata/suricata.yaml –pidfile /run/suricata.pid -q 0 ” will run the Suricata service in IPS mode. For this, we use the option “ -q -0“. In this way, we are telling the Suricata that we will use the NFQUEUE mode.

Now, let’s restart the Suricata. For this we can use the command below:
sudo service suricata start Or
sudo systemctl start suricata.service Sending traffic to Suricata’s NFQUEUE
Now that we’ve configured Suricata to act as an IPS, we need to create firewall rules to send traffic to Suricata’s NFQUEUE. To do this, let’s change the UFW’s “before.rules” file.
sudo nano /etc/ufw/before.rules -I INPUT -j NFQUEUE
-I OUTPUT -j NFQUEUE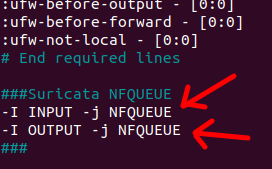
NOTE. If you choose to use another firewall, remember to redirect traffic to the Suricata NFQUEUE
Now let’s edit the file ”/etc/default/ufw”· In most cases the INPUT policy is set to DROP by default. So let’s change this policy to accept by default. Consequently, we are telling the firewall that what is not blocked by Suricata’s NFQUEUE will have ACCEPT permission.
sudo nano /etc/default/ufw ACCEPT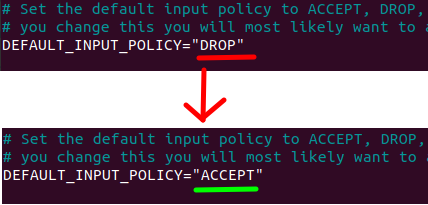
NOTE. This is just a suggested firewall configuration. However, you can configure your firewall to comply with the policy that suits you best. And remember to direct traffic to the Suricata NFQUEUE.
Now let’s restart the UFW firewall using the commands below.
sudo ufw disable sudo ufw enable Open ports 80 and 21
Now let’s open two ports on the Suricata-protected machine. For this, we are going to use the netcat command and we are going to open port 80 and port 21. Port 80 is used in WEB servers for the HTTP protocol and port 21 is used for the FTP protocol.
We will use the commands below to open ports 80 and 21. I suggest you open a terminal for each of the commands.
sudo nc -vln 80 Now let’s open another terminal or another terminal tab and type the command below.
sudo nc -vln 21 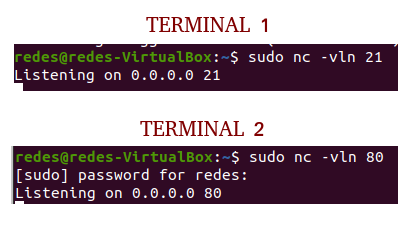
NOTE. We are using the netcat command to open ports 80 and 21. However, the reader can install a WEB server link to video HERE and install an FTP server link to video lecture HERE.
Testing access with nmap
Now let’s use nmap on the other machine to simulate a port scan against the machine we are protecting. In this case, we expect only port 80 to appear as open in the nmap results.
If you don’t have nmap installed, we have a post explaining the steps here.
NMAP: Identify the version of a service
NMAP: TCP and UDP port mapping
Now, inside the client machine that is on the same internal network as the machine that is protected with Suricata, let’s use the command below
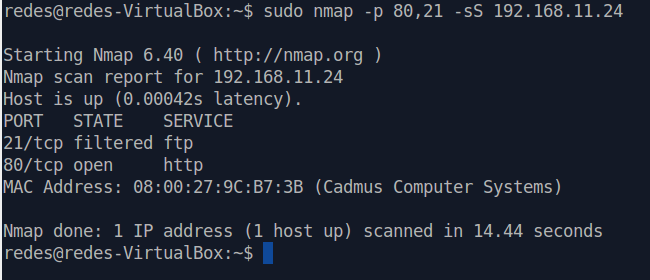
sudo nmap -p 80,21 -sS 192.168.11.24 In this case we are specifying that we want to scan ports 80 and 21 of the Suricata’s target machine which has IP 192.168.11.24.
We can see that port 80 is open “open” and port 21 is filtered as “filtered”. The term “filtered” is used to identify ports that did not respond to nmap scanning.
Checking logs on Suricata.
Now let’s go to the Suricata machine and open the log file. For this, we will use the command below:
cat /var/log/suricata/fast.log We can see the result of the lock log in the figure below.

Testing the Suricata IPS
Disabling the rule and testing the scan
Now let’s disable the rule we inserted in Suricata and let’s rescan with nmap. To do so, let’s edit the rules file again below and comment with “#” the rule we have inserted.
sudo nano /etc/suricata/rules/redes.rulesNext, let’s make the Suricata ignore the rule. For this we will insert “#” in front of the rule:
#drop tcp any any -> $HOME_NET !80 (msg:"TCP Scan ?"; flow:from_client;flags:S; sid:992002087;rev:1;) After that we will save.
Next we will reset the Suricata rules with the command below.
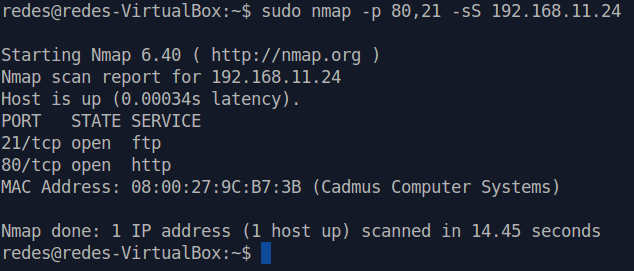
sudo kill -USR2 $(pidof suricata) Now let’s rescan nmap on the client machine.
sudo nmap -p 80,21 -sS 192.168.11.24 We can see that the scan result shows ports 21 and 80 as open.
Finally, we present in this tutorial a Suricata configuration in Host IPS mode. In future tutorials, we will introduce Suricata in network IPS mode. Or Network IPS (NIPS). Furthermore, we intend to present different ways to graphically present the Suricata logs.
This tutorial is part of the Suricata Linux Course.
Lesson 1: Install Suricata on Linux
Lesson 3: Suricata Network IPS
Comment on our YouTube channel if you liked this post and if you want to see more posts like this one.
See more:
- Install Suricata on Linux
- Addrwatch : Install and Configure
- Configure Load Balance with PfSense
- Configure Failover in PfSense