
FreeRadius is an excellent tool to control access to WIFI networks. This article will teach how to install and configure the Radius server.
Thus, using the Radius server (freeradius), we can control our users through a login and a specific password for each user.
How to install freeradius?
To install freeradius, let’s open the terminal and type the commands below.
Let’s update the repositories:
sudo apt-get update Next, let’s install freeradius:
sudo apt-get install freeradius Testing freeradius.
Now let’s perform the initial tests with freeradius. For this, we will use the command below:
First let’s stop the freeradius. That’s because, usually when we install freeradius the system already starts the service.
sudo service freeradius stop If we don’t stop freeradius before running freeradius -x, we will get the error below:
“ Failed binding to auth address 127.0.0.1 port 18120 bound to server inner-tunnel: Address already in use ”

So we need to stop the service with the command:
sudo service freeradius stop After that, let’s initialize debug mode with freeradius -X.
sudo freeradius -X 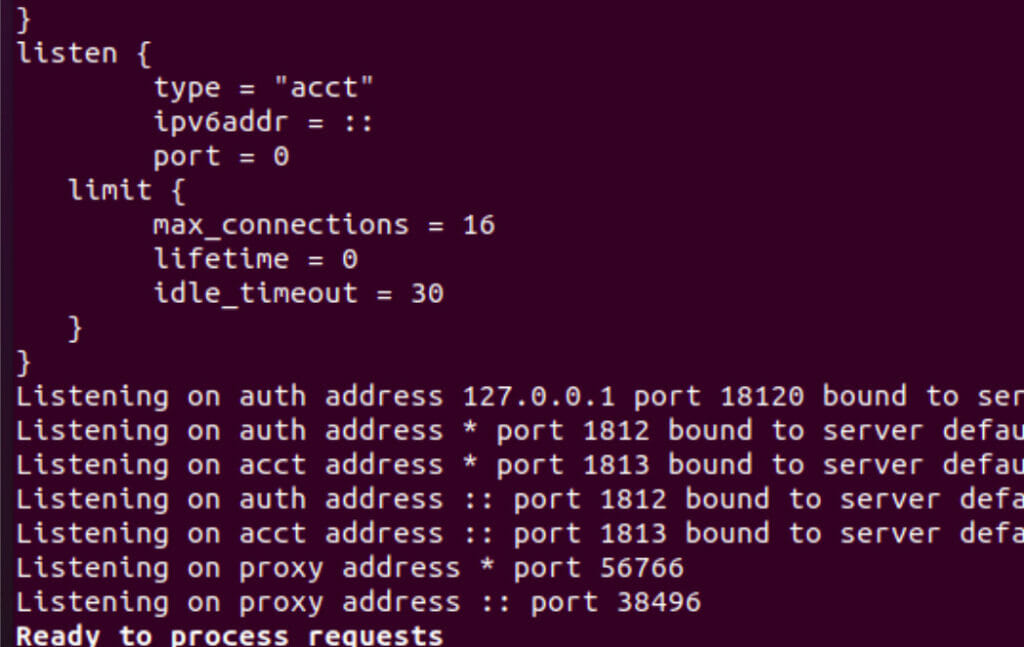
We can verify that the freeradius server is working correctly.
Problems starting freeradius in debug mode?
Sometimes we have problems starting freeradius in debug mode.
This is because, even using the command “ sudo service freeradius stop “ to stop freeradius, freeradius still works and occupies port 18120.
One way to check if this problem is happening to you is to check if the freeradius is still keeping the port open. So after you do the command below:
Sudo service freeradius stop Now let’s check if the freeradius still continues to listen on port 18120. For that, let’s use the command:
sudo netstat -anp | grep :18120 This command above will check if there is any process using port 18120. If there is any process using it, let’s see the screen below:

In this case, we will end the freeradius process using the killall command. For this, we will use the command below:
sudo killall freeradius Now we can run it again:
sudo freeradius -X Configuring the users file ( freeradius)
To access the users file, we need to access the directory /etc/freeradius. Once inside this directory, we can look for the freeradius version.
In our case, the version is 3.0 . So let’s use the command below:
sudo nano /etc/freeradius/3.0/mods-config/files/authorize This command allows us to use a text editor such as nano and modify the /etc/freeradius/3.0/mods-config/files/authorize file
Inside the file “ /etc/freeradius/3.0/mods-config/files/authorize “ we will add lines with the user configuration. As an example, let’s add the first line:
maria Cleartext-Password := "maria123" 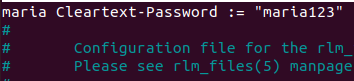
This line tells us that we are going to use the user = maria with the password = maria123.
You can change your usernames and passwords. In this case, we are using the cleartext password “Cleartext-Password “ in the configuration file.
After changing, save the change.
Freeradius on other Linux distributions
On other Linux distributions, the users file may be in the path below:
/raddb/mods-config/files/authorize Restarting the server to update changes
Now, let’s restart Freeradius so that the changes are updated. For this, we can use the commands below:
First let’s stop the freeradius:
sudo service freeradius stop Then, let’s restart freeradius in debug mode:
sudo freeradius -X Testing the new user on freeradius
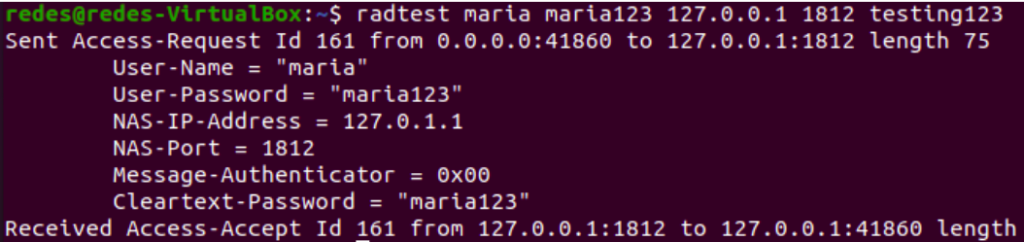
Now let’s test the new user “maria”. For that, we’ll use the radtest command. The test layer is below:
radtest maria maria123 127.0.0.1 1812 testing123 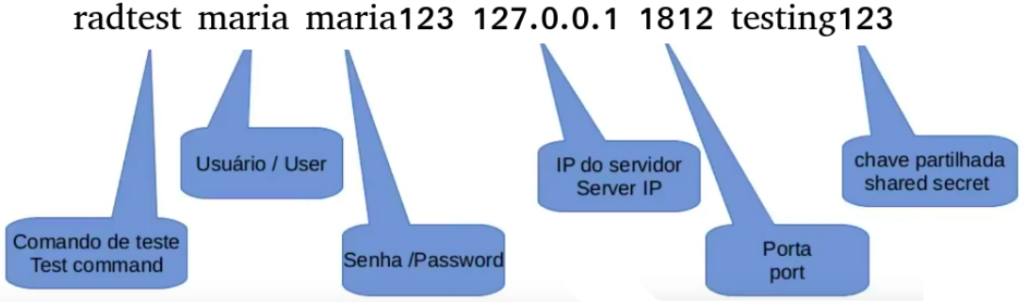
In the above command, we are using user=maria and user password=maria123. Then we have the server loopback IP = 127.0.0.1.
Then we have the port used = 1812. After that, let’s inform the shared key, this shared key is used to have access to the radius server.
Later you can upload the shared key in the file: /etc/freeradius/3.0/clients.conf .
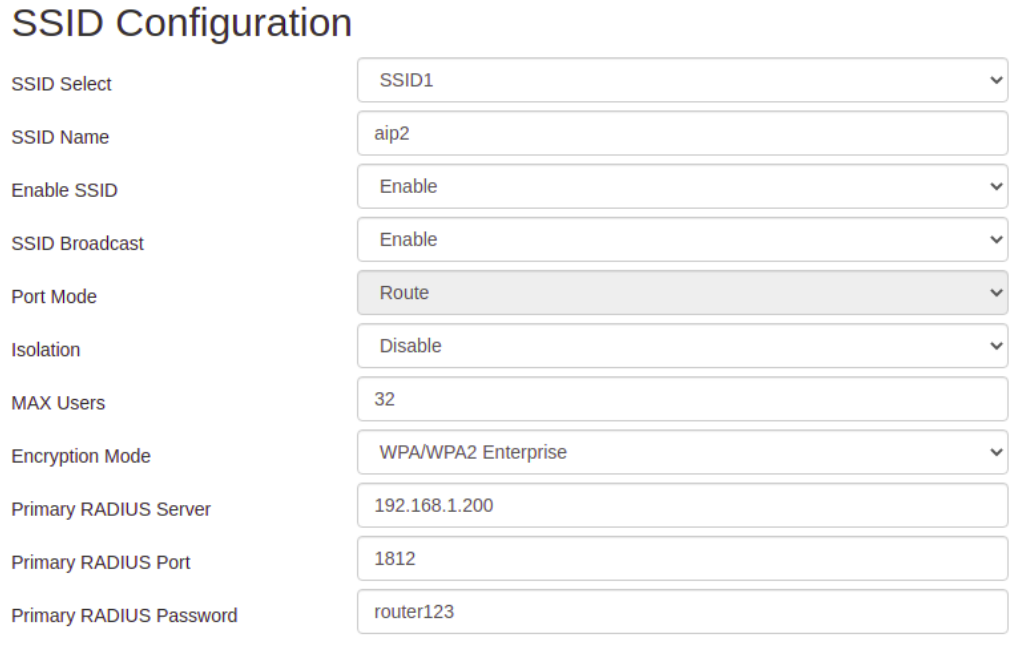
Configuring freeradius on the WIFI router
Now we are going to access the file “ /etc/freeradius/3.0/clients.conf” and we are going to include the necessary configuration to allow access from the WIFI router to the radiaus server.
First, let’s access the “ /etc/freeradius/3.0/clients.conf” :
sudo nano /etc/freeradius/3.0/clients.conf Now, let’s add the following configuration:
client Router1{

ipaddr=192.168.1.254 #router IP

secret= router123  #secret password between router-radius

}
The above settings indicate that we are going to use a router client named Router1. Router1’s IP is 192.168.1.254.
In this way, the freeradius server will allow access from this router IP.
Also, we will use a password shared between the router and the radius server. In this case, we use the password router123 . This shared password is essential, as it will create the necessary security in authenticating the router to the radio server.
Restarting the server to update changes
Now, let’s restart freeradius so that the changes are updated. For this, we can use the commands below:
First let’s stop the freeradius:
sudo service freeradius stop Then, let’s restart freeradius in debug mode:
sudo freeradius -X Configuring WIFI router for freeradius
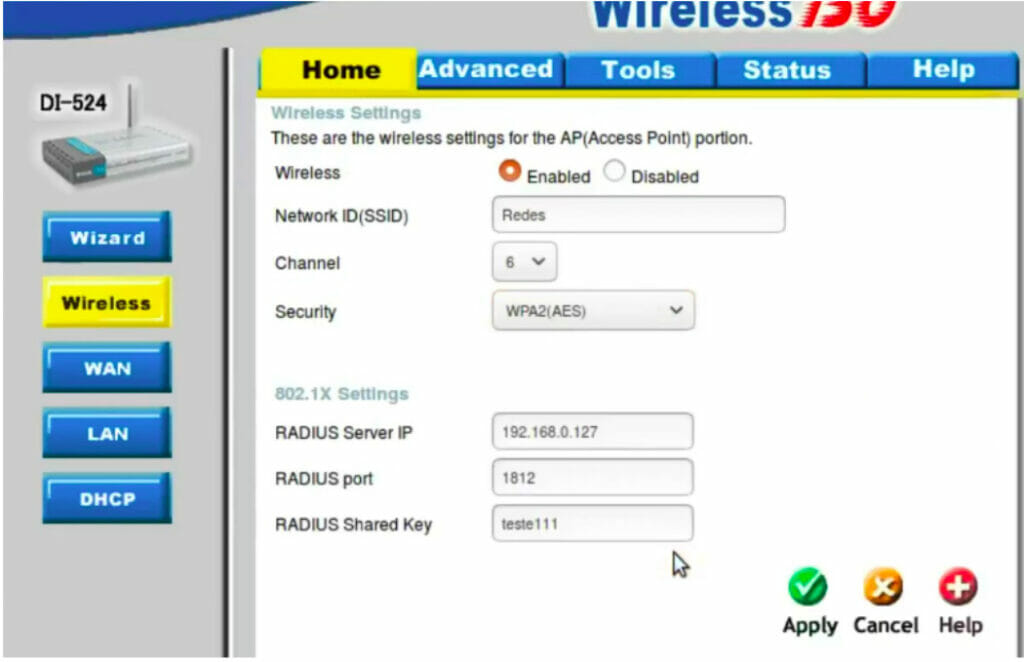
Now let’s configure the wireless router to point to the freeradius server. In this way, we will be able to use 802.1X user and password authentication.
The configuration syntax for using radius authentication on routers may vary. Below are two figures with examples of radius configuration in wireless routers.
Checking user connection
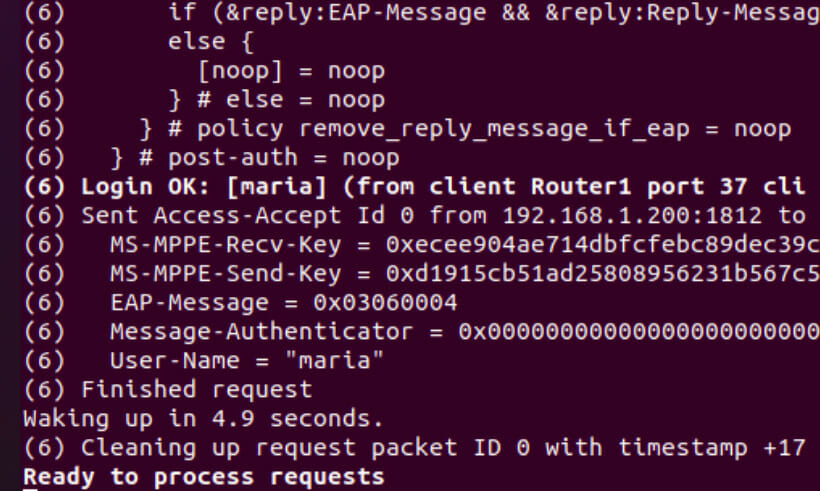
We can check the user’s connection using the Freeradius debug mode. For this, we will use the command below:
sudo freeradius -X We can verify that the authentication was successful and that the user is now connected to the wireless network.
The figure below demonstrates the result of connecting the user maria. For this, we use the debug mode of freeradius (freeradius -X).
If you liked it, comment on our channel: https://www.youtube.com/c/SimplificandoRedes


