Tutorial for creating a simple chat using TCP sockets in Python 3. The goal is to demonstrate unidirectional communication, where a client sends messages to a server.
Learning to use sockets in python is a great way to combine programming knowledge and networks.
Creating the chat in TCP
First, let’s show how to create a chat using TCP. The nice thing about TCP is that this protocol will handle errors and segment losses during the execution of the chat.
This means that if there is loss of packets on the network TCP will treat this for us and consequently we will not have errors caused by this type of loss in our chat.
If you want to create a UDP socket chat click here.
Explaining the TCP chat server.
Now, let’s show the chat server code in python. Then we will show you how to execute the code and then we will explain the code.
#!/usr/bin/python3
import socket

# Request the port that the server should listen to
server_port = int(input("Enter the port the server should listen to: "))

server_ip = ''  # Server IP address, '' means it will listen on all interfaces

# Create the TCP socket
tcp = socket.socket(socket.AF_INET, socket.SOCK_STREAM)

# Define the server's IP and port to listen to
server_address = (server_ip, server_port)

try:
    tcp.bind(server_address)  # Bind the IP and port to start listening
    tcp.listen(1)  # Start listening (waiting for connection)
    print(f"Server listening on port {server_port}...")

    # Accept connection from client
    connection, client_address = tcp.accept()
    print("Client =", client_address, "connected")

    # Loop to receive messages from the client
    while True:
        received_message = connection.recv(1024)
        if received_message:
            # If there is a new message, print it
            print("Received =", received_message.decode("utf8"), ", From client", client_address)

except socket.error as e:
    print(f"Error during communication: {e}")
finally:
    # Close the connection at the end
    connection.close()
    print("Connection closed.")
Running the TCP socket server on Windows.
Now let’s open a text editor on Windows. In this case, we are using Notepad to paste the code we copied. After pasting the above code, click on “save as.”
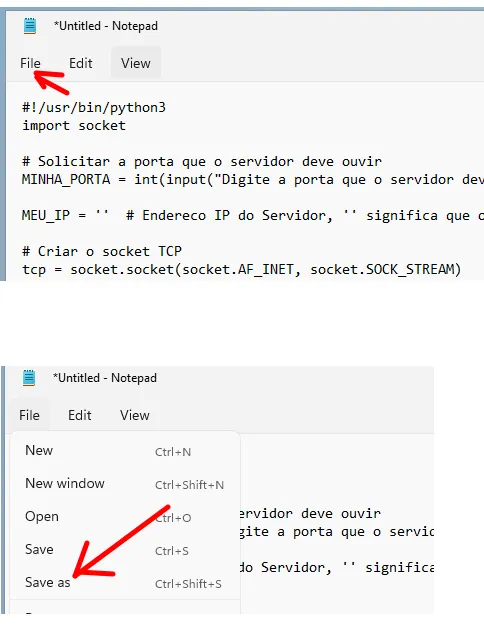
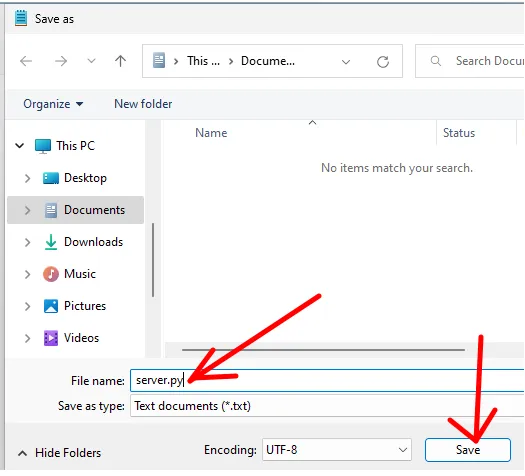
Then we will give the name “server.py” and we will click save. Remember where you are saving the file.
Now, let’s go to the location where you saved the “server.py” file and double-click on it to run it. After executing “server.py,” we will choose the port that the server will listen on.
In that case, we’re making the server listen on port 4040.
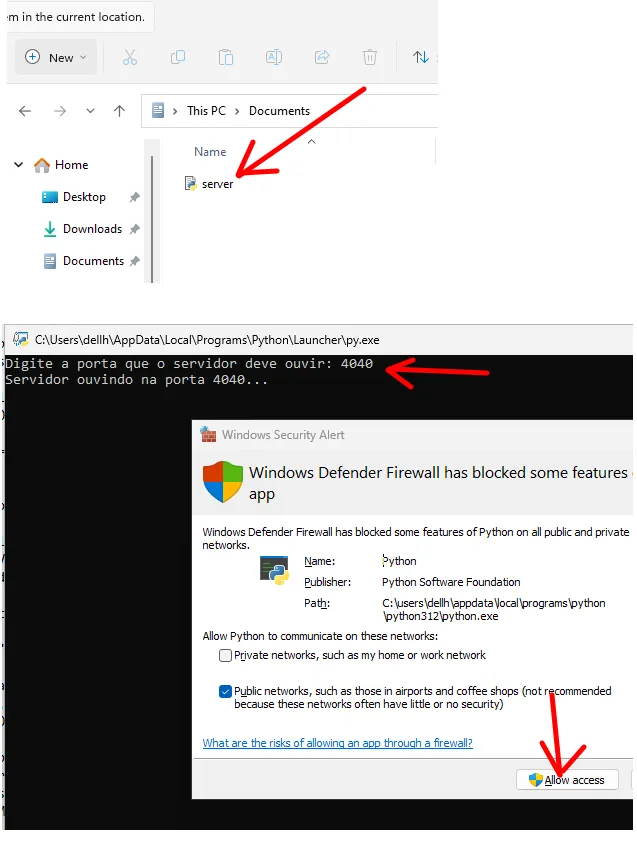
Remember to allow access in Windows Defender Firewall. In this case, you can choose between access for private network only or access to public networks. See which access best meets your practice laboratory.
Running the TCP socket server on Linux.
On a machine with Linux, we can open the terminal and type the command below. And then paste the server code you copied above.
nano server.py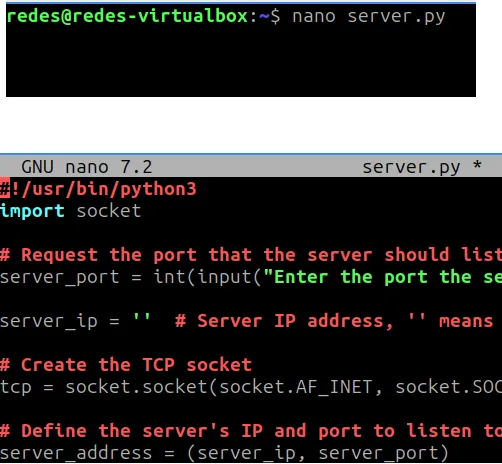
After pasting the code and saving, we will run the “server.py“. For this, let’s type the command below.
python3 server.py
We can see that the server is listening at port 4040 and waiting for connections.
Explaining the TCP socket server code.
Now let’s explain the TCP socket server code from our chat.
Initially we will ask what door the server will hear. My suggestion is to use high doors such as 4040.
# Request the port that the server should listen to
server_port = int(input(“Enter the port the server should listen to: “))
server_ip = ” # Server IP address, ” means it will listen on all interfaces
Then we will create the TCP socket that will be of type IPv4 = “AF_INET” and will be TCP = “SOCK_STREAM“.
# Create the TCP socket
tcp = socket.socket(socket.AF_INET, socket.SOCK_STREAM)
Now, let’s set up the IP and the port we want to monitor. In this case, we are considering that the IP will be “0.0.0.0“, that is, the server will be listening on the specified port on all the IPs available on the machine.
# Define the server’s IP and port to listen to
server_address = (server_ip, server_port)
try:
tcp.bind(server_address) # Bind the IP and port to start listening
tcp.listen(1) # Start listening (waiting for connection)
print(f”Server listening on port {server_port}…”)
Next we will store connection data in two variables. The “client_address” variable stores the client’s IP and the “connection” variable presents connection data.
# Accept connection from client
connection, client_address = tcp.accept()
Next, let’s see the loop that awaits the incoming messages that are collected with the variable “connection“.
# Loop to receive messages from the client
while True:
received_message = connection.recv(1024)
if received_message:
# If there is a new message, print it
print(“Received =”, received_message.decode(“utf8”), “, From client”, client_address)
- recv(1024) = reads up to 1024 bytes of the message sent by the customer through the socket connection.
- received_message.decode(“utf8”) = decoded from bytes to string the received message;
Finally we have the connection finalization using the socket “connection“.
# Close the connection at the end
connection.close()
Explaining the TCP chat client.
Next, we will show the client code of the chat in python and then how to run it.
#!/usr/bin/python3
import socket

# Request server IP and port from the user
server_ip = input("Enter the server IP address: ")
server_port = int(input("Enter the server port: "))

# Create the TCP socket
tcp = socket.socket(socket.AF_INET, socket.SOCK_STREAM)
tcp.settimeout(10)  # Set a timeout of 10 seconds

# Define the destination (IP + Port)
destination = (server_ip, server_port)

try:
    # Connect to the server
    tcp.connect(destination)
    print(f"Connected to server {server_ip}:{server_port}.")
    print("You can start sending messages (type 'exit' to disconnect).")

    # Main loop to send messages
    while True:
        message = input("Enter your message: ")
        if message.lower() == 'exit':
            print("Disconnecting...")
            break
        tcp.send(bytes(message, "utf8"))
except socket.error as e:
    print(f"Error connecting or sending data: {e}")
finally:
    tcp.close()
    print("Connection closed.")
Running the TCP socket client on Windows.
Let’s open an editor like the Notepad and we’re going to paste the code we copy above. Then we’ll click save.
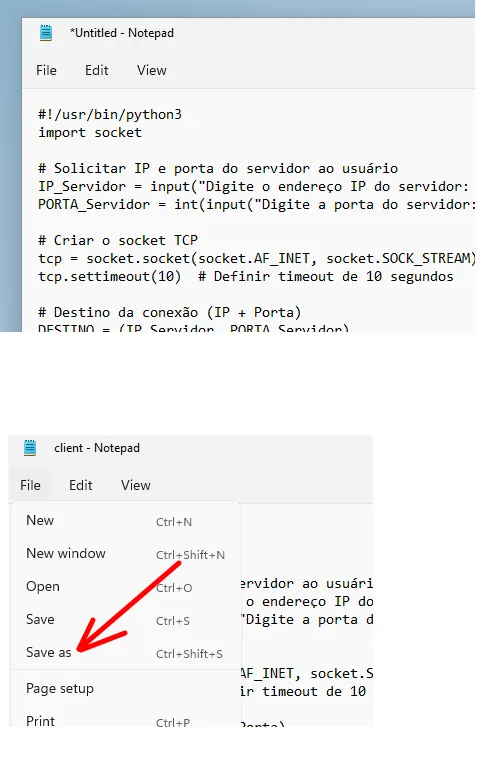
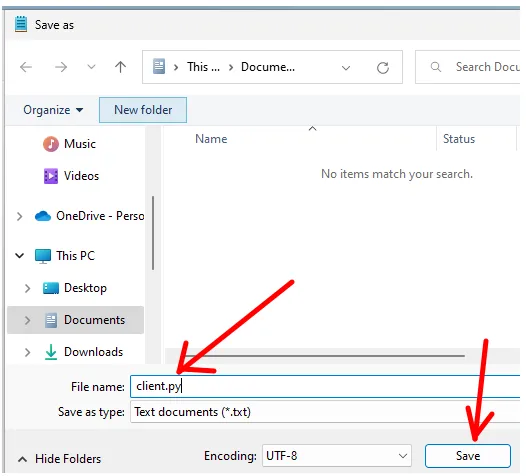
At that point, we will choose where we will create the file and the name. In this case we will use the name “client.py“.
Now, we go to the directory where you saved the “client.py” and we can double-click the client to run it.
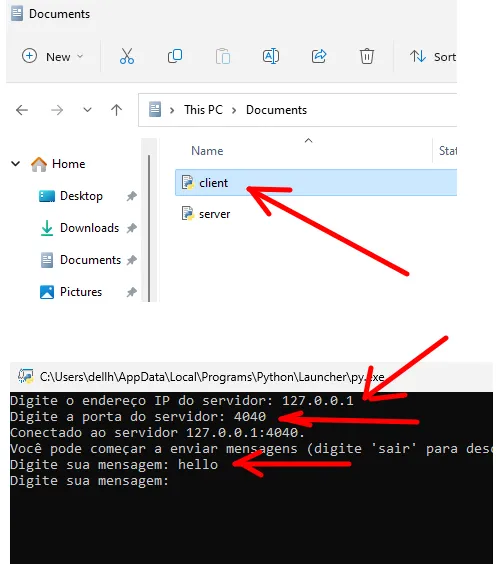
When running “client.py“, we will specify the server’s IP address. In this case, we are using the loopback address “127.0.0.1,” but you can choose the IP of a machine on your network that is running “server.py“.
Next, let’s type the door that the server is listening to, which in this example was port 4040.
Then we send a “hello” message.
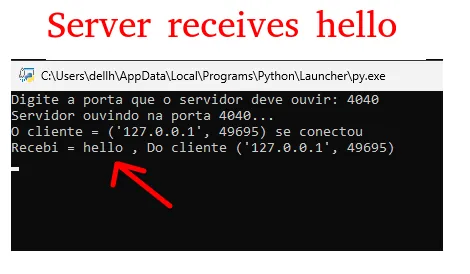
We can see in the figure above that the server received the message “hello” that the client sent.
Running the TCP socket client on Linux.
To run the client on Linux, we will open a terminal and use an editor. In our case we are using the “nano” editor. So let’s type the command below to create and edit the file “client.py“.
nano client.py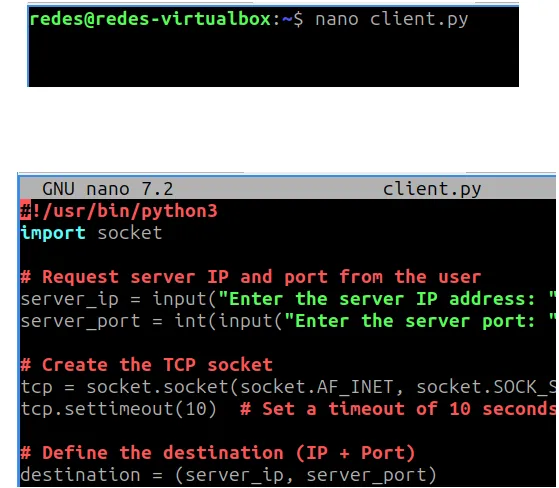
After opening the editor, we will paste the client code that we copy above and then save.
Now, let’s run the “client.py” using the command below.
python3 client.py
When running the “client.py” we will indicate the server’s IP. In this case, we are using the loopback address the “127.0.0.1” but you can choose the IP of a machine from your network that is running the “server.py“.
Next, let’s type the door that the server is listening to, which in this example was port 4040.
Now, let’s type “hello” in the client.
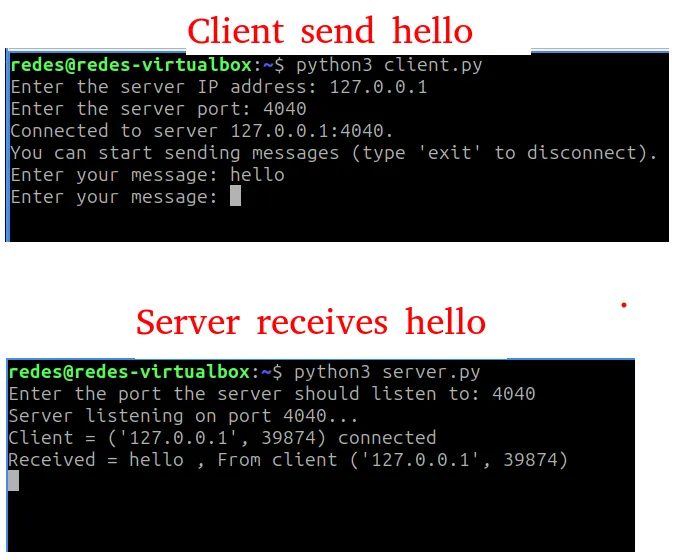
We can see that the server “server.py” received the “hello” from the client.
Explaining the TCP socket client code.
Initially we are asking the user to indicate the IP and the port that the client will connect. In this case, we will insert the IP of the server and the port that the server is listening to.
# Request server IP and port from the user
server_ip = input(“Enter the server IP address: “)
server_port = int(input(“Enter the server port: “))
Now, let’s create the TCP socket and configure a “timeout” as maximum time that TCP will wait without connection.
# Create the TCP socket
tcp = socket.socket(socket.AF_INET, socket.SOCK_STREAM)
tcp.settimeout(10) # Set a timeout of 10 seconds
The first line creates a socket for client-server communication using:
- AF_INET = IPv4 as a family of addresses.
- SOCK_STREAM = TCP as a communication protocol, which means that communication will be connection-oriented, reliable, and flow-control-control.
- tcp.settimeout(10) = Sets the time you will wait for the connection as 10 seconds.
Next, we will create the variable that will be used as the TCP communication destination. In this case we have the combination of the IP and server port.
# Define the destination (IP + Port)
destination = (server_ip, server_port)
Next, we go to the function that will connect to the server “tcp.connect”. This function receives as parameter the set (IP + server port) that we have previously defined as “destination“.
try:
# Connect to the server
tcp.connect(destination)
Next, we will see the snippet of the code that allows the user to send multiple messages to the server until he decides to close the connection.
# Main loop to send messages
while True:
message = input(“Enter your message: “)
if message.lower() == ‘exit’:
print(“Disconnecting…”)
break
tcp.send(bytes(message, “utf8”))
- input() = Ask the user to enter a message.
- If the user type “exit” the program exits the loop using break.
- tcp.send() = function to send the message.
- bytes(Mensagem, “utf8”) = The message is converted to bytes to be sent over the network.
Then we will have the parra function check if there was error in the socket “except socket.error” and finally, we will have the function to finish the socket with “tcp.close()“.
except socket.error as e:
print(f”Error connecting or sending data: {e}”)
finally:
tcp.close()
Read more:
Python get metadata from images and pdfs
How to connect mysql using python

Juliana Mascarenhas
Data Scientist and Master in Computer Modeling by LNCC.
Computer Engineer

