Remote access has become an essential tool for managing servers and desktops, enabling administrators and users to work efficiently from anywhere. Among the various tools available, VNC (Virtual Network Computing) stands out for its simplicity and versatility. In this guide, we’ll focus on install and configure TigerVNC, a robust and lightweight VNC server that is perfect for setting up a graphical interface for remote access.
Whether you’re managing a headless server or need an alternative to SSH for remote control, TigerVNC offers a reliable solution. This tutorial will walk you through the installation and configuration process step-by-step.
You’ll learn how to set up the server, secure it with SSH tunneling, and connect using a client application. By the end, you’ll have a fully functional remote access solution that’s both efficient and secure.
Let’s dive in and explore how to configure TigerVNC for seamless remote access to your systems!
Install Tiger VNC on Ubuntu
Initially, we will install some packages to allow the user to use the “xfce4” environment. “xfce4” is a very lightweight environment and can be recommended when working with VNC.
sudo apt install xfce4 xfce4-goodies
Next, we will install tigervnc as our VNC server. For this installation, we will use the following command.
sudo apt install tigervnc-standalone-server
Now, we will install the SSH server. Installing the SSH server will allow us to use an SSH tunnel to forward VNC traffic in an encrypted manner. We will use OpenSSH as the SSH server. To install it, we will use the following command.
sudo apt-get install openssh-server
Creating the VNC Password
First, we need to create a password to access the VNC server. This password will be required when initiating a connection with the VNC server.
To create the VNC password, use the command below.
vncpasswd
After typing the password, you will be asked if you want to create a password for users who will only have view-only permissions.
Configuring the VNC Startup Environment
Now we will configure the session environment to be used when the client logs in to the VNC server. For this, we will use the “xstartup” file located inside the “~/.vnc/” folder.
To edit the “xstartup” file, use the command below.
nano ~/.vnc/xstartup
Then, paste the following text into the file if you want to use the xfce environment.
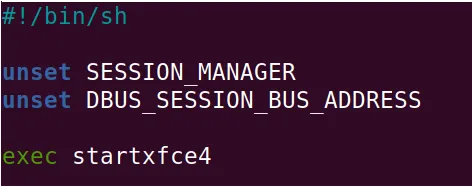
#!/bin/sh

unset SESSION_MANAGER
unset DBUS_SESSION_BUS_ADDRESS

exec startxfce4
If you don’t want to use xfce, you can choose another environment available on the server machine. The example below shows an alternative to xfce, which is the gnome environment.
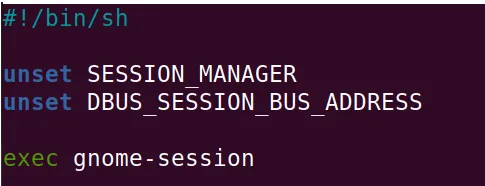
#!/bin/sh

unset SESSION_MANAGER
unset DBUS_SESSION_BUS_ADDRESS

exec gnome-session
Now, let’s make the “xstartup” file executable. This will enable “xstartup” to run whenever a client connects to the VNC server.
To make “xstartup” executable, use the command below.
chmod +x ~/.vnc/xstartup
Next, we can use the “ls” command to verify if the “xstartup” file is marked as executable.
ls ~/.vnc/
Starting the VNC Server
Now let’s start the VNC server. Upon starting the VNC server, you can check the port where the server will listen for connections and the display number.
To start the VNC server, use the command below.
vncserver
The image above shows that the VNC server is listening on port “5901” and using “display :1“. Your server might use a different port, such as “5902”, and a different display, such as “:2”.
If you need to make changes to the VNC server and restart it, you can use the “vncserver -kill :” command followed by your server’s “display” number to stop the VNC server.
For example, my server is using display number 1. Therefore, I will use the command below to stop it.

vncserver -kill :1Then, use the command below to restart the VNC server.
vncserverUsing VNC on the Client Side
Now let’s move to the VNC client side. In this case, we will use the remmina application as our VNC client. To install remmina, use the command below.
sudo apt install remmina
Creating an SSH Tunnel on the VNC Client
Next, we’ll create an SSH tunnel to the VNC server. Use the command below for this.
ssh -L 5901:127.0.0.1:5901 redes@10.0.2.21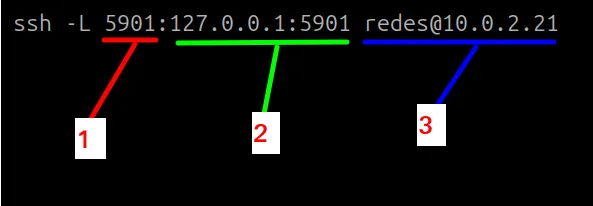
- “-L” indicates that we are creating an SSH tunnel listening on a local port.
- “1” represents the local port number we’ll use to create the SSH tunnel.
- “2” specifies the IP and port we’ll reach once the SSH tunnel is established. Here, we’re using “127.0.0.1:5901” because the VNC server is listening on port 5901 locally.
- “3” specifies the username of the VNC server machine followed by “@” and the server machine’s IP. In our scenario, the server machine’s username is “redes,” and the IP is “10.0.2.21.” Thus, we use “redes@10.0.2.21”.
Running the VNC Client
Now let’s open remmina and input the loopback IP followed by the port where our SSH tunnel is listening locally. In remmina, enter “127.0.0.1:5901” without quotes.

Next, the VNC server will request a password. This is the password you configured at the beginning of the VNC server installation.
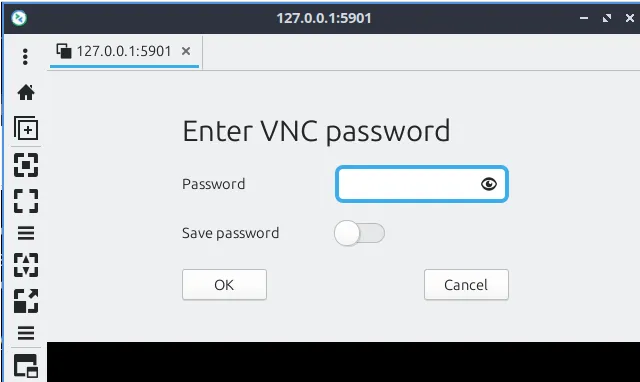
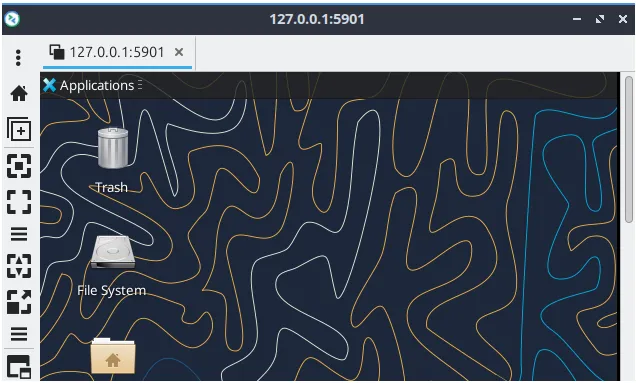
After entering the password, you’ll see the server machine’s environment screen. You are now operating within the server machine via VNC.
See more:
Python get metadata from images and pdfs
Install and Configure OpenVPN Server on PfSense

Juliana Mascarenhas
Data Scientist and Master in Computer Modeling by LNCC.
Computer Engineer

