We will introduce how to install and configure an FTP server on a Linux machine.
In this case, we are using Ubuntu as the operating system and the ProFTPD FTP server.
FTP Server Installation
Let’s use the command below to install the FTP server.
sudo apt install proftpd

Once the FTP server is installed, let’s test it to see if it’s operational. For this, we will use the command below.
ftp localhost
Okay, the FTP server is installed and we can start the configuration.
Configuring FTP Server on Linux
Now, let’s look for the Proftpd FTP server configuration file. The Proftpd configuration file is in the path “/etc/proftpd/proftpd.conf
“.
The file is proftpd.conf and specifies the server configuration parameters.
Let’s use the command below to edit the file and start to understand its settings.
sudo nano /etc/proftpd/proftpd.conf
The first line points to the module-related settings file.

The line below states that the FTP server can use IPv6. If you choose not to use IPv6, you can comment the line with “#”.

The figure below can be used to identify the remote user ( IdentLookups ). It may be interesting to have IdentLookups set to on in some configurations. However, it is worth noting that this setting causes delay.

Next is the server name configuration. This name will be presented to the user when logging in to the FTP server. We can change the name to our server name or company name.

The figure below presents some configurations that we will detail.
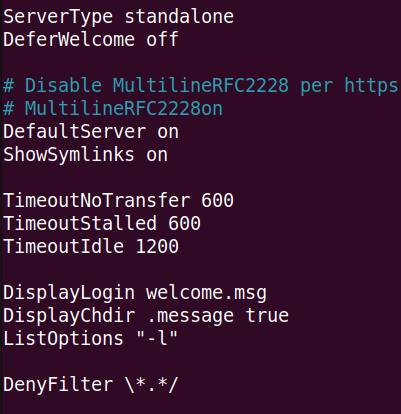
DeferWelcome = Hide information such as name and addresses until authenticated. We can test this configuration by changing the “off” to “on”.
After changing, let’s restart the FTP server with the command below.
sudo service proftpd restart
ServerType = Presents 2 possibilities: standalone = the daemon starts and starts listening on the configured port for connections. Creating child processes to fulfill customer requests. And we can also use the option inetd = the daemon expects to be executed/managed through the “Super Server” inetd.
MultilineRFC2228 = Enables response message formatting compatible with most browsers and FTP clients.
DefaultServer = Indicates that it will be the system’s default FTP server receiving all FTP connections.
ShowSymlinks = Allows you to show symbolic links in file/directory listings.
TimeoutNoTransfer = Time limit, after connection, for a client to send some command.
TimeoutStalled = Timeout for stopped downloads.
TimeoutIdle = Time limit for the client to send some command (control or data) .
DisplayLogin = Displays a message as soon as the user logs in to the FTP server. The file with the message can be created inside the user’s directory, for example “/home/joao/welcome.msg “. Shall we change and test the configuration?
After changing, let’s restart the FTP server with the command below.
sudo service proftpd restart
DisplayChdir = Can be used to display a filename whenever the user moves to a directory.
ListOptions = Specifies rules in file listings such as one file per line, entries in columns.
DenyFilter = Disallow command argument. In this case, it’s the arguments that are inside ” “.
DefaultRoot = Do not allow the user to navigate below their root directory, for example “/home/my_directory”.
RequireValidShell = Restricts usage to known shells only.
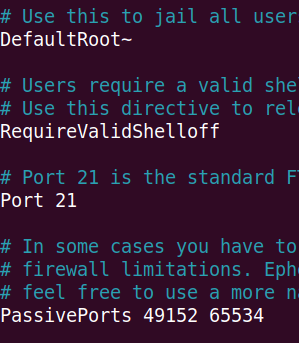
After changing, remember to restart the FTP server.
PassivePorts = Specify the ports that will be used for data transfer. In this case, these ports are used in passive mode. We can change and test.
MaxInstances = Limits the maximum number of proftpd child processes. Each client connection is equivalent to a child process. As such, this setting restricts the number of clients logged in at the same time. We can test.

This is the end of installing and configuring the Proftpd FTP server.
See more:
Install Packet Tracer on Linux
How to create a port forwarding

Juliana Mascarenhas
Data Scientist and Master in Computer Modeling by LNCC.
Computer Engineer
Packet Tracer network with one router
In this tutorial, we will show you how to configure a network with just one…
How to Use Snap Behind a Proxy on Linux (Step-by-Step Guide)
In this guide, you’ll learn how to configure Snap to work behind a proxy, even…
How to Create a Network with a Switch in Packet Tracer – Step-by-Step Guide for Beginners
In this practical tutorial, I will show you how to create a simple switch network…
Why use Kali Linux inside VirtualBox?
In this article, we will see the main reasons for considering the use of Kali…
How to install pfBlocker on pfSense: step by step guide
Today we will learn how to install pfBLocker NG in PFSense. pfBLocker is an excellent…
Packet Tracer for Dummies: Setting Up Your First Network with 2 PCs (Quick Start Guide)
Are you ready to take the first step into the fascinating world of computer networks?…

