In this step-by-step guide, we’ll walk you through the entire process of setting up and configuring a custom DNS server using BIND9, allowing you to handle domain resolutions efficiently while gaining more control over your network’s security and performance.
If you’re looking to take control of your network’s DNS (Domain Name System) management, building your own DNS server with BIND9 is a great place to start.
BIND9, which stands for Berkeley Internet Name Domain, is one of the most popular and robust DNS server software used worldwide.
Created to solve problems related to the translation of names and IPs, the DNS (Domain Name System) was created in 1983.
The DNS was created to have a hierarchical structure and a geographically distributed database. Therefore, DNS would solve the problems mentioned earlier.
Installing BIND9 on Linux
First, let’s install Bind9 on Linux (Ubuntu). We’ll start by updating the apt repositories and then use the command to install bind9.
Update repositories and upgrade:
sudo apt update && sudo apt upgradeInstall bind9 with apt:
sudo apt install bind9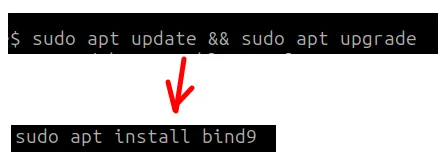
Testing the Bind9 Installation
After installing, we’ll verify if the server is operational and functioning correctly. To do this, we’ll use the commands below.
named -v
Next, we’ll check the status of bind9 with the commands below.
sudo systemctl status bind9or
sudo service bind9 status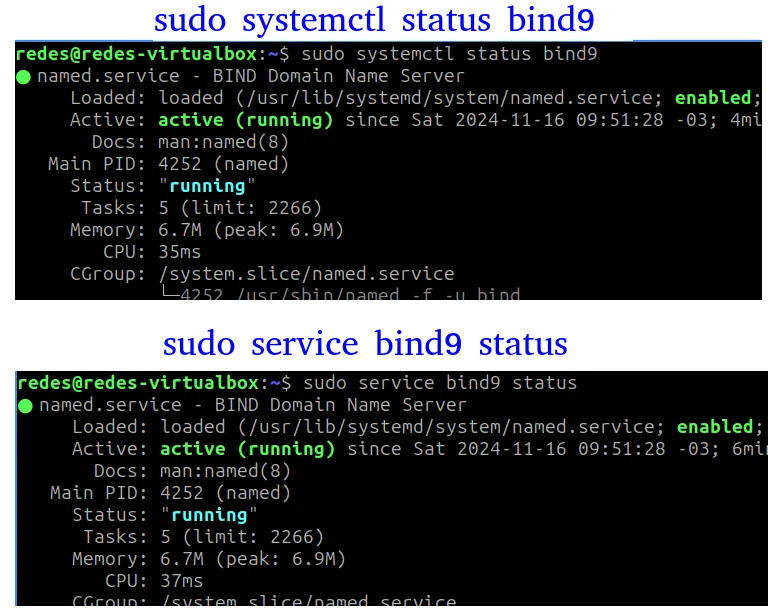
To exit the status screen of “systemctl status bind9” and “service bind9 status,” press CTRL + c.
Configuring bind9 on Linux
Now, we’ll configure bind9 by entering the configuration directory located at “/etc/bind“.
To enter the bind9 configuration directory, we’ll use the command below.
cd /etc/bind/
Next, we can use the “ls” command to list the contents of the “/etc/bind” directory.
ls
After using the “ls” command, we’ll see two files that we need to modify: “/etc/bind/named.conf.options” and “/etc/bind/named.conf.local“.
Before modifying the files, we’ll create backup copies using the commands below.
sudo cp named.conf.options named.conf.options_OLDsudo cp named.conf.local named.conf.local_OLD
Configuring named.conf.options
We’ll use an editor to configure the “named.conf.options” file. In our case, we’ll use the nano editor. To open the “named.conf.options” file, we’ll use the command below.
sudo nano named.conf.options
Then, we’ll insert the text below at the end of the configuration file: after “listen-on-v6 { none; };” and before the “};”.
The figure below shows the correct location to insert the text we’ll use as an example.
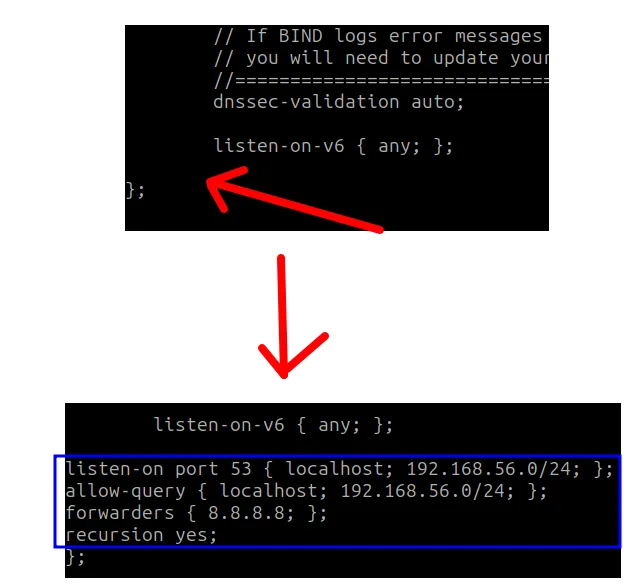
Below is the text we’ll add to the configuration.
listen-on port 53 { localhost; 192.168.56.0/24; };
allow-query { localhost; 192.168.56.0/24; };
forwarders { 8.8.8.8; };
recursion yes;
Below we have the description of the fields used in the configuration.
- listen-on port 53 { localhost; 192.168.56.0/24; }; indicates that the DNS server will listen on port 53 and will serve localhost (127.0.0.1) and our network, which is “192.168.56.0/24“.
- allow-query { localhost; 192.168.56.0/24; }; specifies the addresses that can make requests to our DNS.
- forwarders { 8.8.8.8; }; for external domains, we’ll forward to an external DNS. In this case, we’re using Google’s DNS for external forwarding.
- recursion yes; enables recursive queries.
Remember that we’re using “192.168.56.0/24” as an example network, and you need to adapt it to your network address. Additionally, we’re using Google’s DNS for external forwarding, but you can choose another DNS, such as your Internet provider’s DNS.
Configuring named.conf.local
Now, we’ll configure the next bind9 file, “named.conf.local“. To do this, we need to go to the “/etc/bind/” directory.
cd /etc/bind/Next, we’ll use the nano editor to edit the “named.conf.local” file.
sudo nano named.conf.local
Inside the “named.conf.local” file, we’ll add the text below at the end, as shown in the following figure.
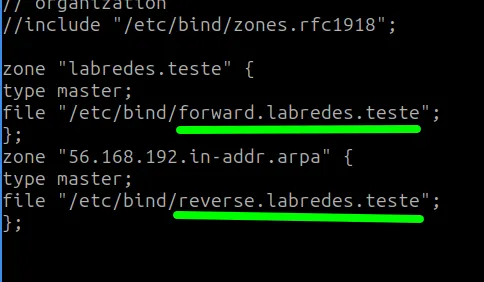
zone "labredes.teste" {
    type master;
    file "/etc/bind/forward.labredes.teste";
};
zone "56.168.192.in-addr.arpa" {
    type master;
    file "/etc/bind/reverse.labredes.teste";
};
Below is the description of the forward zone configuration.
- type master = Defines the server as master for the domain labredes.teste.
- file “/etc/bind/forward.labredes.teste” = Defines the forward zone file
Next, we have the description of the reverse zone configuration.
- type master = Defines the server as master for the reverse zone
- file “/etc/bind/reverse.labredes.teste” = Defines the reverse zone file
The next step is to create the zone files. In this case, our files will be named “forward.labredes.teste” and “reverse.labredes.teste“.
Creating the forward Zone File
Now, we’ll create the forward zone file. In our case, the file will be named “forward.labredes.teste“. To create this file, we’ll use the command below.
sudo nano /etc/bind/forward.labredes.teste
Then, we’ll insert the text below into the forward zone file we created.
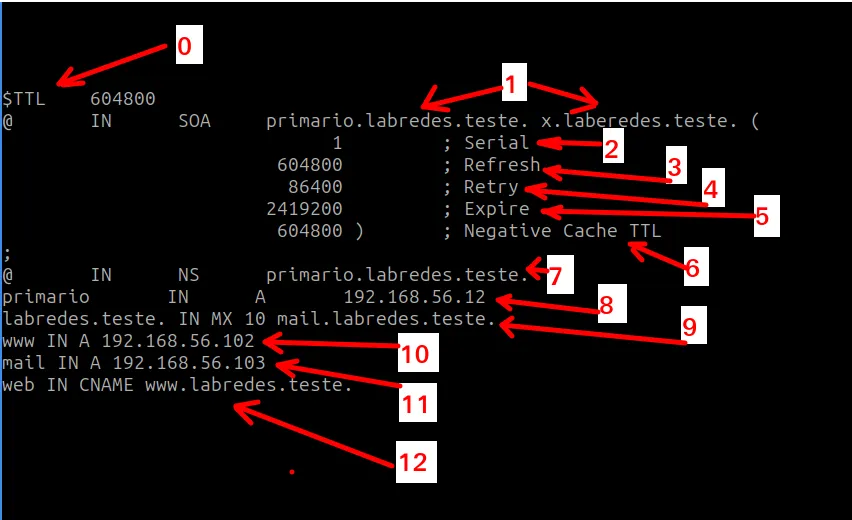
$TTL    604800
@       IN      SOA     primario.labredes.teste. x.laberedes.teste. (
                          1         ; Serial
                     604800         ; Refresh
                      86400         ; Retry
                    2419200         ; Expire
                     604800 )       ; Negative Cache TTL
;
@       IN      NS      primario.labredes.teste.
primario       IN      A       192.168.56.12
labredes.teste. IN MX 10 mail.labredes.teste.
www IN A 192.168.56.102
mail IN A 192.168.56.103
web IN CNAME www.labredes.teste.
Below is the description of each field presented in the “forward.labredes.teste” file figure.
- 0 = Defines the Time to Live (in seconds) for the DNS server’s cached records.
- 1 = Defines the SOA (Start of Authority) record.
- 2 = Zone serial number, incremented with each change.
- 3 = Time a secondary server should wait before checking for updates.
- 4 = Time a secondary server should wait before retrying an update.
- 5 = Time a secondary server should wait before discarding zone information.
- 6 = Negative caching TTL for non-existent records.
- 7 = Name server information.
- 8 = Defines the IP address of the “primario” name server.
- 9 = Defines the MX (Mail Exchanger) record for the domain, pointing to the mail server.
- 10 = Defines the IP address of the “www” host.
- 11 = Defines the IP address of the “mail” host.
- 12 = Defines an alias (CNAME) “web” for the “www” host.
Creating the Reverse Zone File
Now, we’ll create the reverse zone file. In our case, the file will be named “reverse.labredes.teste“. To create this file, we’ll use the command below.
sudo nano /etc/bind/reverse.labredes.teste
Then, we’ll insert the text below into the reverse zone file we created.
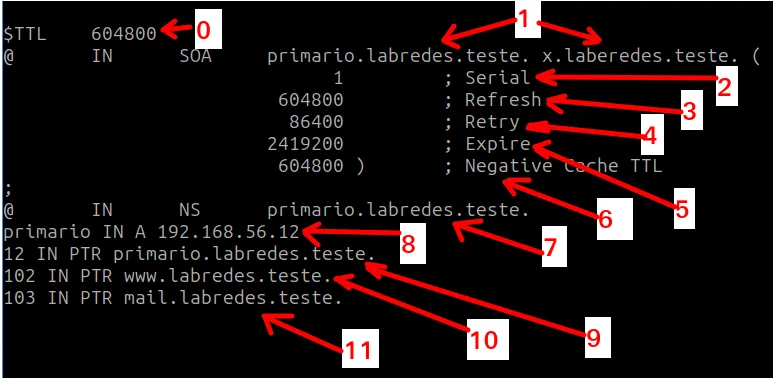
$TTL    604800
@       IN      SOA     primario.labredes.teste. x.laberedes.teste. (
                          1         ; Serial
                     604800         ; Refresh
                      86400         ; Retry
                    2419200         ; Expire
                     604800 )       ; Negative Cache TTL
;
@       IN      NS      primario.labredes.teste.
primario IN A 192.168.56.12
12 IN PTR primario.labredes.teste.
102 IN PTR www.labredes.teste.
103 IN PTR mail.labredes.teste.
Below is the description of each field presented in the “reverse.labredes.teste” file figure.
- 0 = Defines the Time to Live (in seconds) for the DNS server’s cached records.
- 1 = Defines the SOA (Start of Authority) record.
- 2 = Zone serial number, incremented with each change.
- 3 = Time a secondary server should wait before checking for updates.
- 4 = Time a secondary server should wait before retrying an update.
- 5 = Time a secondary server should wait before discarding zone information.
- 6 = Negative caching TTL for non-existent records.
- 7 and 8 = Name server information.
- 9 = Defines the hostname “primario” for the IP address “192.168.56.12”.
- 10 = Defines the hostname “www” for the IP address “192.168.56.102”.
- 11 = Defines the hostname “mail” for the IP address “192.168.56.103”.
Restarting and Enabling BIND9
Now, we’ll restart the BIND9 DNS server so that the modifications take effect. To restart the BIND9 server, we’ll use the command below.
sudo systemctl restart bind9
We’ll use the command below to enable bind9. This way, the BIND9 DNS server will start along with the operating system.
sudo systemctl enable named
Checking for Configuration Errors in BIND9
After configuring the BIND9 files, we’ll use the commands below to check for any errors in our configuration.
Check for syntax errors in “named.conf.local“.
sudo named-checkconf /etc/bind/named.conf.local
Check for errors in the forward zone.
named-checkzone labredes.teste /etc/bind/forward.labredes.teste
Check for errors in the reverse zone.
named-checkzone labredes.teste /etc/bind/reverse.labredes.teste
If there are errors, we’ll correct them and restart the server with the command below.
sudo systemctl restart bind9
If the errors are only in the zone files, we’ll correct them and can reload the zone with the command below.
sudo rndc reload
Testing BIND9 Locally
Once BIND9 is configured, we’ll perform some local tests to see the response of our DNS server.
The first test we’ll do is to check the DNS server’s response to a query about our domain. For this, we’re using the “dig” command, followed by the IP of our DNS server “192.168.56.12” and then our domain “labredes.teste“.
dig @192.168.56.12 labredes.teste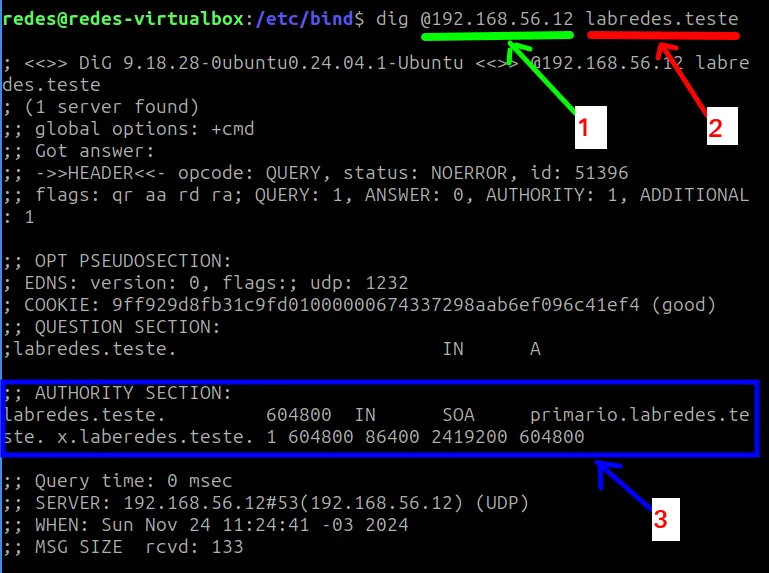
Let’s understand the response to our DNS query presented in the figure above.
- 1 = “@IP” is the IP of our DNS server, which is responsible for responding to the DNS query from the “dig” command.
- 2 = This is the address we want to query. In this case, the address is our domain name “labredes.teste“.
- 3 = Here we have the response to the query. In this case, we can see that the server responded with information about the SOA (Start of Authority) record of our BIND9 server.
In the second test, we’ll check the DNS server’s response to a query about our email server. For this, we’re using the “dig” command, followed by the IP of our DNS server “192.168.56.12” and then the name of our email server followed by our domain “mail.labredes.teste“.
dig @192.168.56.12 mail.labredes.teste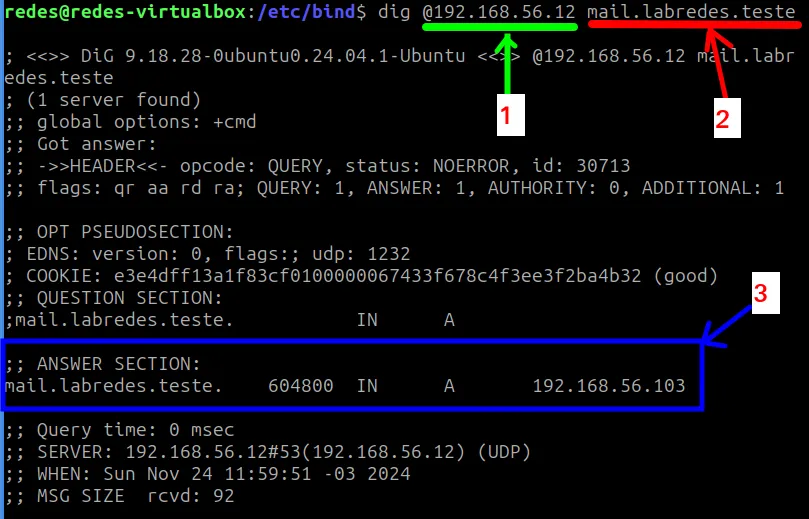
- 1 = “@IP” is the IP of our DNS server, which is responsible for responding to the DNS query from the “dig” command.
- 2 = This is the address we want to query. In this case, the address is the name we gave to our email server followed by our domain “mail.labredes.teste“.
- 3 = Here we have the response to the query. In this case, we can see that the BIND9 server responded with the IP of our email server “192.168.56.103“.
In the next test, we’ll check the DNS server’s response to a query about our web server. For this, we’re using the “dig” command, followed by the IP of our DNS server “192.168.56.12” and then the alias of our web server followed by our domain “web.labredes.teste“.
dig @192.168.56.12 web.labredes.teste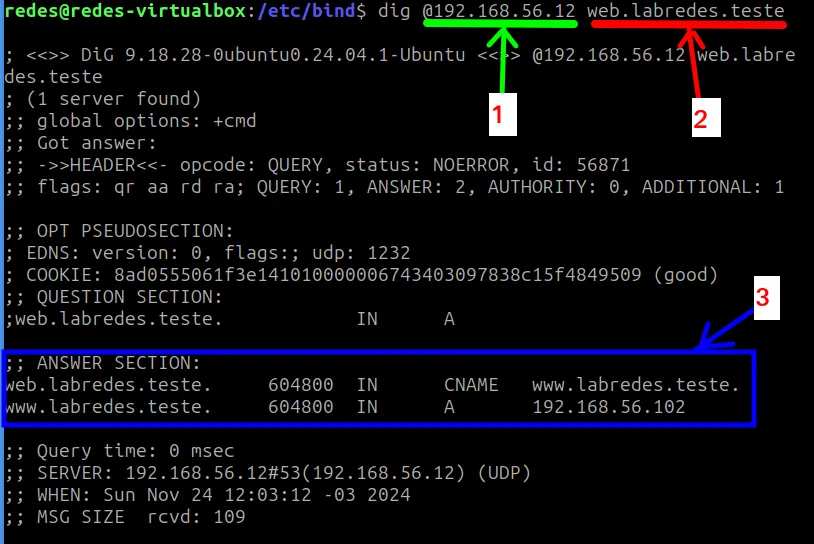
- 1 = “@IP” is the IP of our DNS server, which is responsible for responding to the DNS query from the “dig” command.
- 2 = This is the address we want to query. In this case, the address is the alias “CNAME” we gave to our web server followed by our domain “web.labredes.teste“.
- 3 = Here we have the response to the query. In this case, we can see that the BIND9 server responded with the name of the web server “www.labredes.teste” linked to the alias of our web server “web.labredes.teste“. Additionally, the response also contains the IP of the web server “192.168.56.102“.
Testing the BIND9 server with a client
Now we will create an internal network to allow a client host to use our BIND9 DNS as a name server. For this, we will add a second machine to the same network as the BIND9 server machine.
Those who wish to test the proof of concept can create a network using VirtualBox.
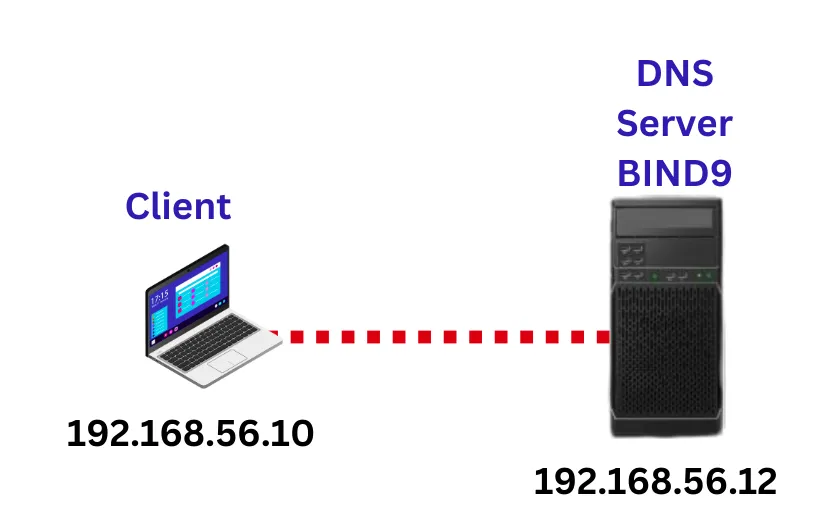
In our case, we will add a client machine with the Lubuntu operating system.
First, we need to configure the client to point to our DNS server.
Configuring a Lubuntu client to point to DNS
To make the client host use our DNS, click on the Lubuntu symbol in the lower-left corner.
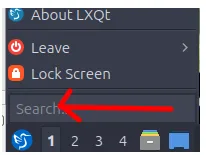
Next, type “network” in the search tab.

Then, select the “Edit connections” option.
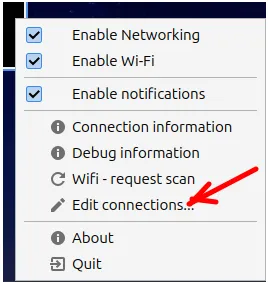
Now, select the network interface you will use, then click on the gear icon at the bottom left.
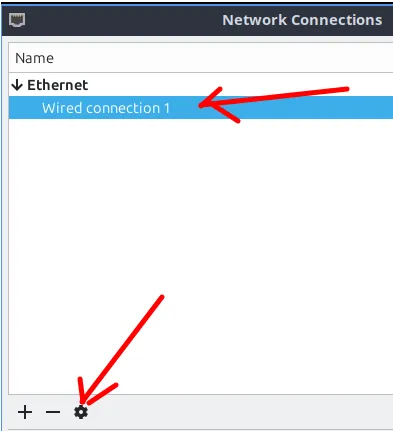
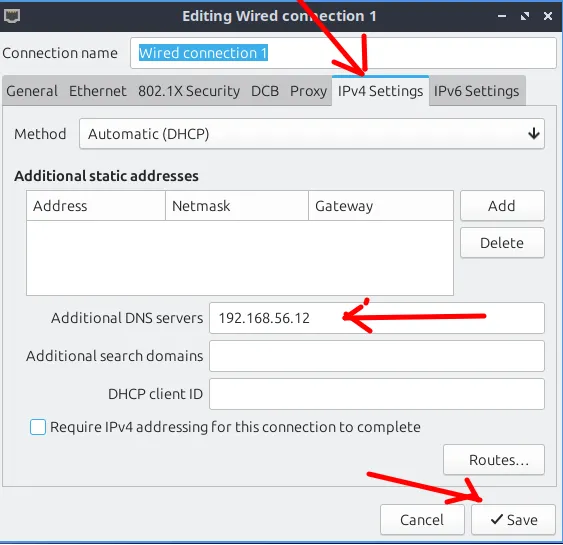
The next step is to choose the “IPv4 Settings” tab and type in the IP of our BIND9 DNS server. Then, click on “Save”.
Restarting the client interface after the new configuration pointing to our DNS. Use the command below:
sudo systemctl restart NetworkManager
Configuring an Ubuntu client to point to DNS
If you are using a client with Ubuntu, you can search for “Network” and click on the gear icon.
After that, you will click on the IPv4 tab and insert the IP of the BIND9 server. Then, click on “Apply”.
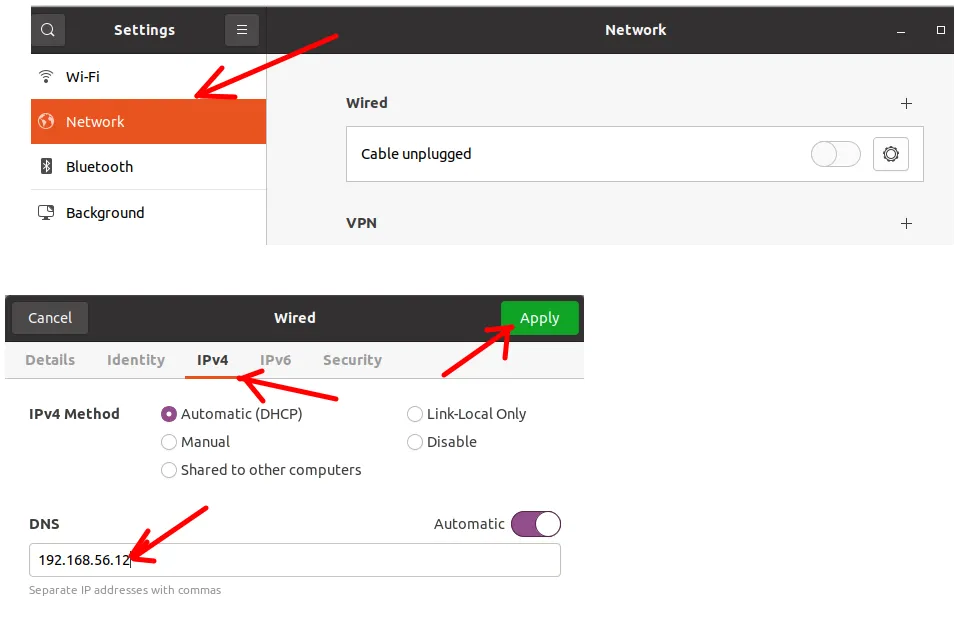
Restarting the client interface after the new configuration pointing to our DNS. For this, we’ll use the command below.
sudo systemctl restart NetworkManager
Testing BIND9 on the client
Now that we’ve configured the client interface to point to our BIND9 DNS, we’ll perform tests to see if the client is accessing the addresses we’ve registered in our BIND9.
The first test we’ll do is use the “ping” command to the “primario” address of our DNS server. This test is important because only our DNS server knows who “primario.labredes.teste” is.
Thus, if we don’t point to our DNS server, we won’t be able to know who “primario.labredes.teste” is.
To test, we’ll use the command below.
ping primario.labredes.teste
We can see that we received a response from the “ping” command and even have a response from the BIND9 server hosted at IP “192.168.56.12“.
The second test we’ll perform is using the “dig” command for the name of our WEB server. In this test, we won’t specify the DNS server before the name to be queried.
Thus, the command will use the default DNS server of the client host.
To perform this test, we’ll use the command below.
dig web.labredes.teste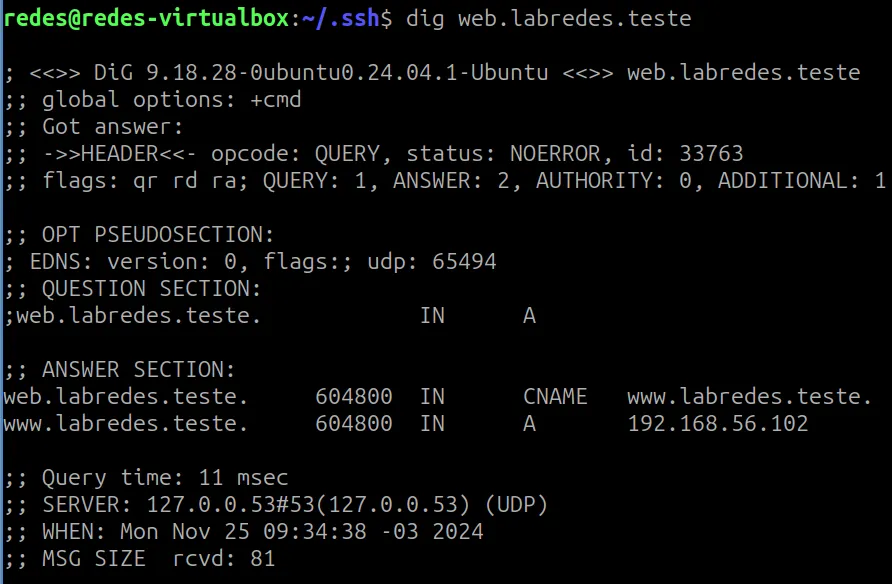
We can verify in the “dig” query that we received a response from the DNS server stating that it is an alias for “www.labredes.teste” and even presenting the IP “192.168.56.102“.
Client can’t use my bind9 DNS server
If your client is not using your BIND9 DNS, change the “/etc/resolv.conf” file. Let’s force it to use your BIND9 DNS by using the command below:
sudo nano /etc/resolv.conf
Then insert a new line for “nameserver” pointing to your DNS server. In my case, my DNS server is “192.168.56.12“. Therefore, I have to insert the line “nameserver 192.168.56.12” before the line “nameserver 127.0.0.53”.
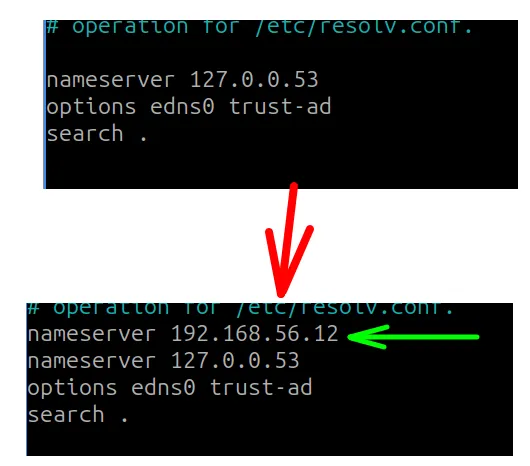
Save the changes “/etc/resolv.conf”.
Restarting the client interface after the new configuration pointing to our DNS. Use the command below:
sudo systemctl restart NetworkManager
Now let’s see if our client is pointing to our DNS server. For this, we can use the command below.
nmcli dev show | grep 'DNS'
In the figure above, we can see that the client is pointing to my DNS which has the IP “192.168.56.12”.
Below I will show an alternative command to see if the client is pointing to your BIND9 DNS server.
sudo resolvectl status
In the figure above, we can see that the client is pointing to my DNS which has the IP “192.168.56.12”.
See more:
Tutorial for SSH Public Key Authentication
Install ubuntu 24 on virtualbox
How to X11 Forwarding using SSH

Juliana Mascarenhas
Data Scientist and Master in Computer Modeling by LNCC.
Computer Engineer

