How can we manipulate data using CRUD MySQL operations with python? Now, we will create data access methods with CRUD operations.
You can access the first article of this project at: Connecting to MySQL with Python
What is CRUD?
CRUD is the acronym used to refer to the basic operations for accessing (generally) a database. Present in any API.
Through them we can manipulate and manage the data persisted in a DBMS, effectively.
The granularity of the data manipulated will depend on the context of your program.
If you need to understand what an API is, I suggest our YouTube playlist on the subject: Simplifying API.
CRUD is an acronym for: Create, Read, Upgrade and Delete. These are the basic operations of any application data access program.

Although it is very intuitive, we will illustrate what each operation would be.
CREATE – is the act of creating an object using the program.
This object can be an instance of a table, a new table in the database, a form, or any other data object manipulated by your program.
READ – Act of retrieving data for reading. (Very simple)
UPDATE – Act of updating an object through the program. Again, the object depends on the program context. Exs: row, table, aggregation, files….
DELETE – Act of removing the data object through the program
Recapping the MySQLDatabase class code
Remember that we are using the object orientation paradigm. Therefore, our class so far is as follows:
import os
import mysql.connector as mysql_connector
from dotenv import load_dotenv

load_dotenv()

class MySQLDatabase:

     def __init__(self):
         self._host = os.getenv("HOST")
         self._username = os.getenv("USERNAME")
         self._passwd = os.getenv("PASSWD")
         self._database = os.getenv("DATABASE")
         self.conn = self._connecting()

     def _connecting(self):
         return mysql_connector.connect(
             user=self._username,
             password=self._passwd,
             host=self._host,
             database=self._database,
         )

     def get_database_name(self):
            return self._database

     def get_database_user(self):
           return self._username

     def closing(self):
         if self.conn.is_connected():
            self.conn.close()
In addition, we have the get_database_tables() and _querying() methods described in the first tutorial.
To make our lives easier, I will leave the code for the _querying() method here. If you need to check the explanation, you can access the article mentioned before.
Connecting to MySQL with Python
def _querying(self, query: str):
     if (not self.conn.is_connected()) or self.conn is None:
         self.conn = self._connecting()

     cursor = self.conn.cursor(dictionary=True)
     cursor.execute(query)
     result = cursor.fetchall()
     cursor.close()

    return result
Let’s start with Getter – Tables!
What is a Getter in programming? Well…. get is associated with “get”, in retrieving some resource from the server/program.
In our case getter are all the methods of a class that retrieve information.
In the other hand are the setters. These “set” add new data using the program.
These terms are closely associated with OOP, with data manipulation within the program.
However, in our case we only have one getter. The rest fall into what we call READ (CRUD) methods.
Let’s understand each part of the method…
The role of this method is to return tables from a specific database. The database in this case was defined during the connection.
def get_database_tables(self):
         dict_of_tables = self._querying('SHOW tables;')
         print(f'List of tables on {self._database} database!\n')
         for table in dict_of_tables:
             print(' '.join(['-', table['Tables_in_'+self._database]]))
         return dict_of_tables
To do this, we use the private method _querying() passing the query SHOW tables as a parameter;
After executing the query using the courses in the method, we receive the dict (dictionary) with the resulting data.
After that, we only have to process the data for better visualization by the user. We print the data and return the dict.
Yes… you don’t need to use both. Here it is for teaching purposes. In your case, see which makes more sense, print or return the dict.
Ok… this part is to return additional information about the database. Now, let’s get to CRUD!
Let’s code…. Creating CRUD with Python
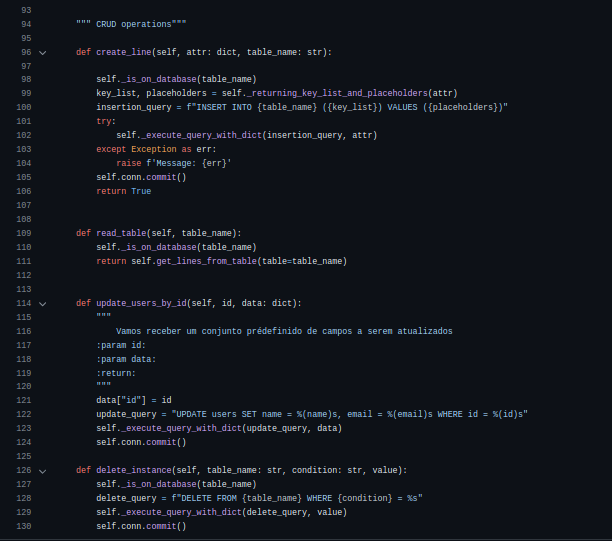
The granularity of the data that we will manipulate with our CRUD operations consists of rows, instances of a DB table present in MySQL.
For reading operations, the previous method, _querying(), is sufficient.
However, when we need to use conditionals, to search or update data, we will need to create another method. In this case, _execute_query_with_dict().
In addition to other methods of supporting the 4 basic CRUD operations.
CRUD Support Methods
How do we pass parameters to a condition in SQL using Python? Using a dict. For this we will use the next method.
The first one we will describe will be _execute_query_with_dict().In order for us to create filters with SQL, Python needs to understand what is being passed.
So, imagine the following simple query:
SELECT name, email FROM users WHERE ID = 8;Now we are passing the value 8 as a filter element to find the user within the users table.
You will notice that the method can only be called by another method within the class. This happens by modifying and accessing the method signature.
We use the underscore (_) to designate that a method is protected.
How to update DB data using Python?
Therefore, when this support method (of our class) receives its parameters, it will allocate a cursor for this query.
Later, you will execute the query sending the parameters via the cursor.
#support methods
     def _execute_query_with_dict(self, query: str, attr: dict):
         try:
             cursor = self.conn.cursor(dictionary=True)
             cursor.execute(query, params= attr)
         except TypeError as err:
             raise (f'An error occurs during the insert '
                    f'operation on {self._database}\n Message:'
                    f'{err}')
But how do we create the dictionary parameter that will be used by the method?
We can pass this parameter in the “hand”, as in the example below. This will be used in another method later.
update_query = "UPDATE users SET name = %(name)s, email = %(email)s WHERE id = %(id)s"In this case, we have the keys and placeholders that will define where the lib should look for the data passed as a parameter and which attributes to link to.
Keys and Placeholders in Query with Python
Observe this excerpt from the query above. The keys designated here are: name and email. Placeholders must have a pattern linked to the key name. This pattern is: %(_chave_)s, where _chave_ must be replaced by the attribute name.
name = %(name)s, email = %(email)s Exactly as in the example.
To create the placeholder for the id that will be searched, the same process is carried out. id = %(id)s. This way, when we pass and execute the query using the cursor, the lib will be able to identify what should be replaced for the query to be executed successfully.
The other way is to create a method that identifies the keys and defines the placeholders.
NOTE: If you are dealing with a specific scenario, you can define the parameters and requirements of your method according to the table. But in that case, you will need to customize a new method for each table.
Now… let’s understand the method!
def _returning_key_list_and_placeholders(self, attr:dict):
         keys_list = ', '.join([key for key in attr.keys()])
         placeholder = ', '.join([f'%({key})s' for key in attr.keys()])

         return keys_list, placeholder
In this case, we will receive a dictionary with the keys and their related values. After data transformation, the method will return two strings.
The key_list, which are the attributes; and the placeholder string, which are the structure we talked about earlier.
Let’s use an example it to facilitate understanding. With the dict below, we will create a new instance in the database.
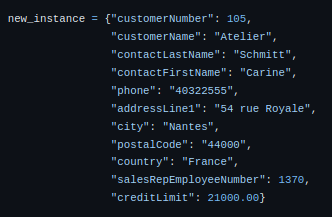
The method to be called (described later in the article) will be create_line(). In addition to the dict, the table to be updated will also be passed.
In turn, the CRUD create_line() method calls the method, which we are explaining, _returning_key_list_and_placeholders. The result of this method will be:
keys_list = 'customerNumber, customerName, contactLastName, contactFirstName, phone, addressLine1, city, postalCode, country, salesRepEmployeeNumber, creditLimit'

placeholder = '%(customerNumber)s, %(customerName)s, %(contactLastName)s,
%(contactFirstName)s, %(phone)s, %(addressLine1)s, %(city)s, %(postalCode)s,
%(country)s, %(salesRepEmployeeNumber)s, %(creditLimit)s'
With these two strings we can create the SQL QUERY. Then the _execute_query_with_dict method will receive the query and the dict with the data to be persisted.
We will talk about this step in the CRUD create_line session.
Is on Database? Support method
Before we continue with CRUD, there are two other support methods used by the main methods of our class: _is_on_database and _get_list_of_databases_tables().
Let’s go… _is_on_database is intuitive. In the code snippet below you will notice that we are checking if the table exists in the database (to which we are connected).
def _is_on_database(self, table_name:str) -> None:
         if table_name not in self._get_list_of_database_tables():
             raise f'Table not found in the {self._database} database'
We simply check whether or not the table name (table_name) is in the database table list using the _get_list_of_database_tables method.
This method, _get_list_of_database_tables, was described in the previous article: Connecting to MySQL with Python
Listing database tables
Now, let’s understand the list of tables. Which is actually quite simple.
We just send the string “SHOW tables;” as a parameter of our _querying() method.
Remember the _querying_with_dict() method is used when we want to send specific data to our table.
In this case, in situations such as updating, removing, inserting or modifying the instance in the DB. Also in cases of macth searches for some table attribute (e.g. ID).
 def _get_list_of_database_tables(self):
         dict_of_tables = self._querying('SHOW tables;')
         return [table['Tables_in_' + self._database] for table in dict_of_tables]
Once we have retrieved the list of tables, we will concatenate the table names using the key ‘Tables_in_nomedb’ in the received dict.
CREATE – CRUD My SQL Python
Very well… we arrived at inserting rows into a table. In CRUD language, the CREATE method.
Let’s understand the method!
def create_line(self, attr: dict, table_name: str):

         self._is_on_database(table_name) #checking the existence of the table
         key_list, placeholders = self._returning_key_list_and_placeholders(attr)
         insertion_query = f"INSERT INTO {table_name} ({key_list}) VALUES ({placeholders})"
         try:
             self._execute_query_with_dict(insertion_query, attr)
         except Exception as err:
             raise f'Message: {err}'
         self.conn.commit()
         return True
Remember those two variables (strings) with the attributes and the placeholder? So, they will be used here to build the QUERY, with this piece of code:
insertion_query = f"INSERT INTO {table_name} ({key_list}) VALUES ({placeholders})"We will handle exceptions when executing the query, that is, when calling the _execute_query_with_dict method.
If there is an error in the construction or execution of the query, except receives the exception through the err variable and returns a raise to the user.
raise f'Message: {err}'Very well, done! Not really…
As we deal with database transactions, a commit must be made at the end of every action.
In other words, you confirm with BD that the modifications made must be durable. Thus, a new instance is inserted.
This happens by calling the commit() method that is associated with the connection (not the cursor). In this case, the excerpt below:
self.conn.commit() # connection related to class READ – CRUD MySQL Python
OK, and when do we need to recover data through reading? The READ of CRUD operations can be related to any data granularity.
In the desc_table() method, we will check the metadata of any table. When we pass the customer table as a parameter, we will result in information about associated fields and data types.
def desc_table(self, table):
      return self._querying(' '.join(['DESC', table]))
In our example (contained in main) we retrieve the metadata from the customers table and print it using the ppprint method.

pprint is widely used in dictionary and JSON structures, making it more presentable with the hierarchical structure that the data has.
The read_table() method receives the name of the target table to be read, checks whether it exists in the DB, and then calls the get_lines_from_table method.
def read_table(self, table_name):
     self._is_on_database(table_name)
     return self.get_lines_from_table(table=table_name)
Within get_lines_from_table we create the query to read the data from the table.
In short, before calling the _querying method, which creates the courses and executes the query, check mos whether the user has passed a maximum number of lines to be retrieved.
How is that? In SQL we can use the LIMIT clause to define the maximum number of instances returned. For example:
SELECT * FROM customers LIMIT 2; Thus, only two instances (rows), containing all attributes, from the customers table are returned.
After executing the _querying method and receiving the data in the result variable, there are two actions.
We print the dict data we received on the screen and return the variable. Note that this approach was used for didactic purposes. You will check which one is most suitable for your scenario.
# read method
def get_lines_from_table(self, table, limit=False, number_of_lines=10):
         query = ' '.join(['SELECT * FROM', table])
         query = query if limit is False else ' '.join([query, 'limit', str(number_of_lines)])

         result = self._querying(query)
         for element in result:
             keys = element.keys()
             for k in keys:
                 print(k+':', element[k])
             print('\n')

         return result
What’s missing now?
Updating data from a table and also removing data. We will continue with the update in the next session.
UPDATE – CRUD MySQL Python
The update usually has an associated conditional. In our case, for simplicity we will only implement the search by ID.
Feel free to create your variations, search by name, city and any other attribute that is relevant.
 def update_users_by_id(self, id, data: dict):
         """
             We will receive a predefined set of fields to be updated
         :paramid:
         :param data:
         :return:
         """
         data["id"] = id
         update_query = "UPDATE users SET name = %(name)s, email = %(email)s WHERE id = %(id)s"
         self._execute_query_with_dict(update_query, data)
         self.conn.commit()
The idea is similar to what we’ve done before.
We need the placeholders to create the query, in addition to calling the _execute_query_with_dict() method so that we can pass the parameters of our conditional.
NOTE: To improve this method, add exception handling when executing the query.
Remember, as we are making a modification, we need to “commit” the action at the end of the method.
DELETE – CRUD MySQL Python
We reached the last method of our class with CRUD operations.
For both update and delete, the idea is the same. What we will modify are the main actions.
In UPDATE, we use the query: UPDATE <table> set <attributes> WHERE <conditional>
Here we need to delete the instance that is compatible with the proposed conditional. Therefore, we would have the following query:
DELETE FROM <table> WHERE <conditional>So, making this modification we will have the same logic as before.
First, I check if the table exists, create the query, execute it with the _execute_query_with_dict() method, and finally commit the action.
NOTE: Again, to improve the code, add exception handling for query execution.
def delete_instance(self, table_name: str, condition: str, value):
         self._is_on_database(table_name)
         delete_query = f"DELETE FROM {table_name} WHERE {condition} = %s"
         self._execute_query_with_dict(delete_query, value)
         self.conn.commit()
Once this is done, we have all the basic operations for accessing data persisted in the MySQL database.
Okay, and how do we test all this?
Running the main program – Main
You definitely want to see this code running. So, let’s move on to some main code that tests our methods.
Here, we basically import the class and use the methods available in it. The connection to the DB and other data are protected.
The beauty of this approach is that you can only use what has been implemented in the class. Leaving no room for the user to use other methods available in the lib through main.
import pprint
from Database import MySQLDatabase

if __name__ == '__main__':
     print('Running')

     try:
         db = MySQLDatabase()
         print(f"Starting the connection...\nStatus: {db.conn.is_connected()}")
     except ConnectionError as err:
         raise f"Error during the connection. Message: {err}"

     tables = db.get_database_tables()

     print("\n-> Sample of the database table")
     db.get_lines_from_table('customers', limit=True, number_of_lines=1)
     description = db.desc_table('customers')
     pprint.pprint(description)

     new_instance = {"customerNumber": 105,
                     "customerName": "Atelier",
                     "contactLastName": "Schmitt",
                     "contactFirstName": "Carine",
                     "phone": "40322555",
                     "addressLine1": "54 rue Royale",
                     "city": "Nantes",
                     "postalCode": "44000",
                     "country": "France",
                     "salesRepEmployeeNumber": 1370,
                     "creditLimit": 21000.00}

     if db.create_line(new_instance, 'customers'):
         print("Insert successful")

     db.delete_instance('customers', 'customerNumber', [105])
I believe the code is self-explanatory. So, if you have any questions, go to our channel and leave them in the comments.
There we were able to resolve doubts about the projects created.
And you who like to watch the project video with hands on. In other words, let’s code the code together. Below are the videos that cover this article.
See you next time!
See More:
How to connect mysql using python
Python: show my TCP and UDP ports
Top Python Libraries for Data Science
Project videos on the Simplificando Redes channel

Juliana Mascarenhas
Data Scientist and Master in Computer Modeling by LNCC.
Computer Engineer
Packet Tracer network with one router
In this tutorial, we will show you how to configure a network with just one…
How to Use Snap Behind a Proxy on Linux (Step-by-Step Guide)
In this guide, you’ll learn how to configure Snap to work behind a proxy, even…
How to Create a Network with a Switch in Packet Tracer – Step-by-Step Guide for Beginners
In this practical tutorial, I will show you how to create a simple switch network…
Why use Kali Linux inside VirtualBox?
In this article, we will see the main reasons for considering the use of Kali…
How to install pfBlocker on pfSense: step by step guide
Today we will learn how to install pfBLocker NG in PFSense. pfBLocker is an excellent…
Packet Tracer for Dummies: Setting Up Your First Network with 2 PCs (Quick Start Guide)
Are you ready to take the first step into the fascinating world of computer networks?…

