In this tutorial, we will teach you how to create and configure access to an SSH server using a public key.
For this tutorial, we will use two virtual machines that are within the same network.
However, the scenario used can be replicated for machines that are on other networks and even on the Internet.
Scenario Used
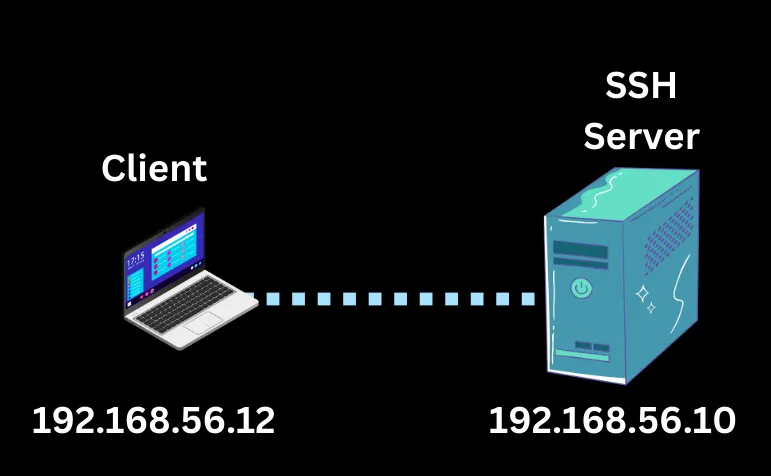
The figure below shows our lab scenario. In this case, we have:
Client Machine: Will use the SSH client to access the server.
Server Machine: Will listen on port 22 using the OpenSSH server.

Creating Public Key for the SSH Client
Now let’s log into the client machine and open a terminal. Remember, we’re using a Linux machine with Ubuntu.
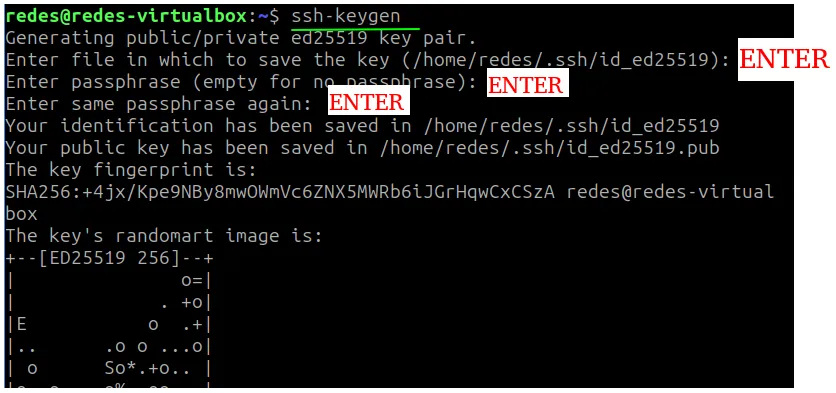
In the terminal, we will use the command below to generate the public and private keys for the SSH client.
ssh-keygen
On the first question about naming the file, press “ENTER“.
On the second and third questions about inserting a “passphrase“, press “ENTER” as well.
Note. We are assuming that we will keep the private key secure, so we will not use a “passphrase“. In your case, you should check if there’s a need to use a “passphrase“.
Next, we can verify if the SSH public and private keys were generated. To do this, type the command below to list your key directory.
ls ~/.ssh/
Now let’s enter the directory where the SSH public and private keys are located. To do this, we’ll use the command below.
cd ~/.ssh/
Now type the command below to list the directory files.
ls
Sending the Client’s Public Key to the SSH Server
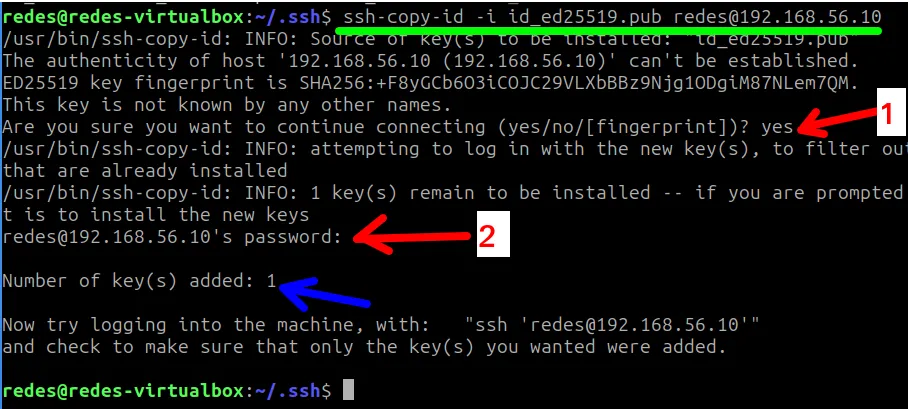
In this step, we will send the client’s public key to the SSH server. The client needs to send the public key to the server, which stores it in the user’s “~/.ssh/authorized_keys“ file for login purposes.
ssh-copy-id -i id_YourPubFile YourUser@YourIP
- 1 = the ssh-copy-id command, which will send the client’s public key.
- 2 = the “i” option to specify the client’s public key file.
- 3 = The client’s public key file.
- 4 = the client’s user @ the SSH server’s IP address. (In our case, the user is “redes”).

After typing the command, a prompt will ask if you want to continue. To proceed, type “yes” and press “ENTER“.
Next, you will be asked for the “password” to connect to the SSH server. Enter the connection password for your client to the SSH server.
Testing the Connection to the SSH Server
Finally, we can log into the SSH server without a password. To do this, type the command below. Remember to replace “redes” with your username and the IP with your SSH server’s IP address.
ssh redes@192.168.56.10
Verifying the Client’s Key on the SSH Server
If desired, you can log into the server and verify the key that was created for the SSH client. To do this, type the command below.
cat ~/.ssh/authorized_keys
Congratulations, you have successfully created a public key to access the SSH server without needing to enter a password.
See more:
Install ubuntu 24 on virtualbox
How to X11 Forwarding using SSH

Juliana Mascarenhas
Data Scientist and Master in Computer Modeling by LNCC.
Computer Engineer

